PART 1
· Police Station
Find the small key under the books on the desk. Use the key to open the drawer and get Mimo’s police license. Find the number 9527 on it.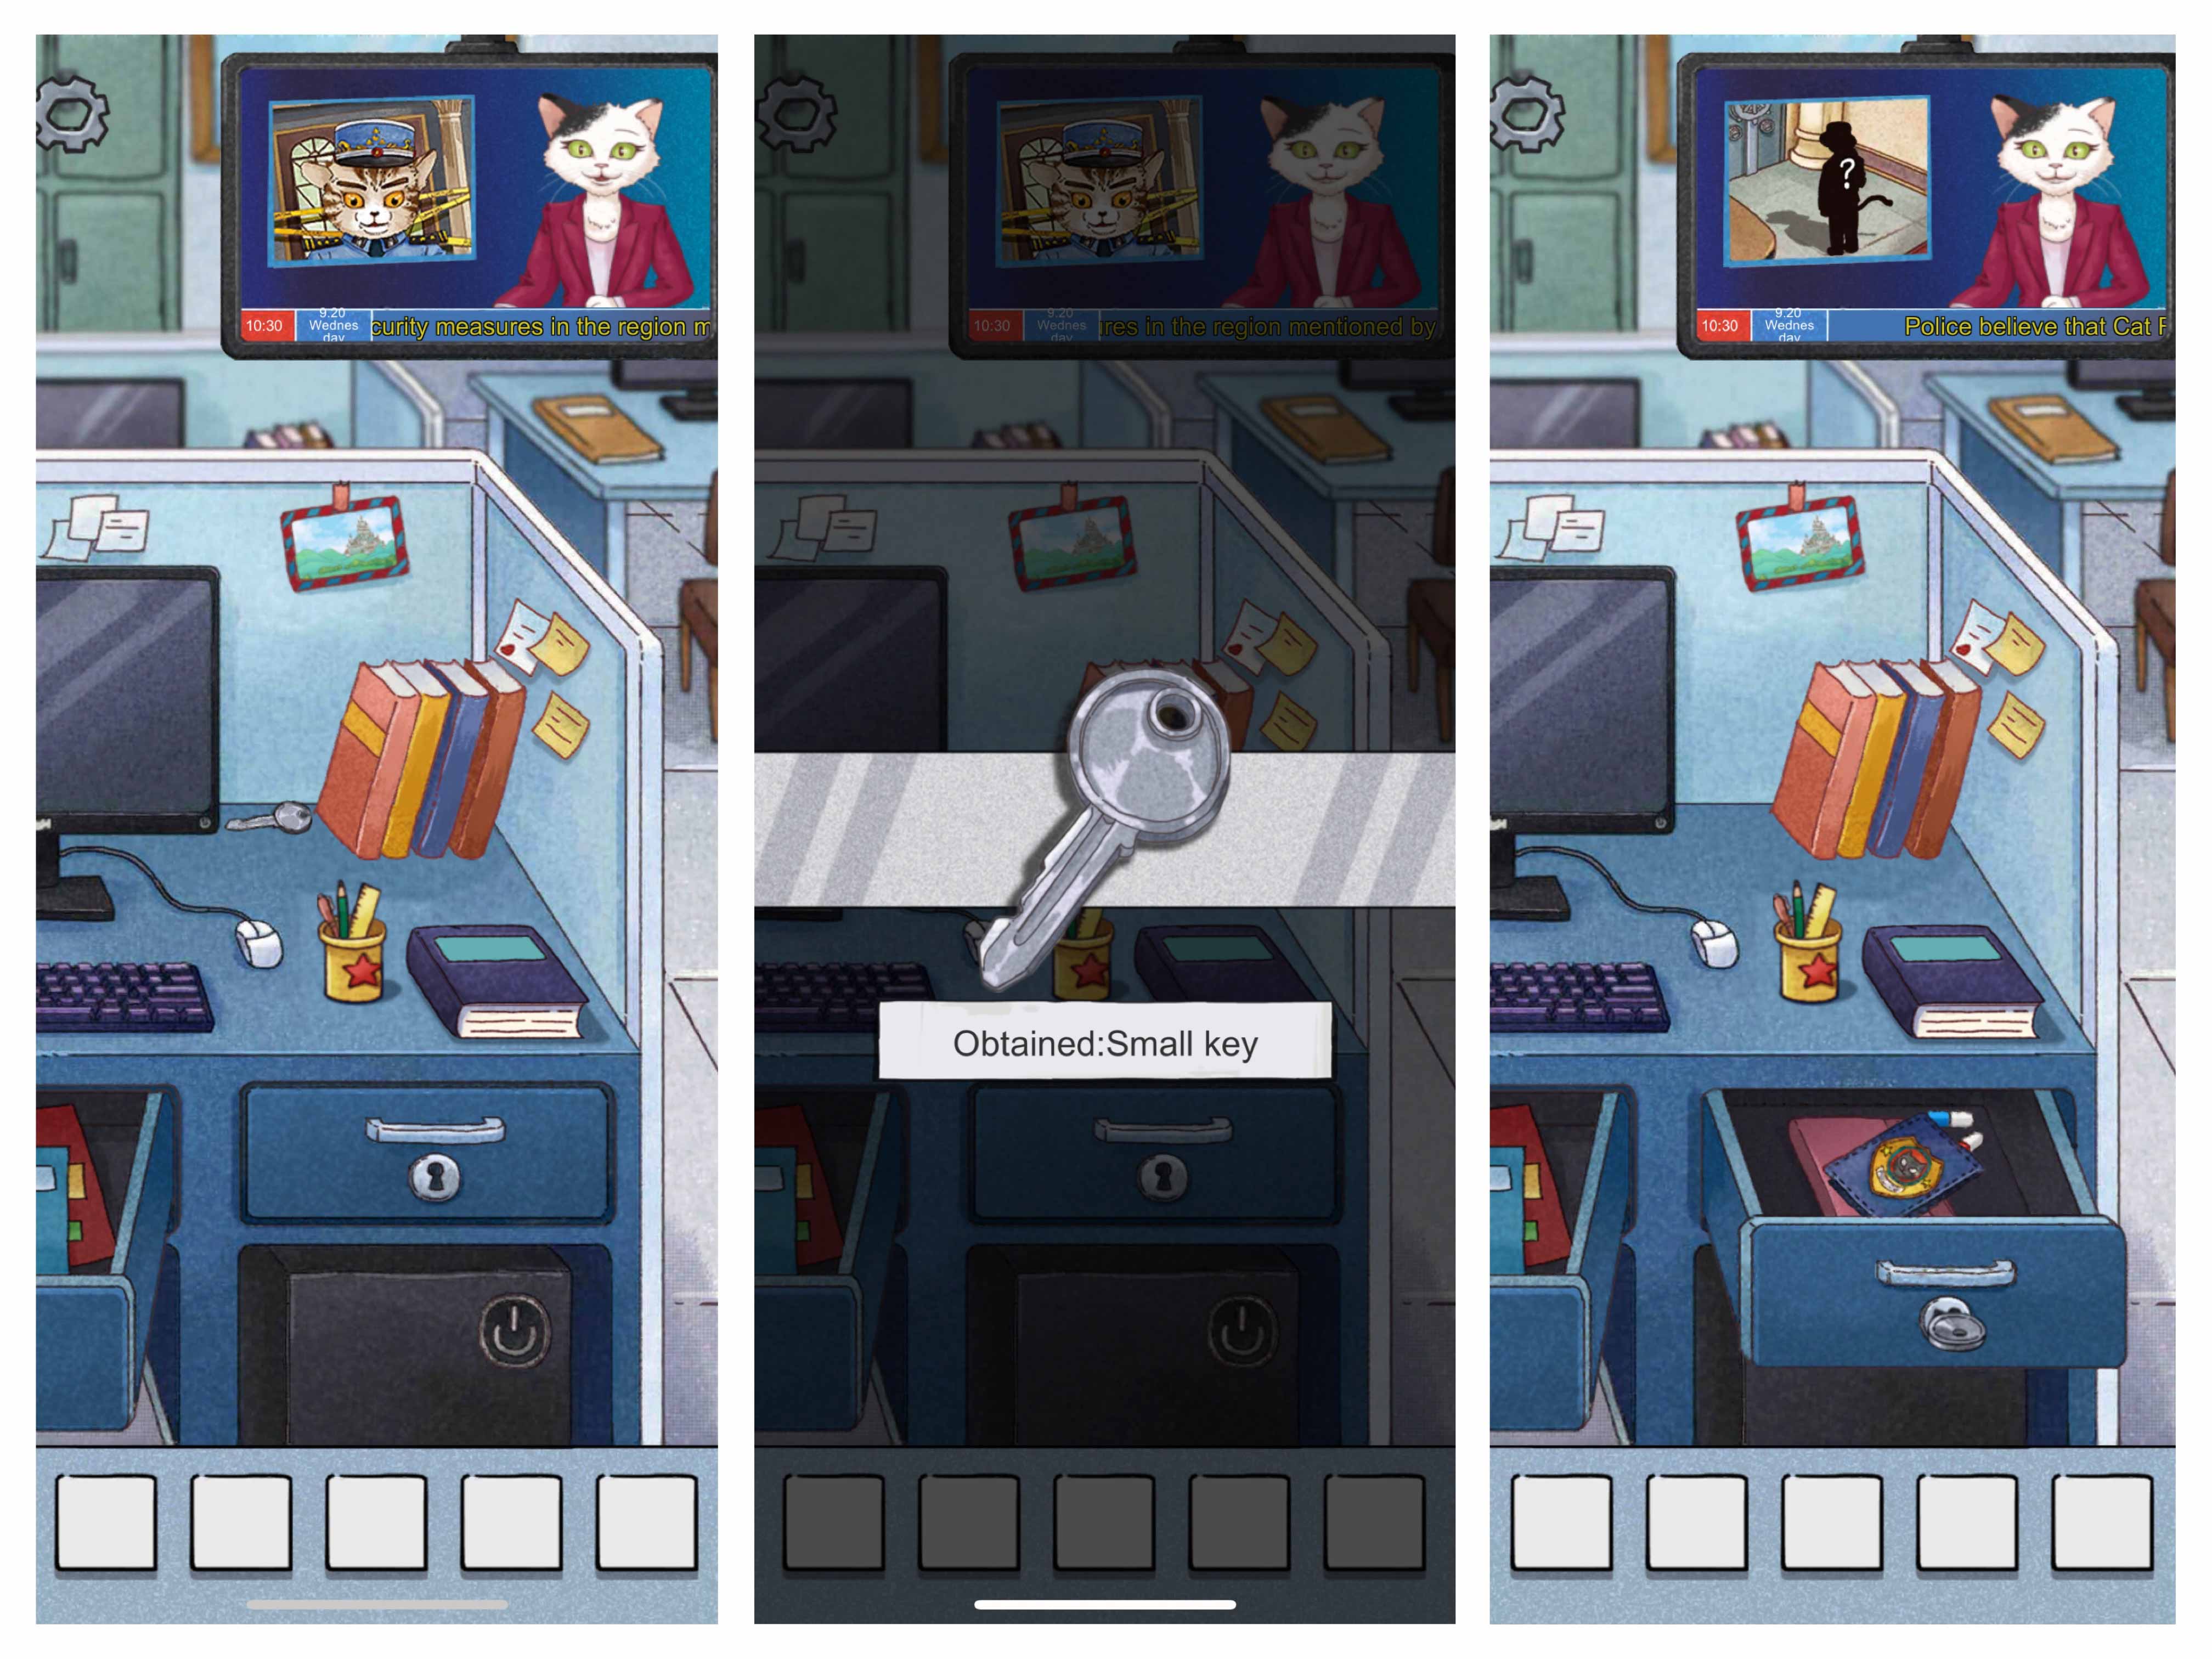
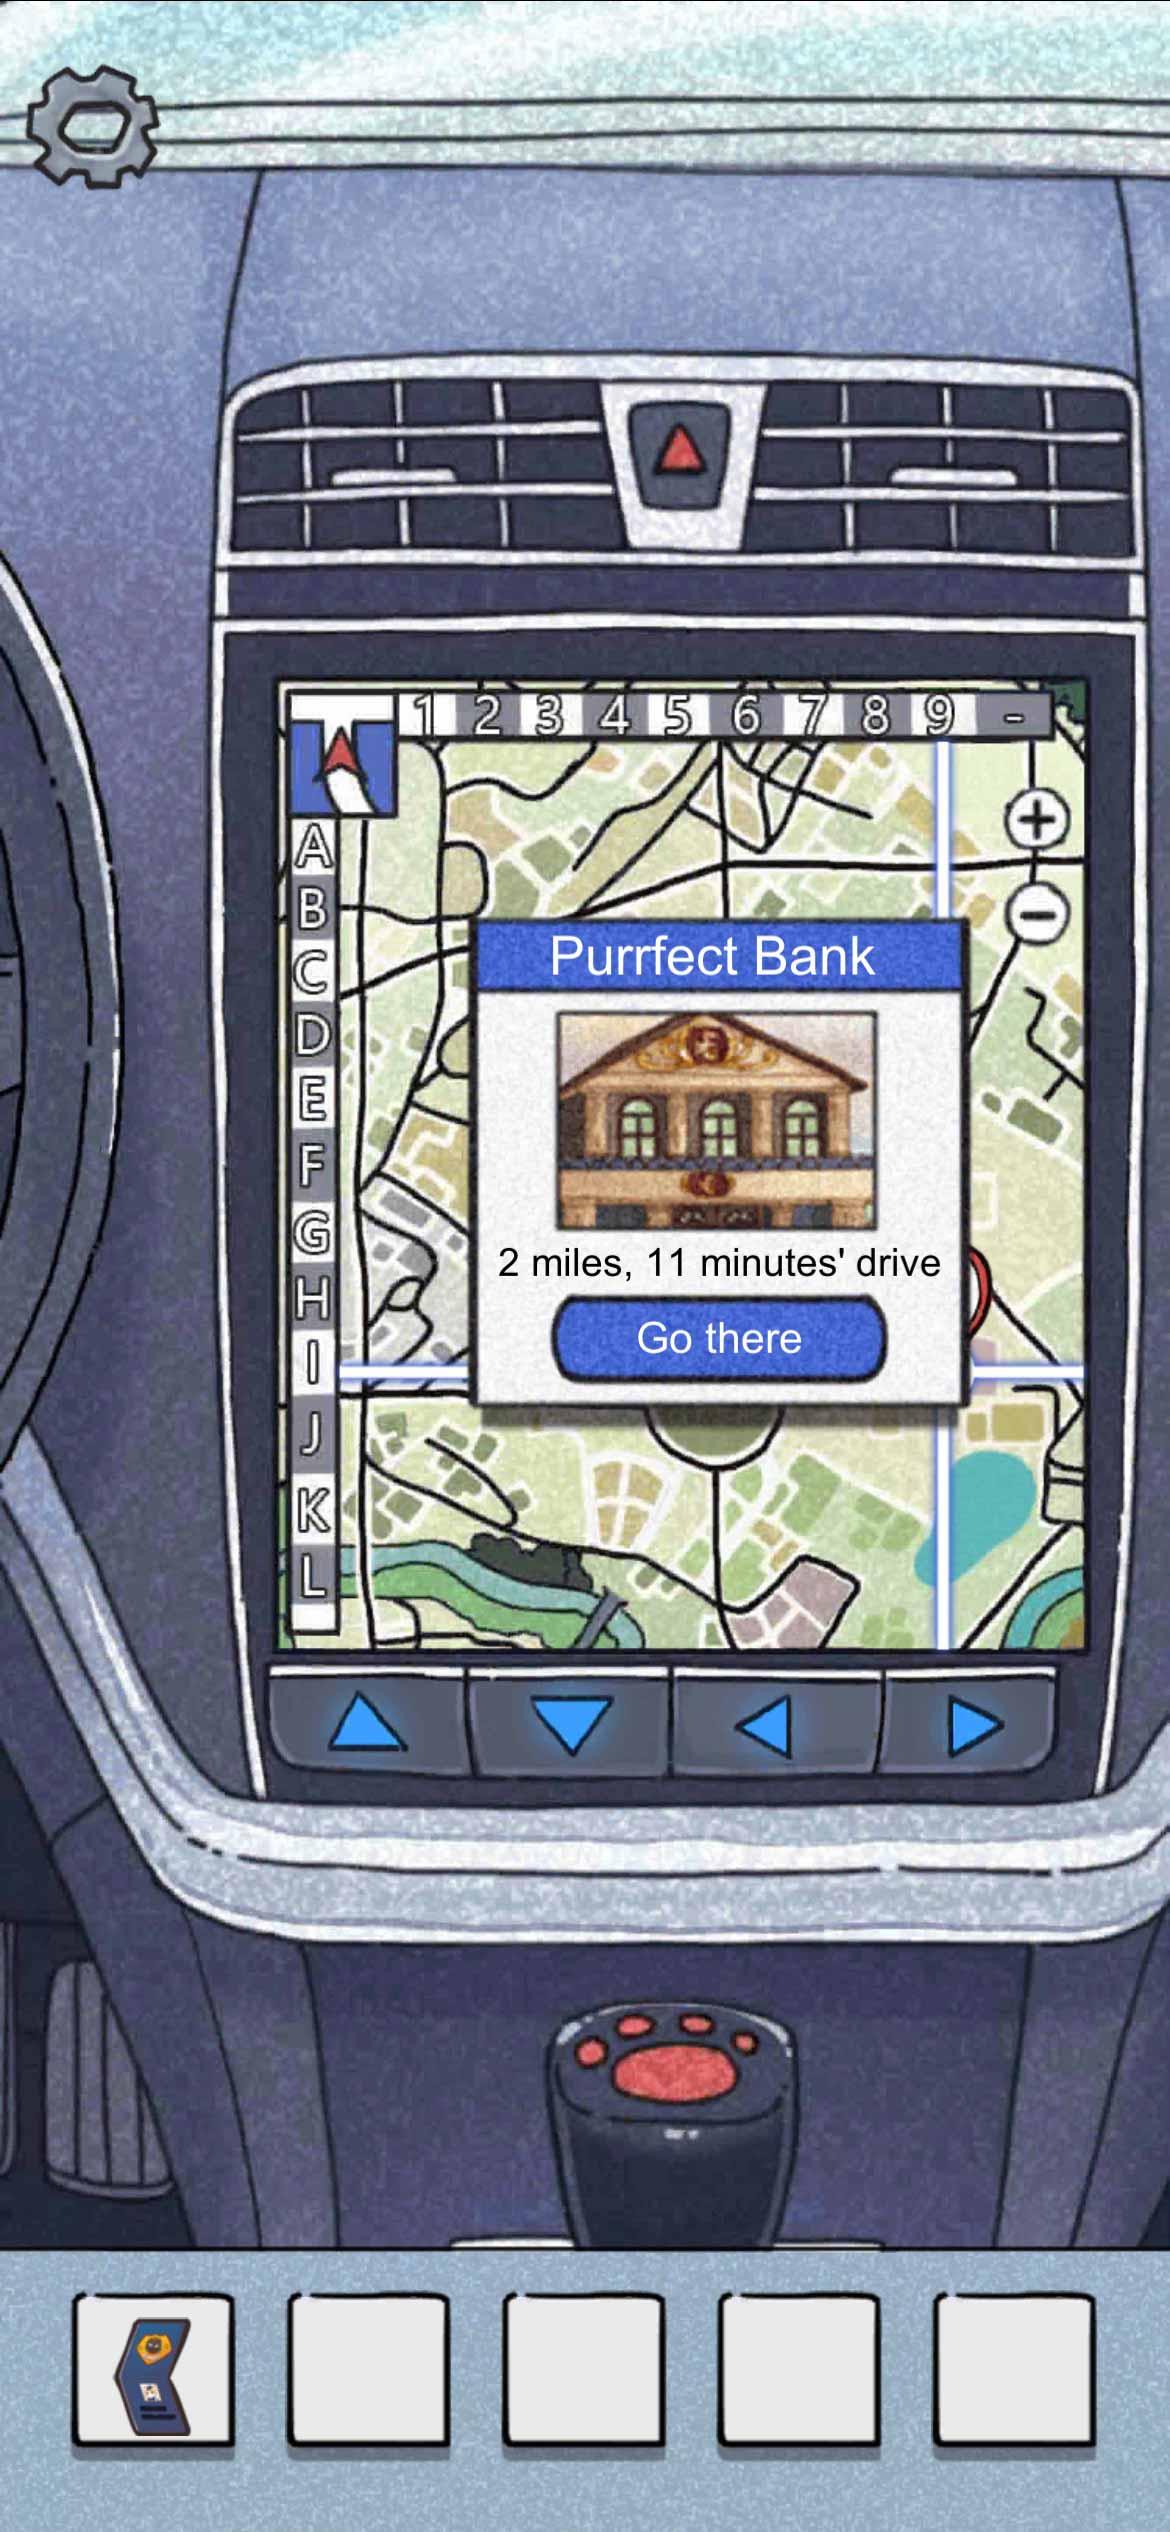
 Turn on the computer and input 9527. Check the files on the computer, it says there will be a crime in Purrfect
Bank. Check the map on the desk and find the banks’ coordinate is I9.
Turn on the computer and input 9527. Check the files on the computer, it says there will be a crime in Purrfect
Bank. Check the map on the desk and find the banks’ coordinate is I9.
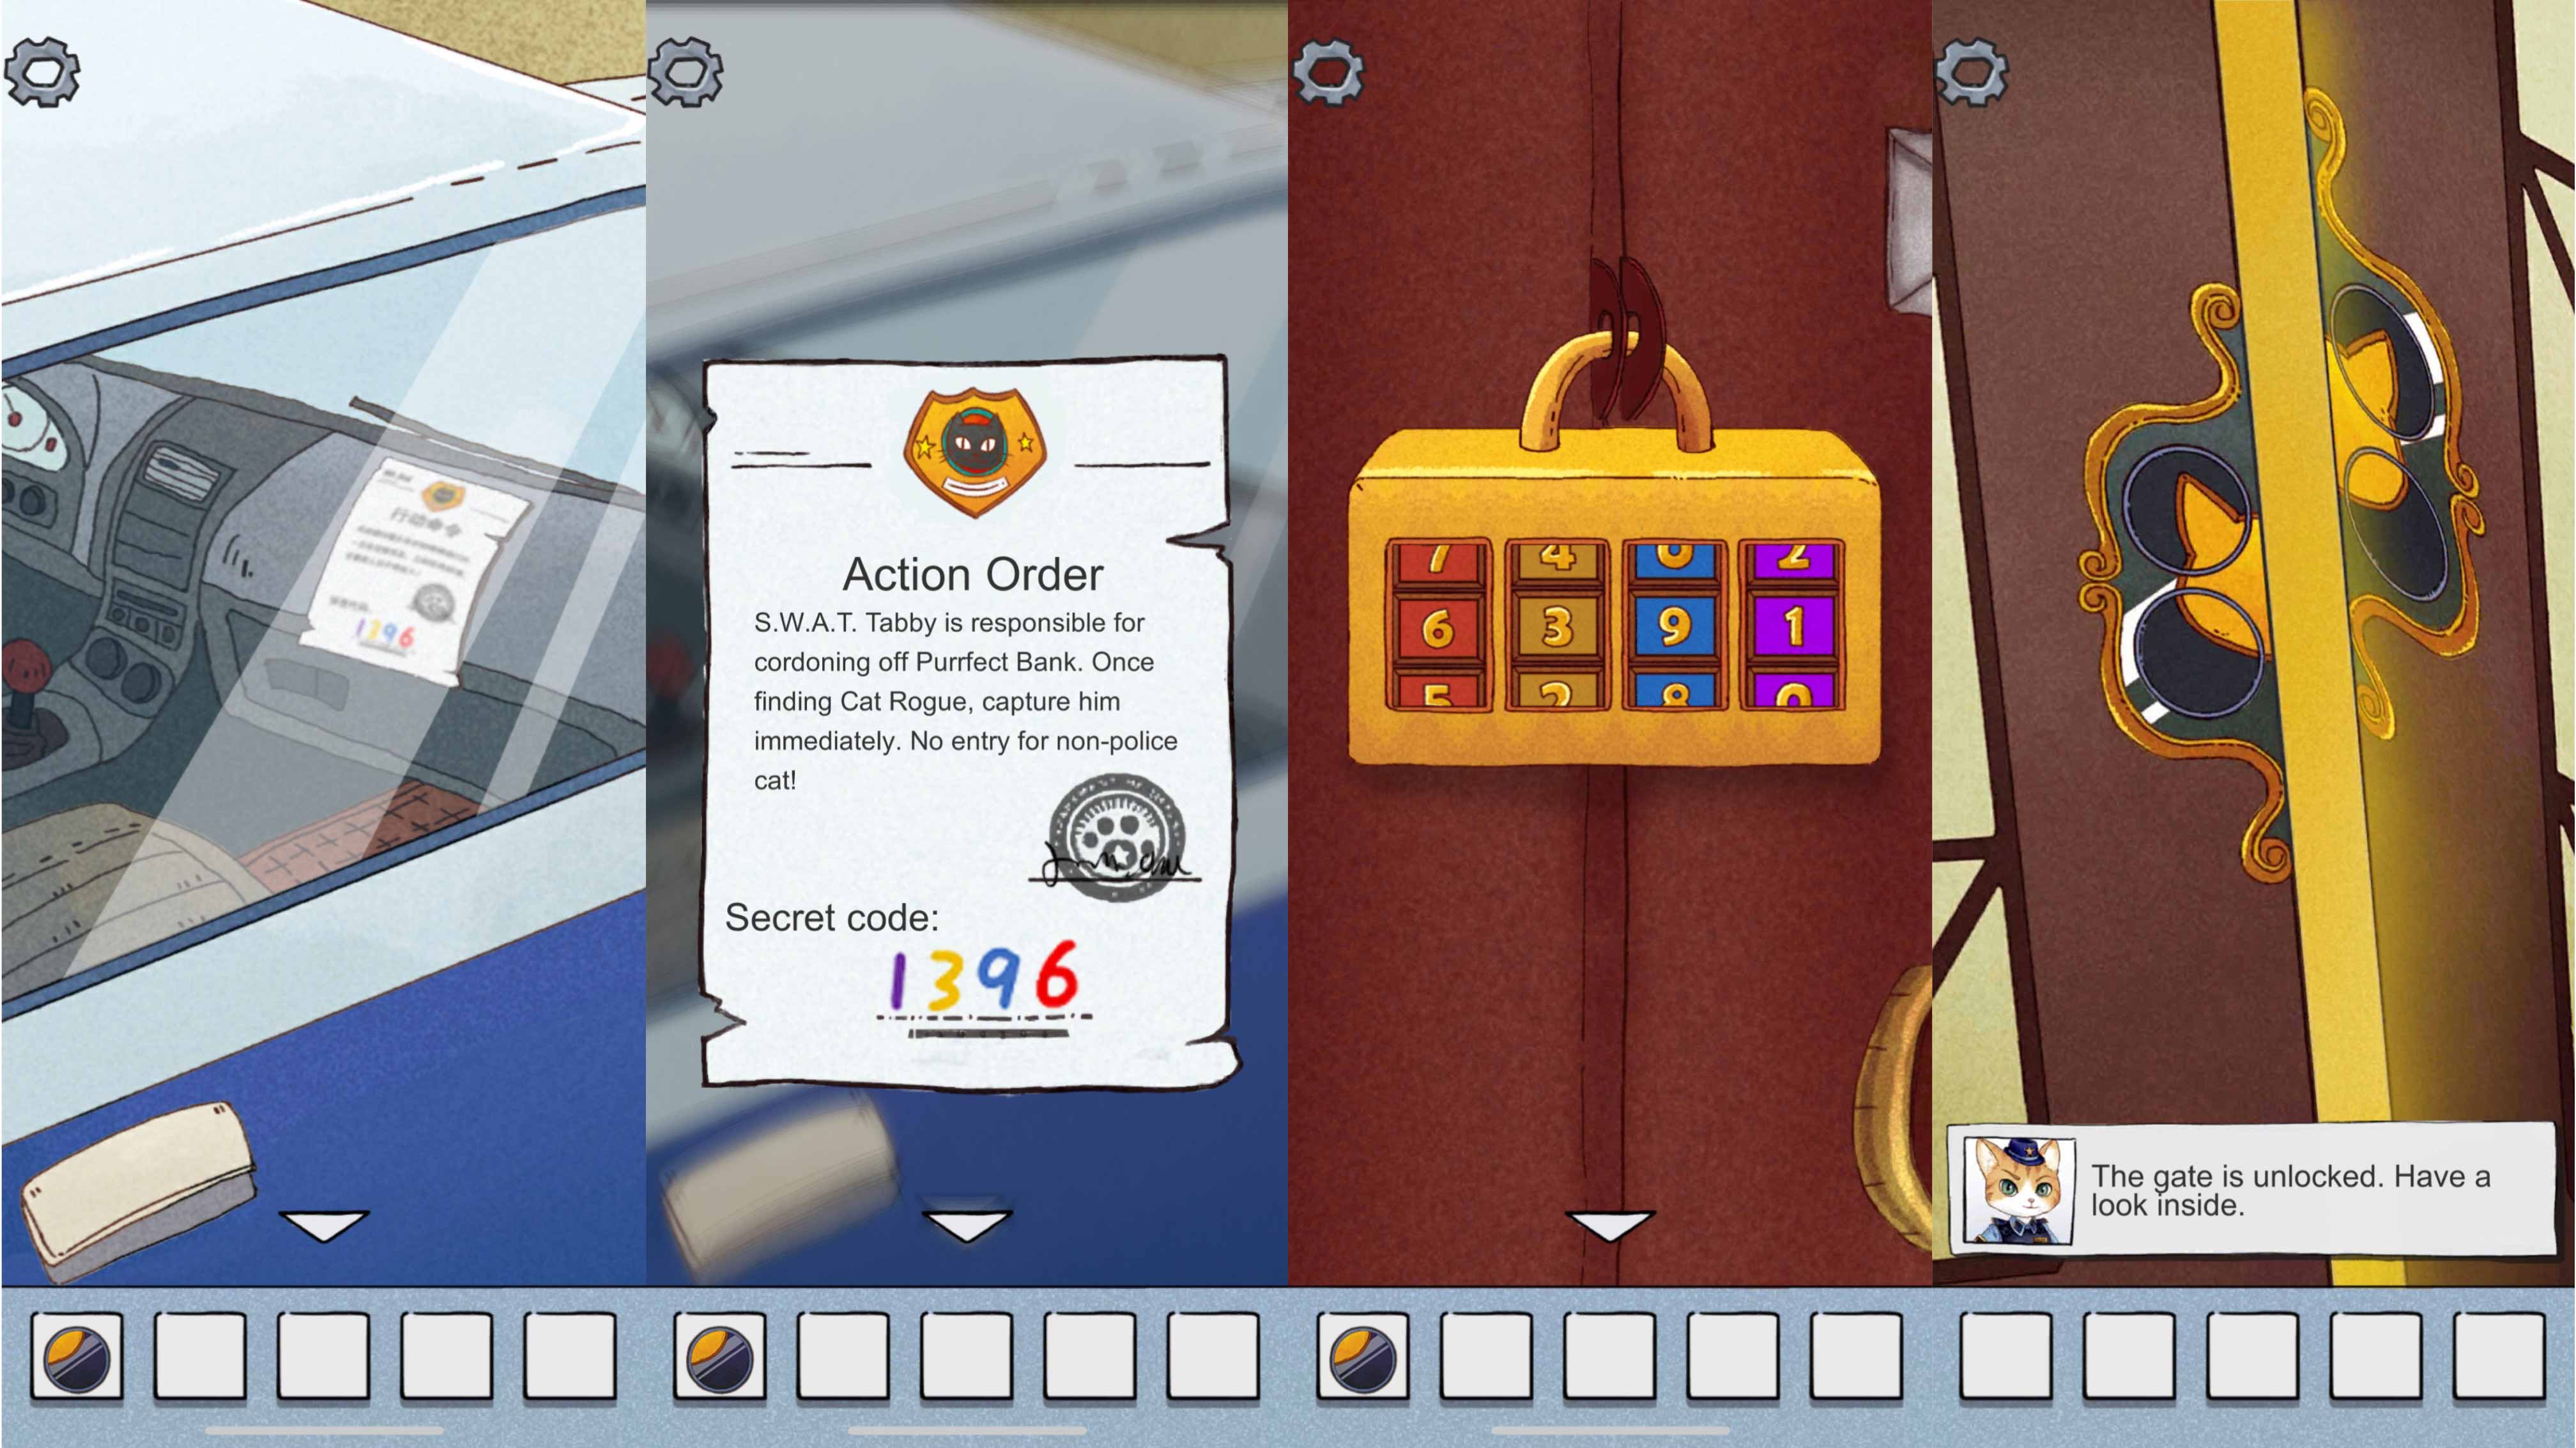
 Go to the police car. Use the four buttons below to navigate to coordinate I9. Then click “Go there”.
· Bank
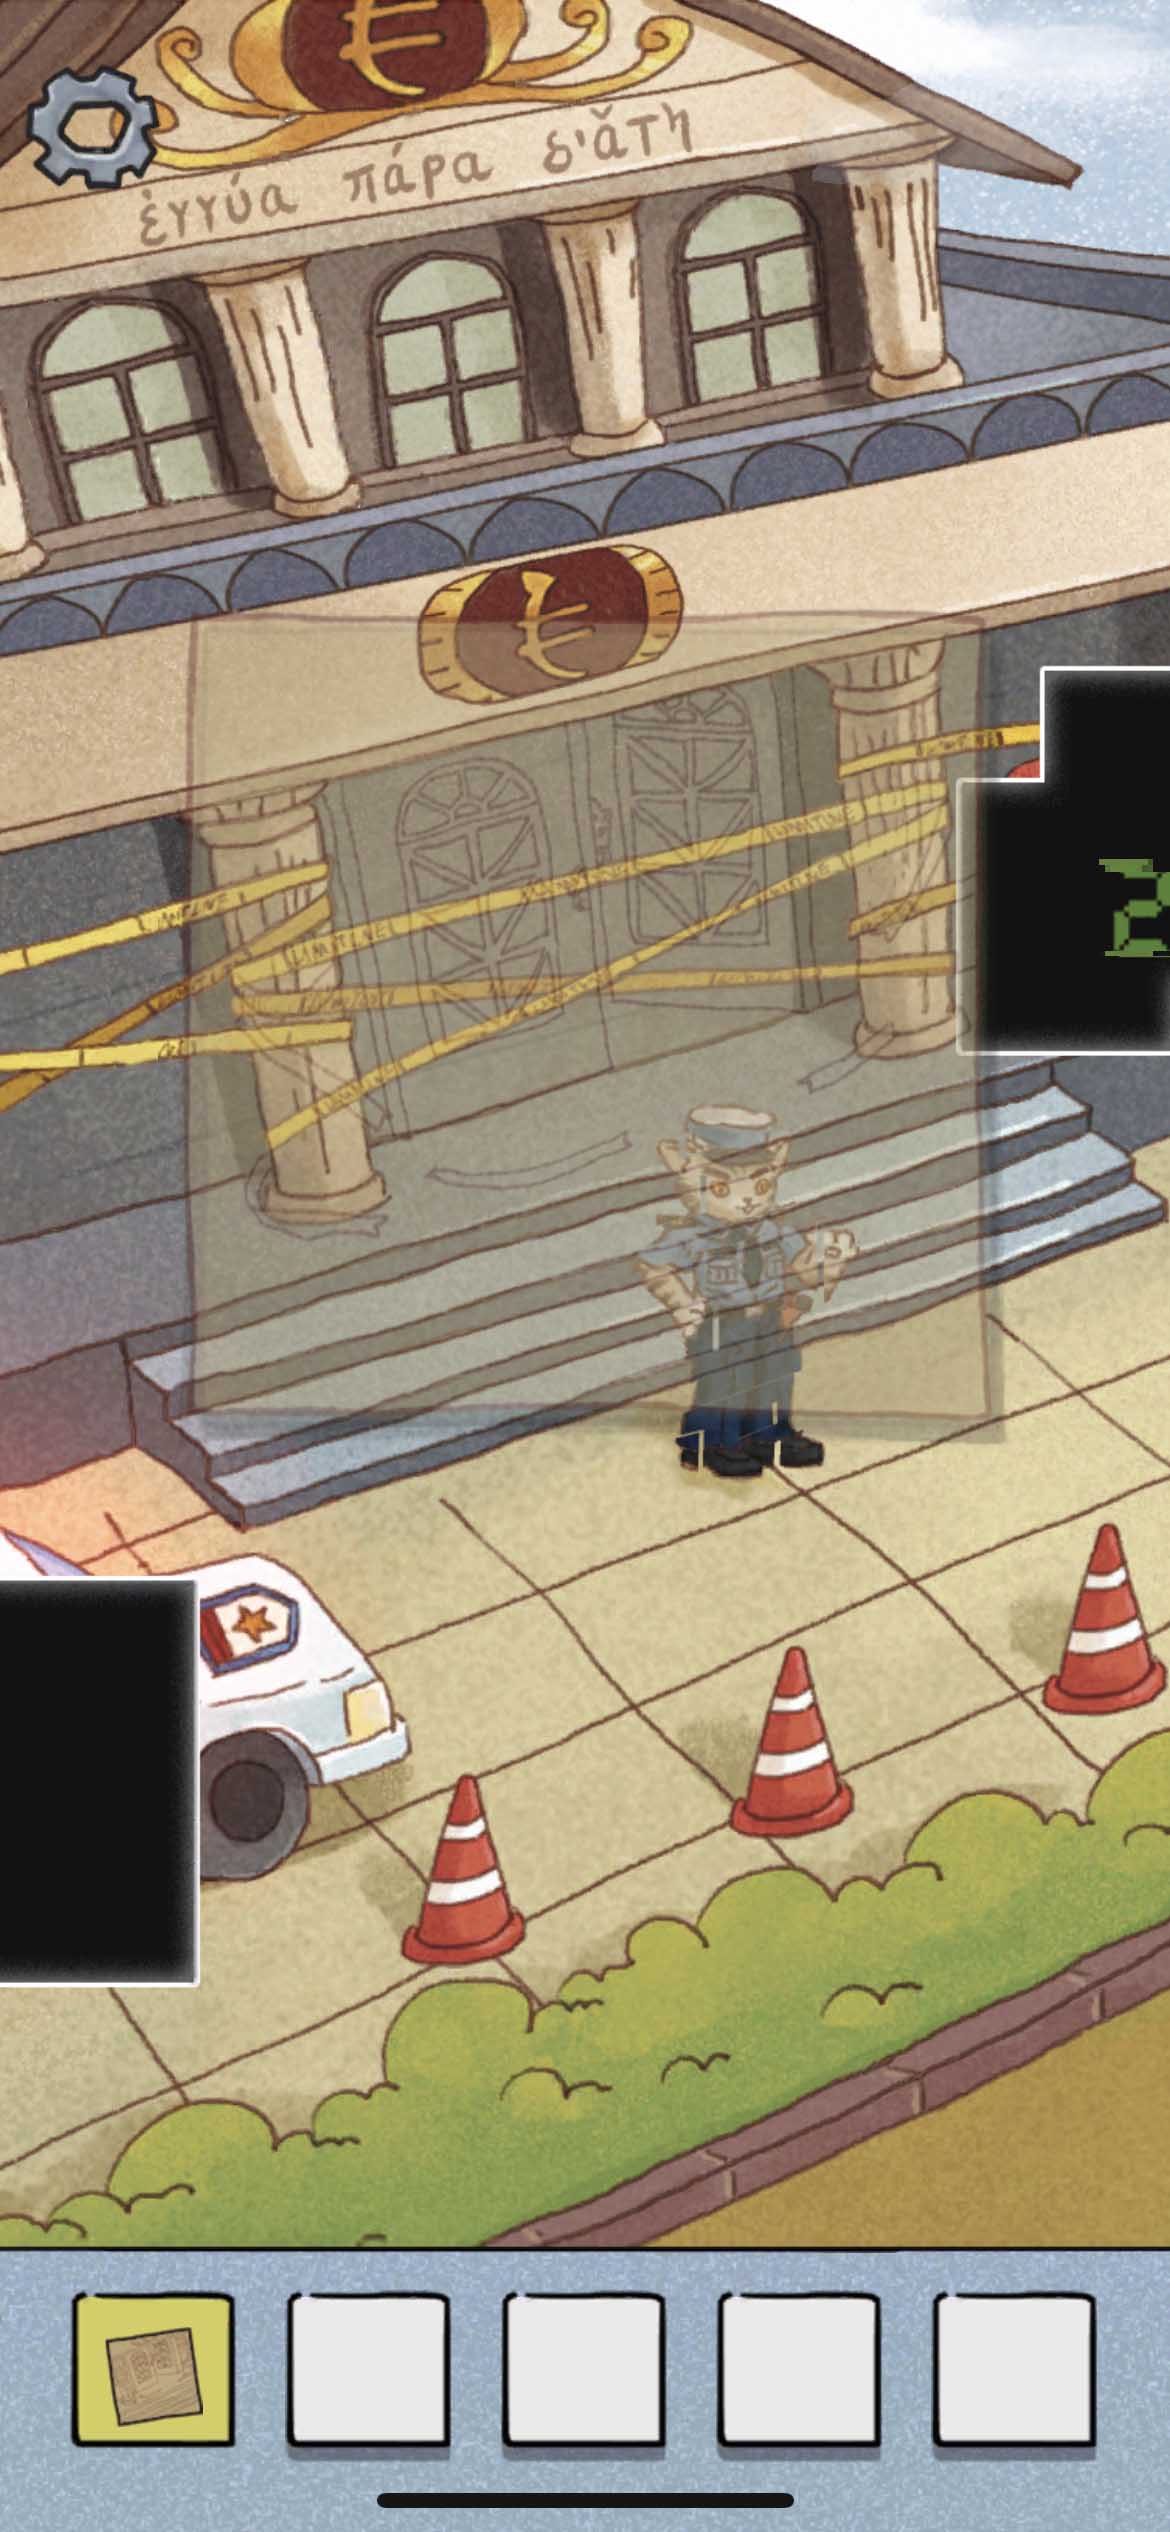
Upon arrive at the front the bank, show Mimo’s license to the police cat and he will tell you to find Agent 52, who are in disguise in the baby stroller. Show Mimo’s license to Agent 52, he will give you a piece of the key.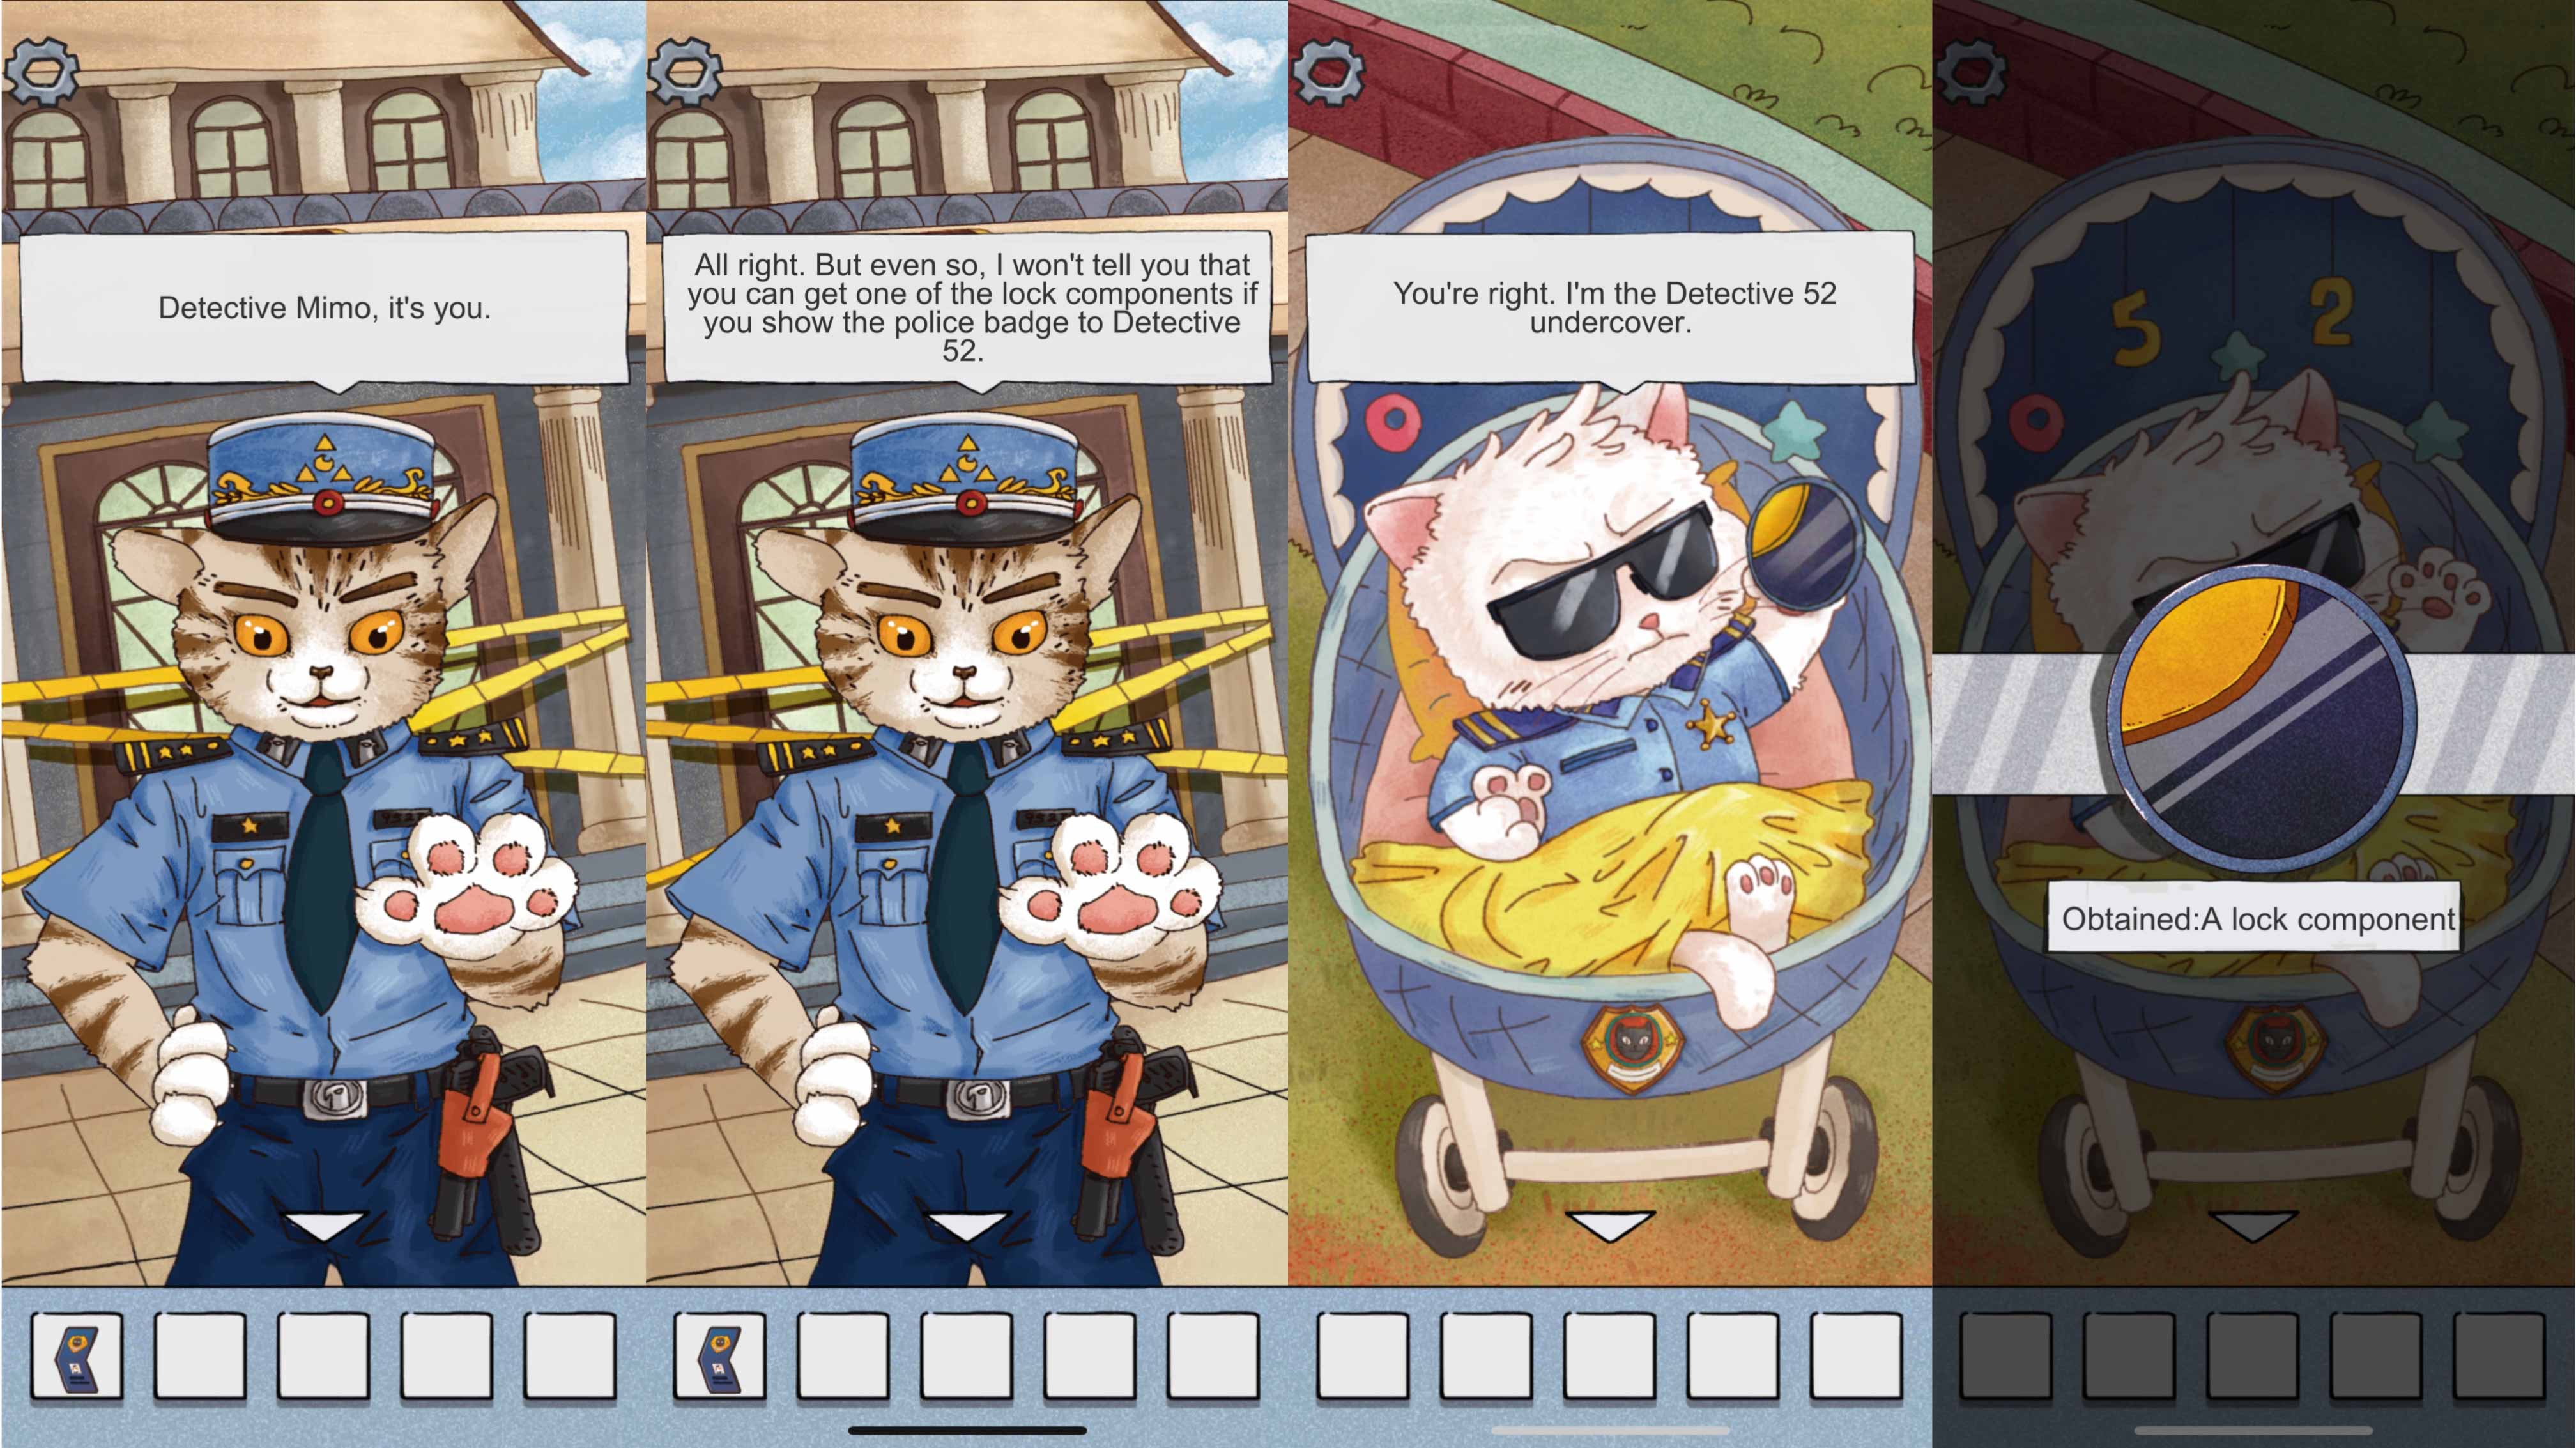 Find a note in the police car (Purple 1, Yellow 3, Blue 9, Red 6). Open the lock on the mailbox and get another
piece of the key.
Find a note in the police car (Purple 1, Yellow 3, Blue 9, Red 6). Open the lock on the mailbox and get another
piece of the key.
Insert pieces onto the door of the bank and finish the jigsaw puzzle.
· Hall
There are 3 bank clerks in the hall.The left one needs you to find canned food for him.
 The food can is in the drawer beneath the mouse device. Check 3 posters with the look of the mouse device on the
wall. Each poster hints you the direction and times of shaking the mouse device. They are 3 times to the right, 2
times to the left and then 4 times to the right. (Shake the device 50 times and you will get a trophy😊)
The food can is in the drawer beneath the mouse device. Check 3 posters with the look of the mouse device on the
wall. Each poster hints you the direction and times of shaking the mouse device. They are 3 times to the right, 2
times to the left and then 4 times to the right. (Shake the device 50 times and you will get a trophy😊)
 Find the screwdriver in the drawer next to the food can drawer. Open the can and give it the left clerk. He will
tell you to press the mew button on the ATM for 3 seconds.
Find the screwdriver in the drawer next to the food can drawer. Open the can and give it the left clerk. He will
tell you to press the mew button on the ATM for 3 seconds.
 Then the clerk in the middle. He needs his glasses to be fixed. A piece of his glasses can be found on the floor
in front of the geared door.
Then the clerk in the middle. He needs his glasses to be fixed. A piece of his glasses can be found on the floor
in front of the geared door.
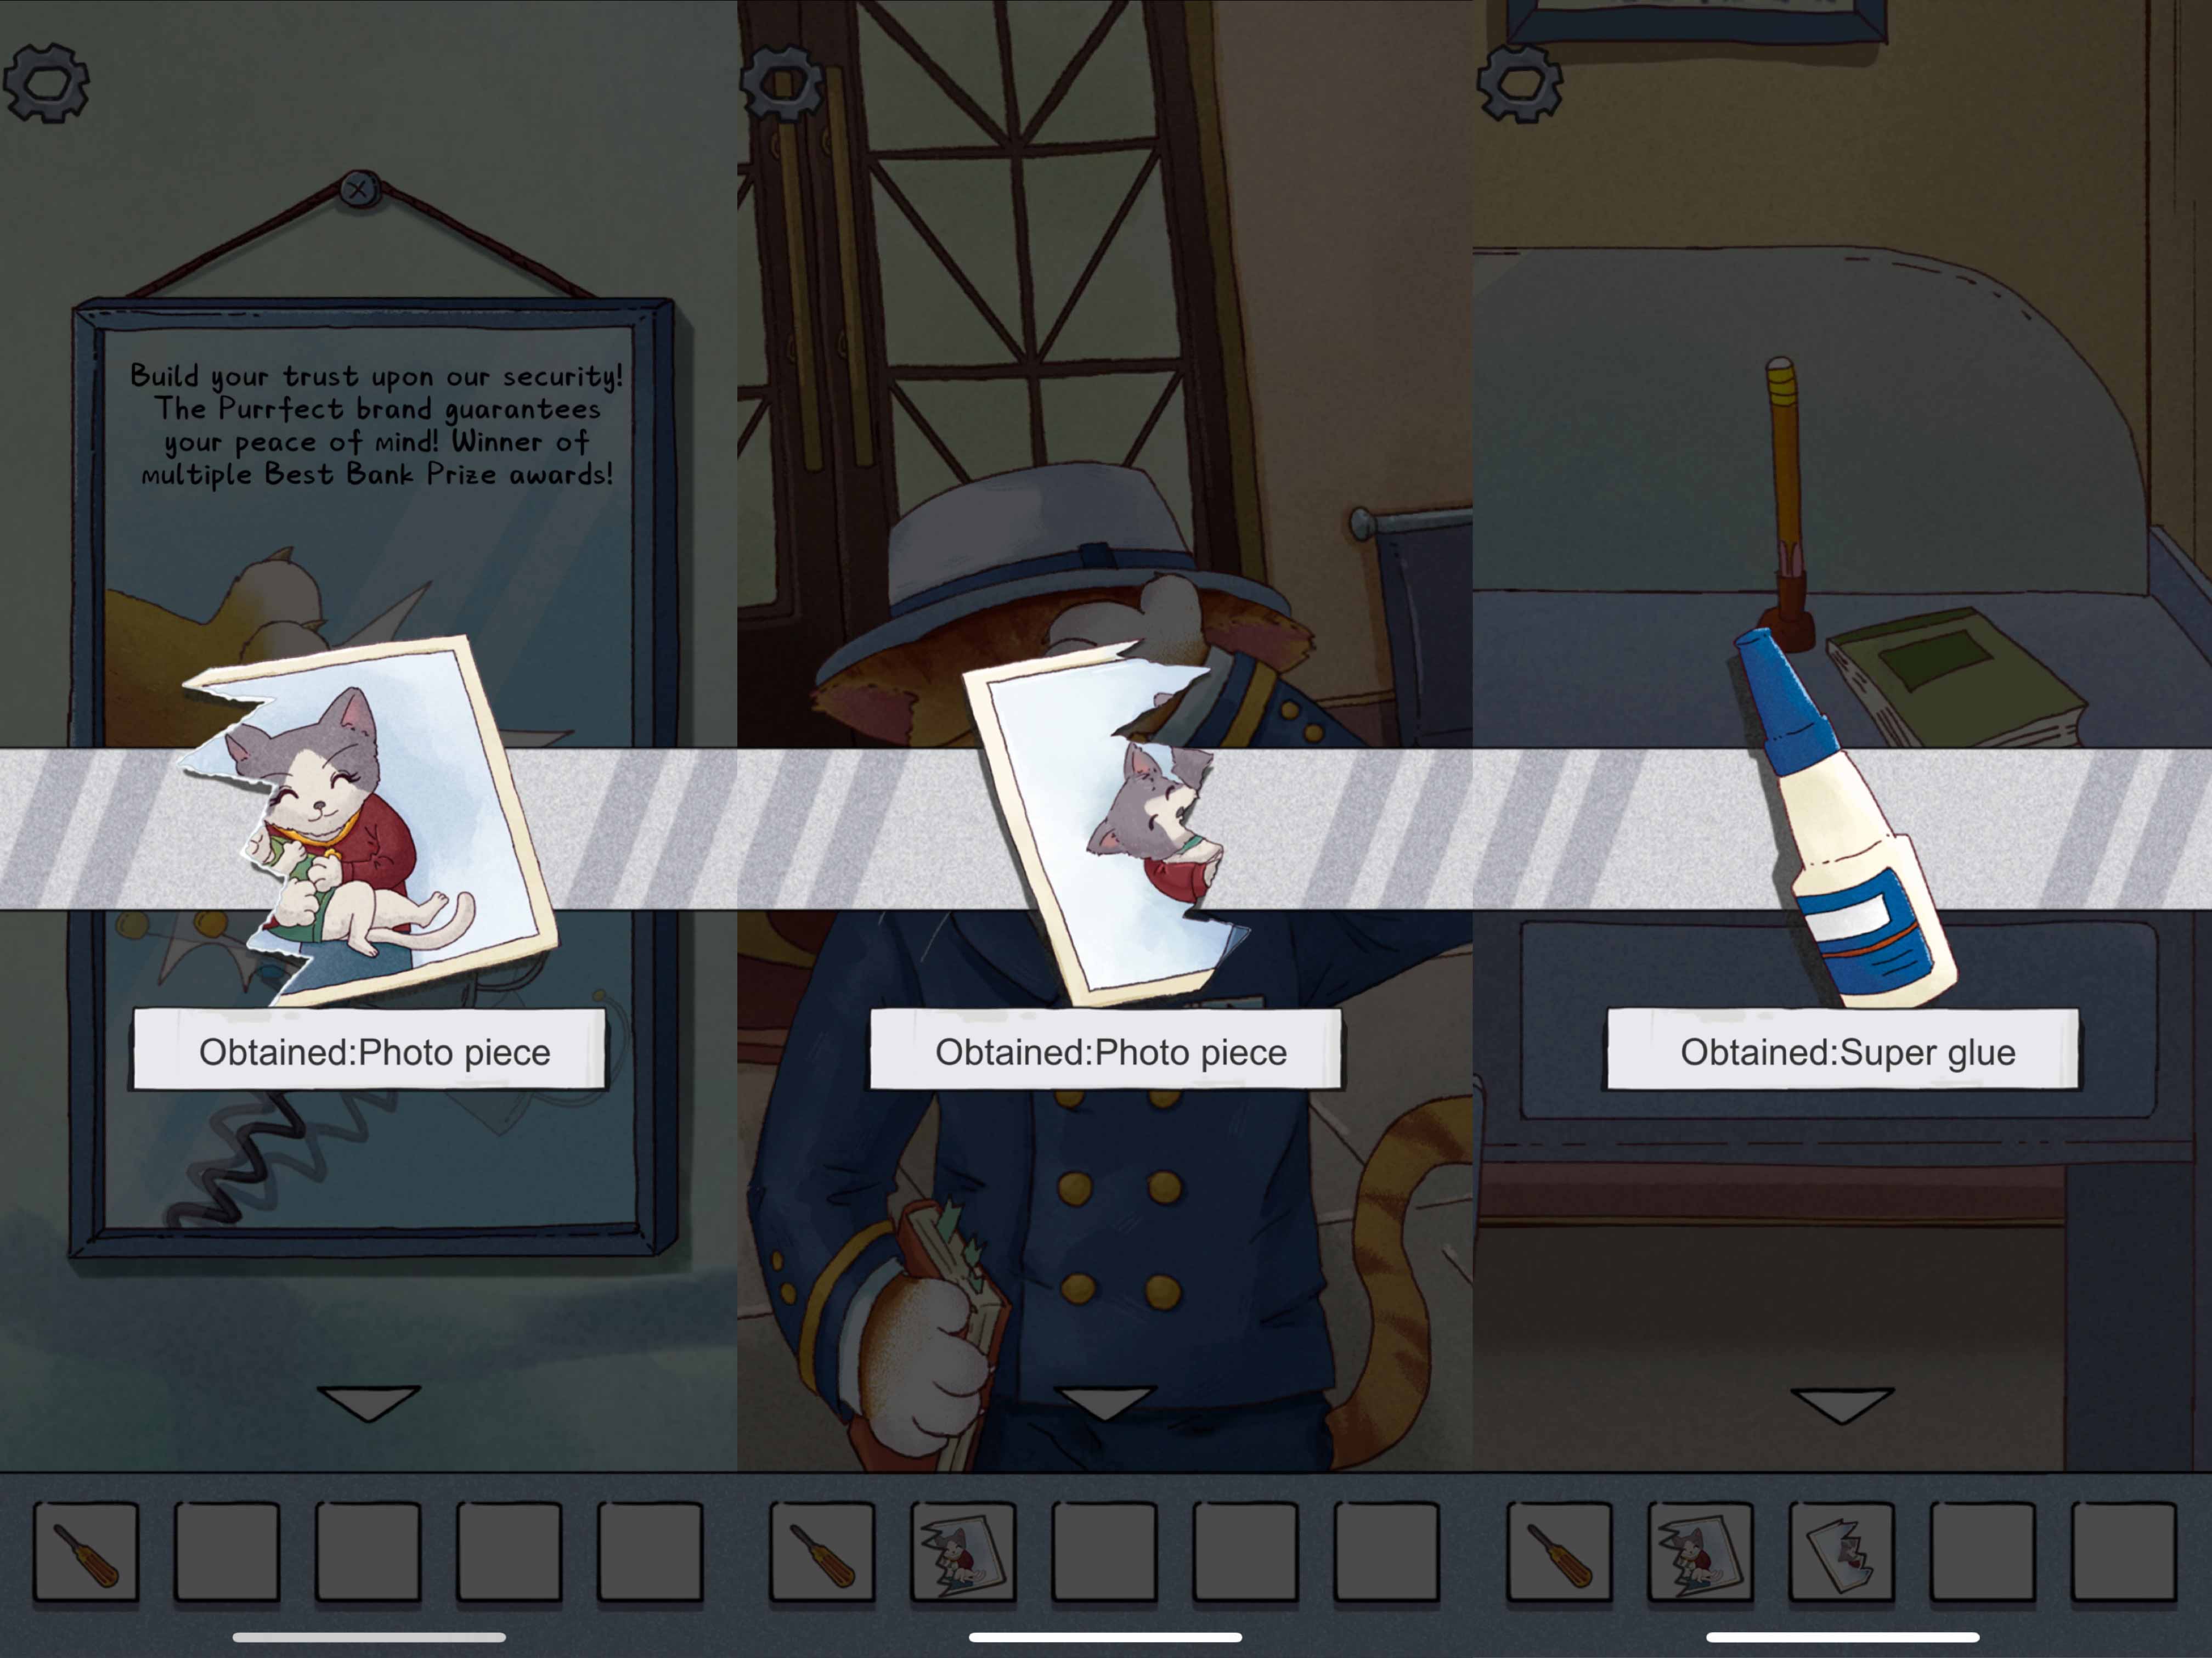
 The right clerk needs you to fix a photo for her. A piece of the photo is hidden near a mouse device poster. The
other piece is on the hat of the bank president. Use the glue find in a drawer. She will tell you the pattern you
need to draw in one stroke.
The right clerk needs you to fix a photo for her. A piece of the photo is hidden near a mouse device poster. The
other piece is on the hat of the bank president. Use the glue find in a drawer. She will tell you the pattern you
need to draw in one stroke.
 With hints from 3 clerks, you go to the ATM, press mew button for 3 seconds, draw a cat by connecting 9 dots and
withdraw the security card in the ATM.
With hints from 3 clerks, you go to the ATM, press mew button for 3 seconds, draw a cat by connecting 9 dots and
withdraw the security card in the ATM.
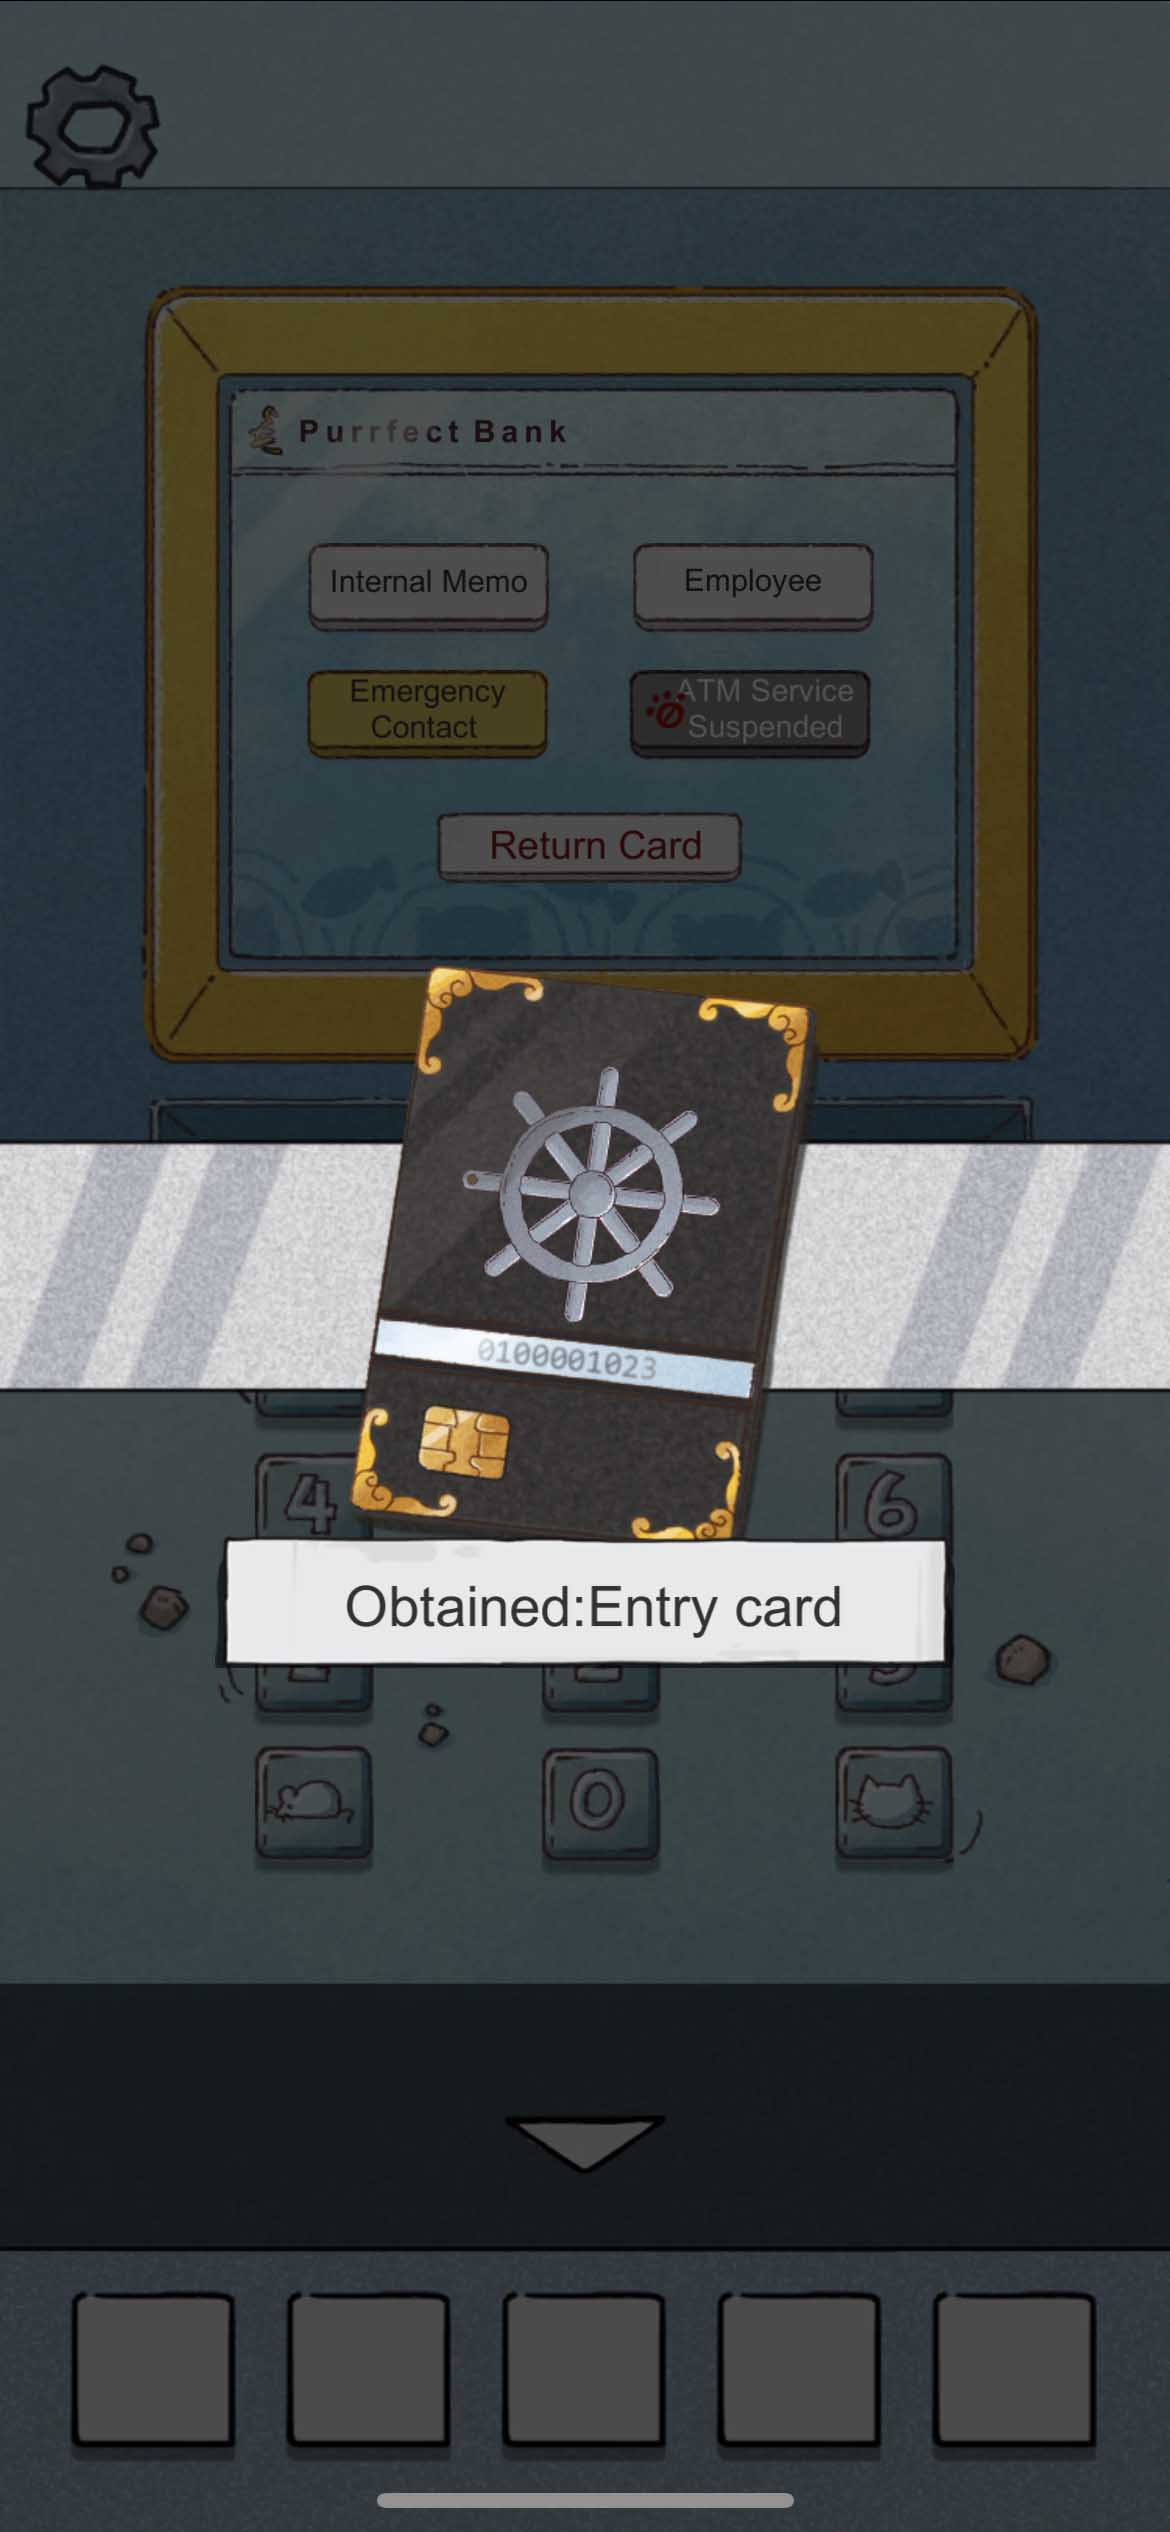
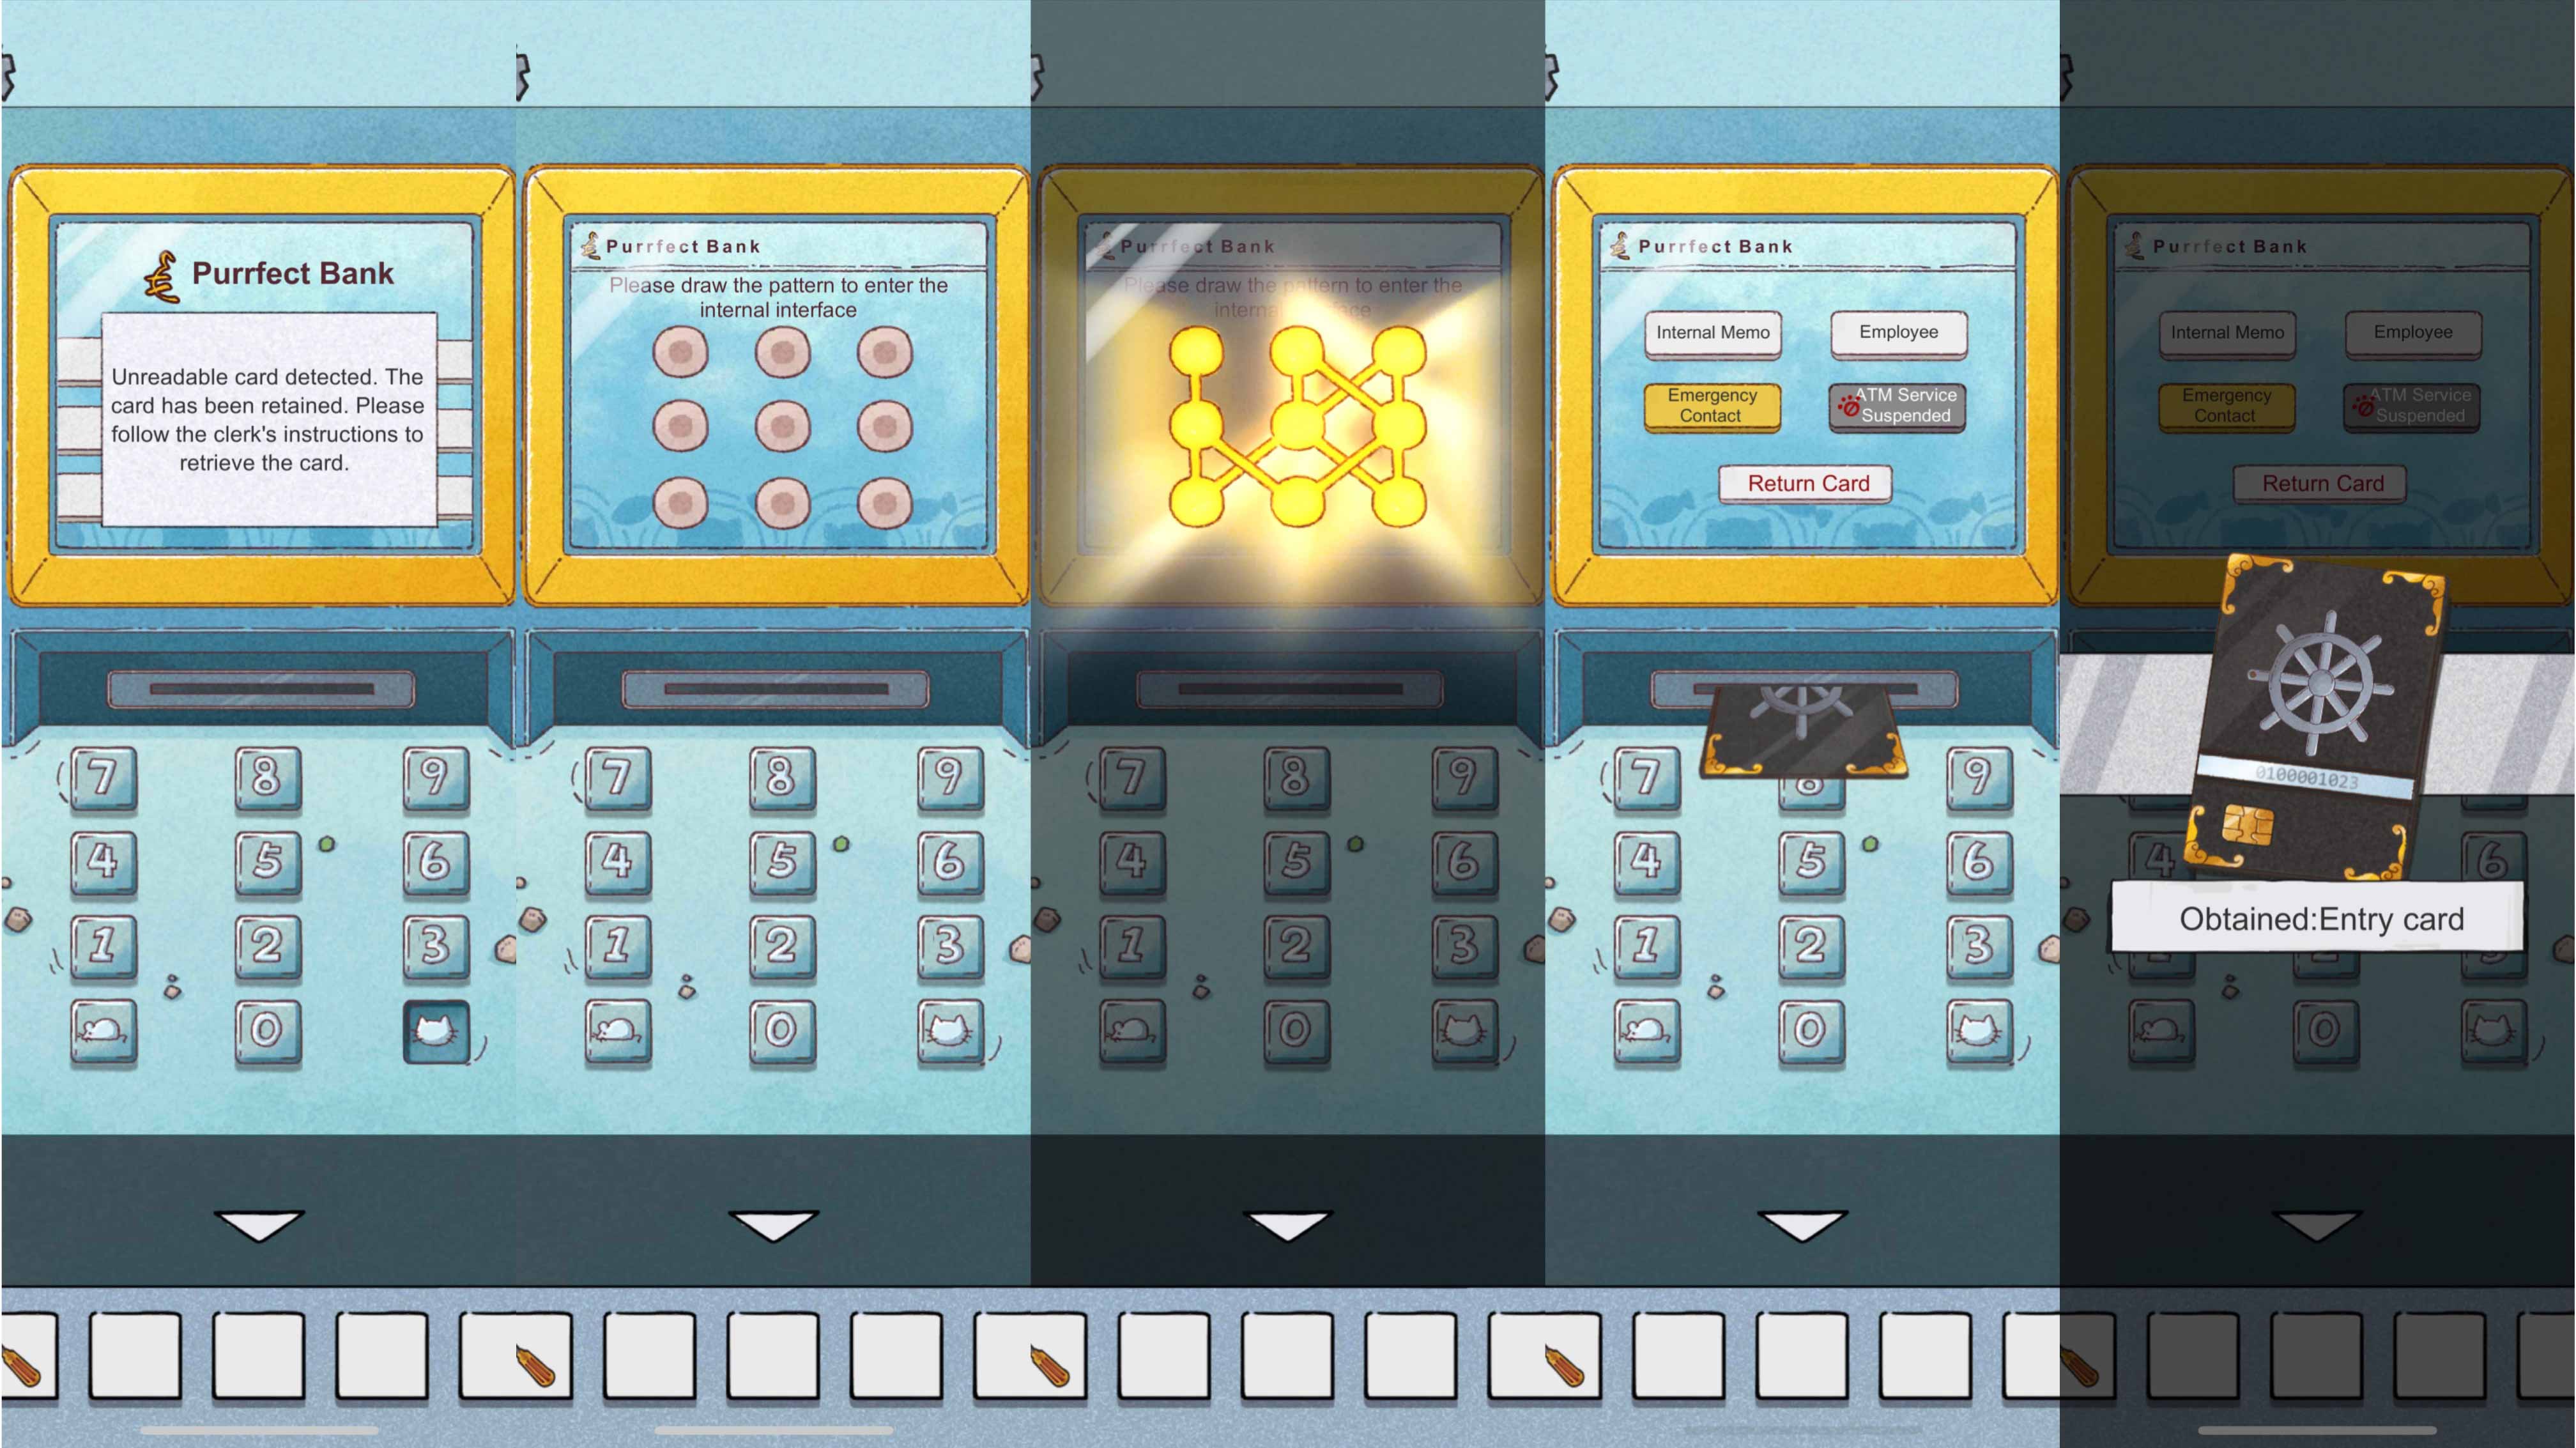 Use the security card in a machine left to the door with 3 wheels. Adjust these wheels until all lights are green.
Then you can open the door.
Use the security card in a machine left to the door with 3 wheels. Adjust these wheels until all lights are green.
Then you can open the door.
· Corridor
Enter the corridor (with multiple doors to other rooms) Use the screwdriver to the power distribution box and open it.
Connect power lines by matching patterns on the left side with patterns on the right.
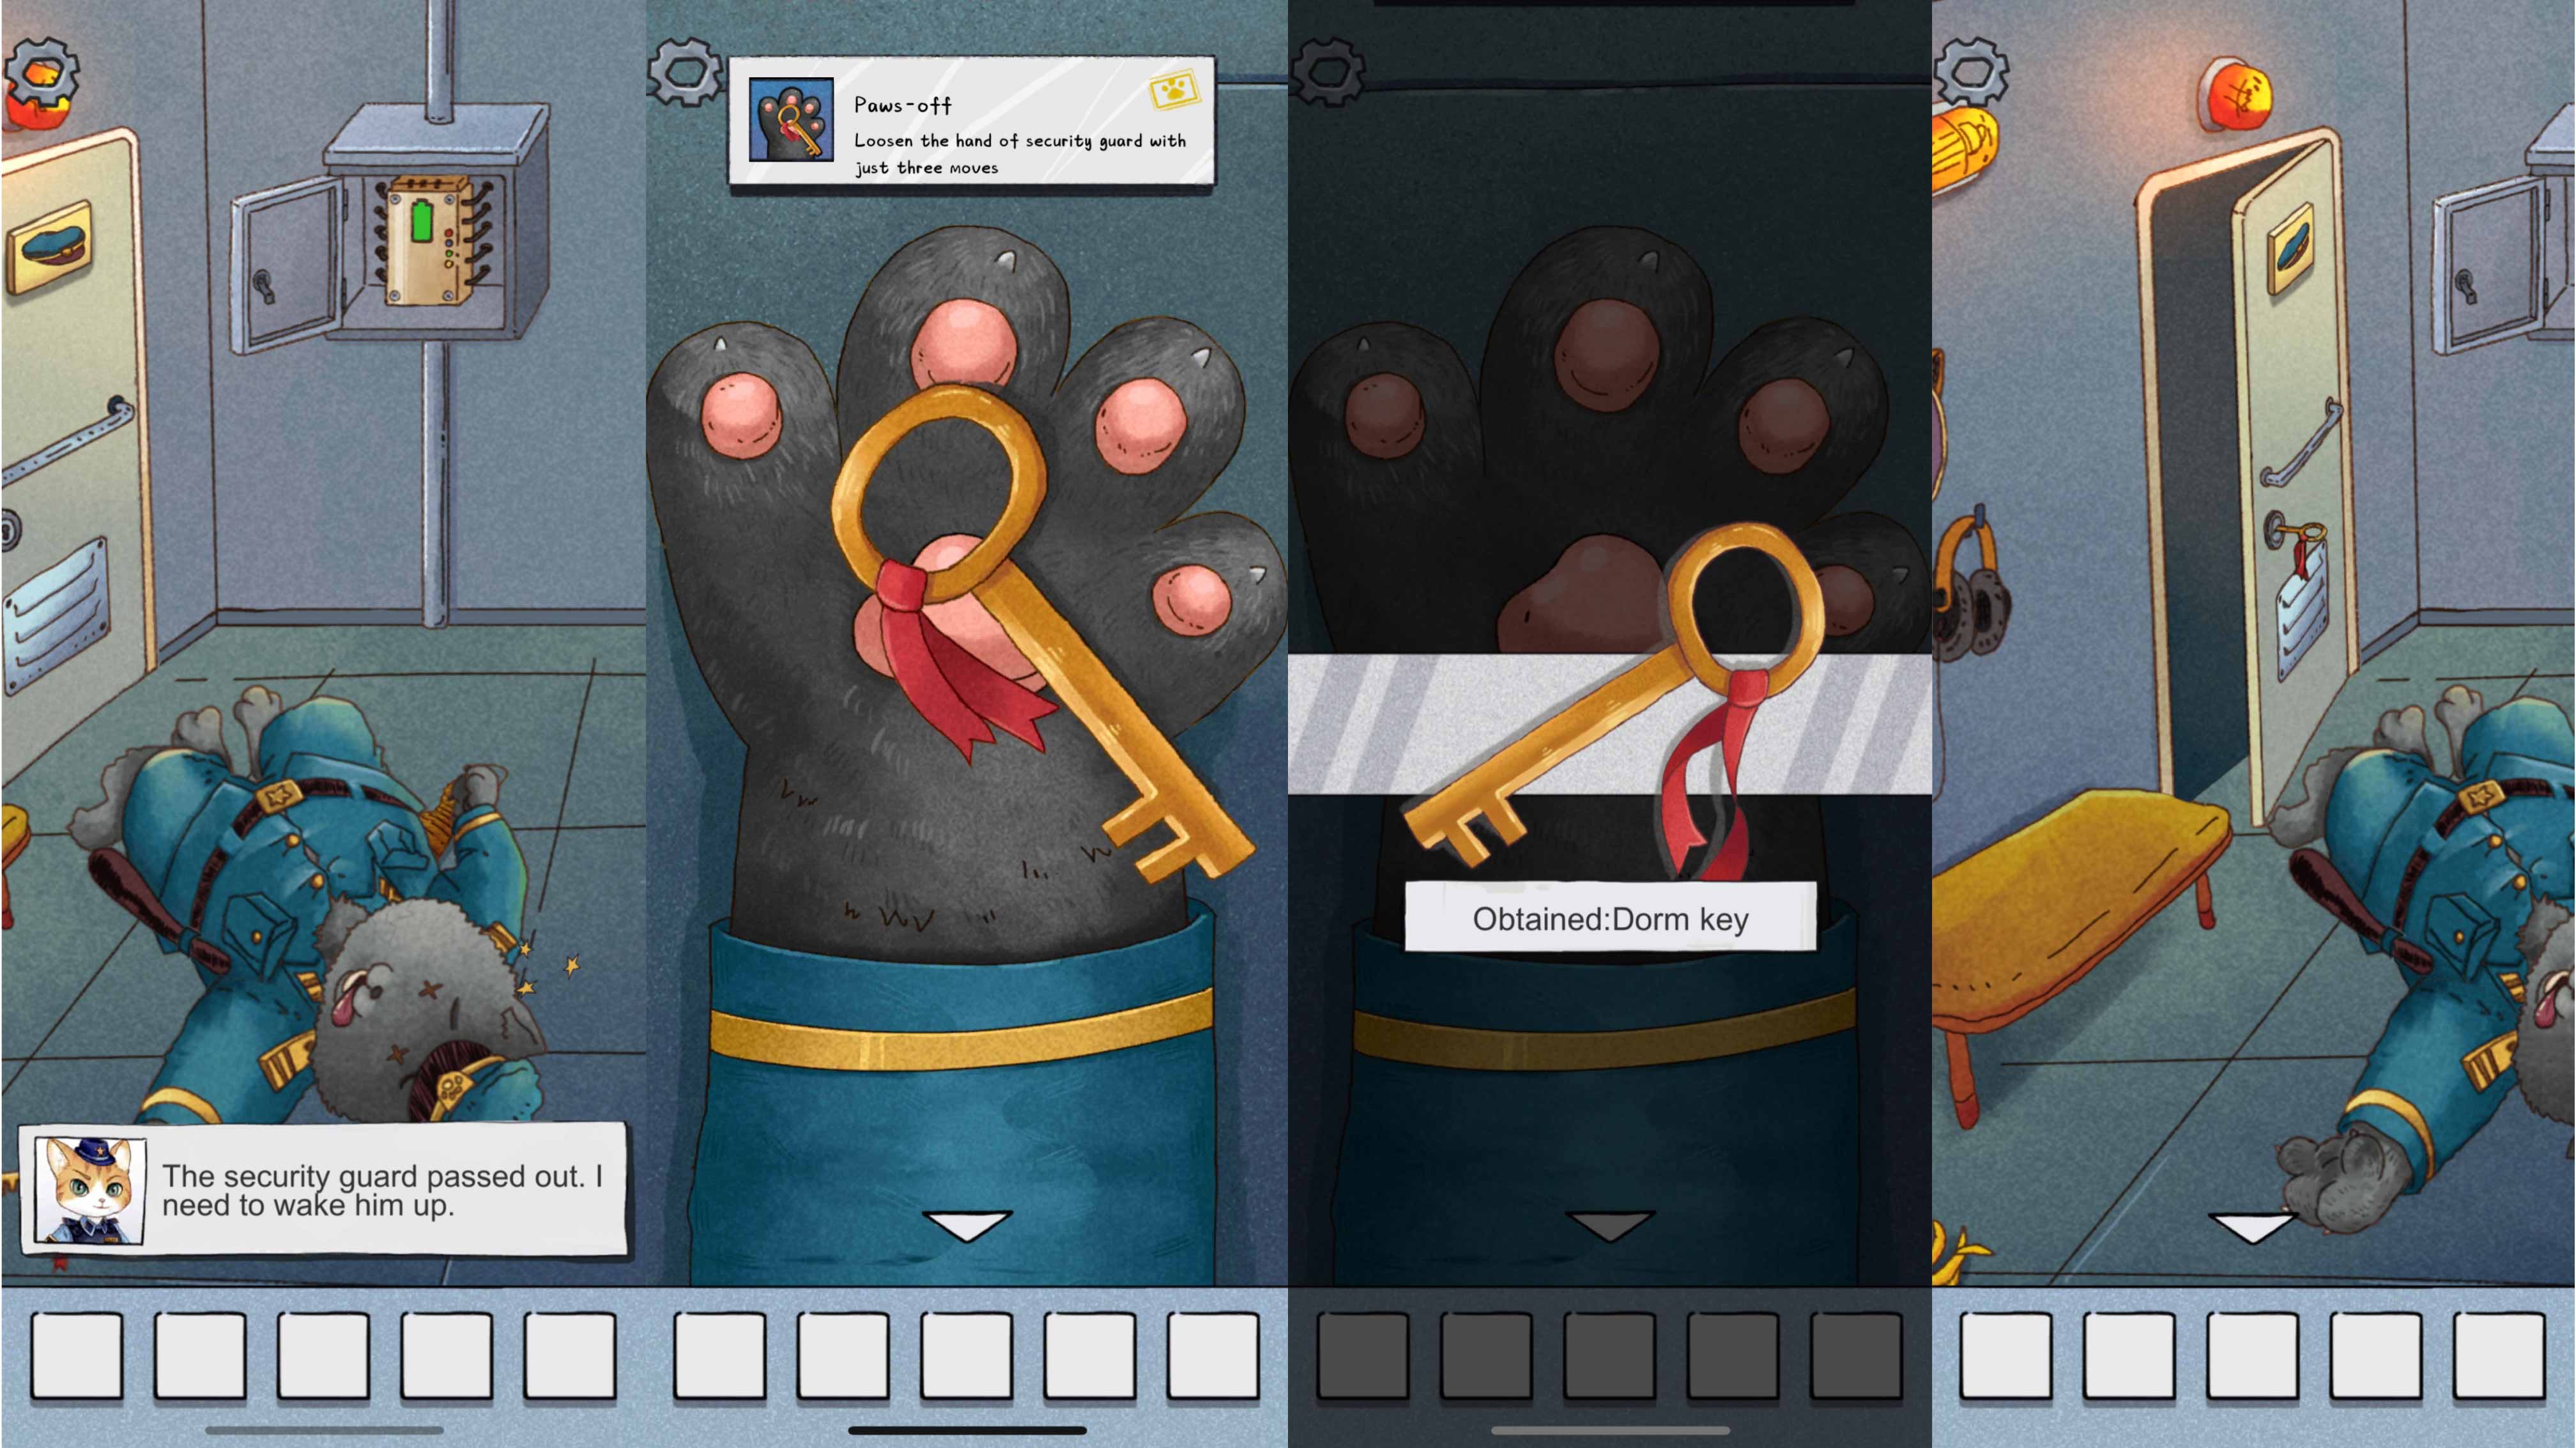
 The security cat is knock out by Mimo. And you need to wake him up.
Check the pawn of the security cat and click his fingers. The quickest solution is 1-3-4 (counting from the left).Then you get the key to his living room called SecurityGuardDormitory.
· Security Guard Dormitory
Find a game card beneath the T-shirt on the floor. Insert the card into the game machine. Then a Mario-like mini game starts. By finishing it, you will get the hint of how to open his closet. Then get an empty cup in the closet.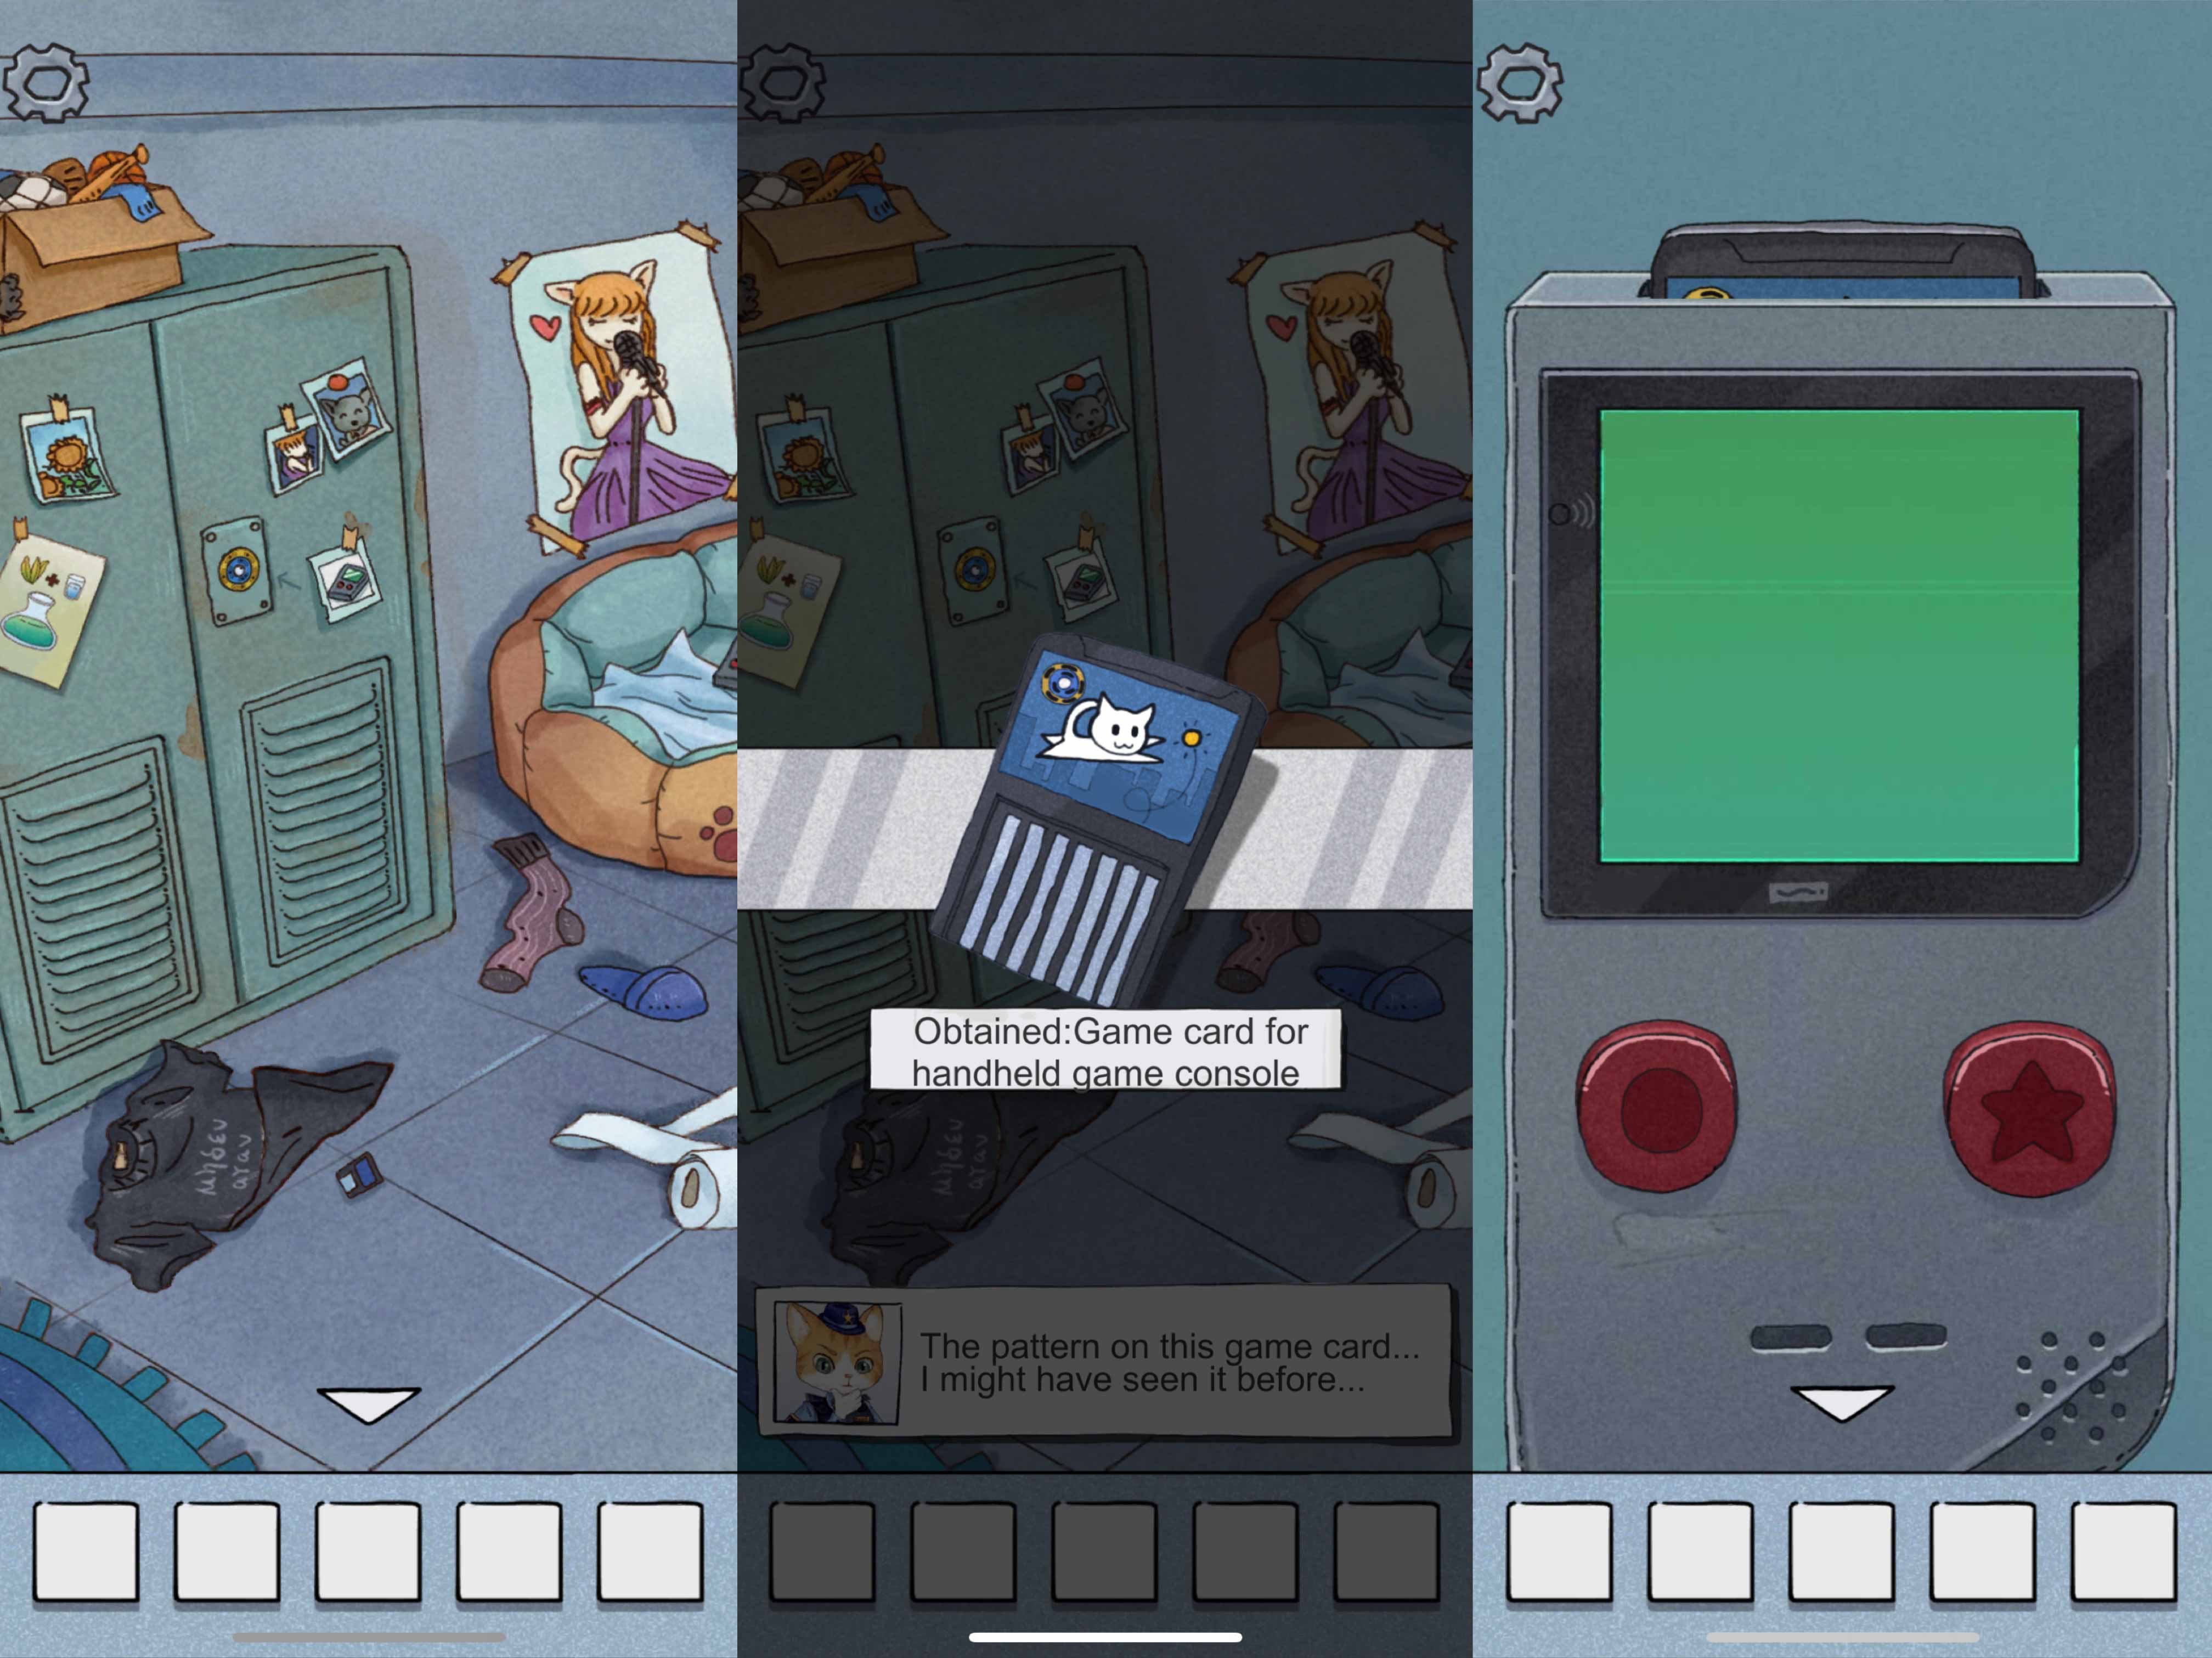
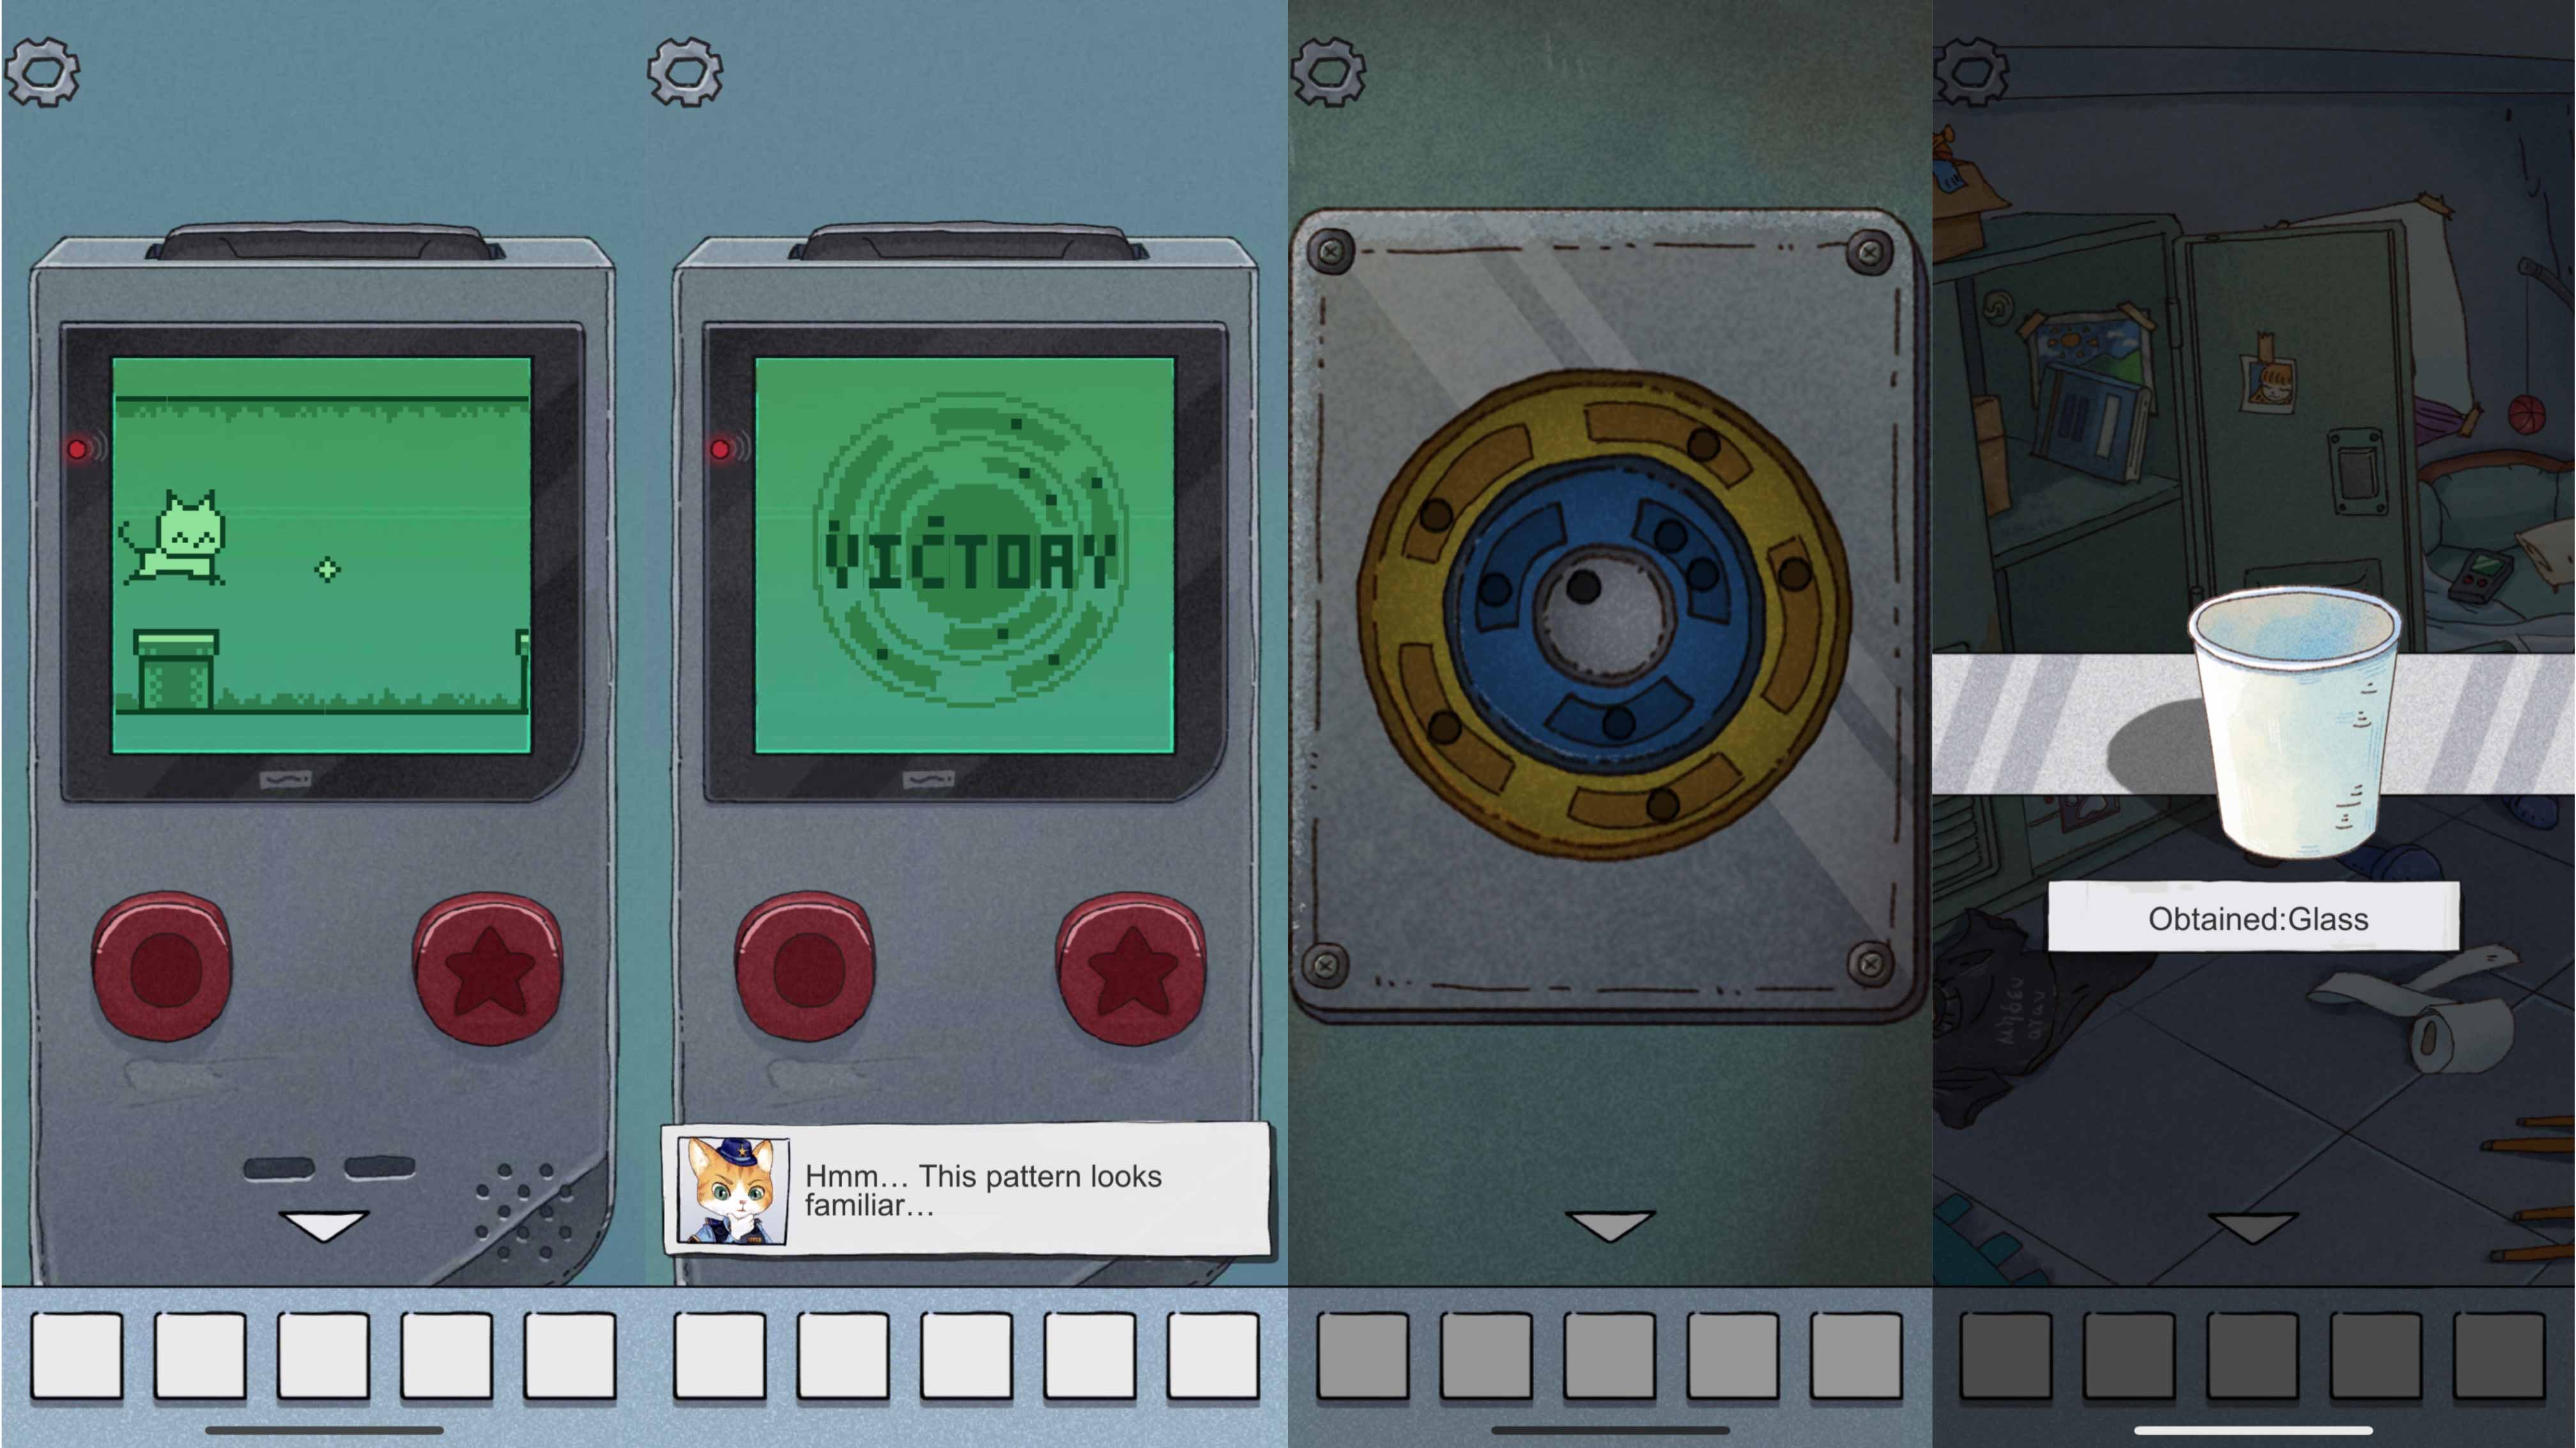
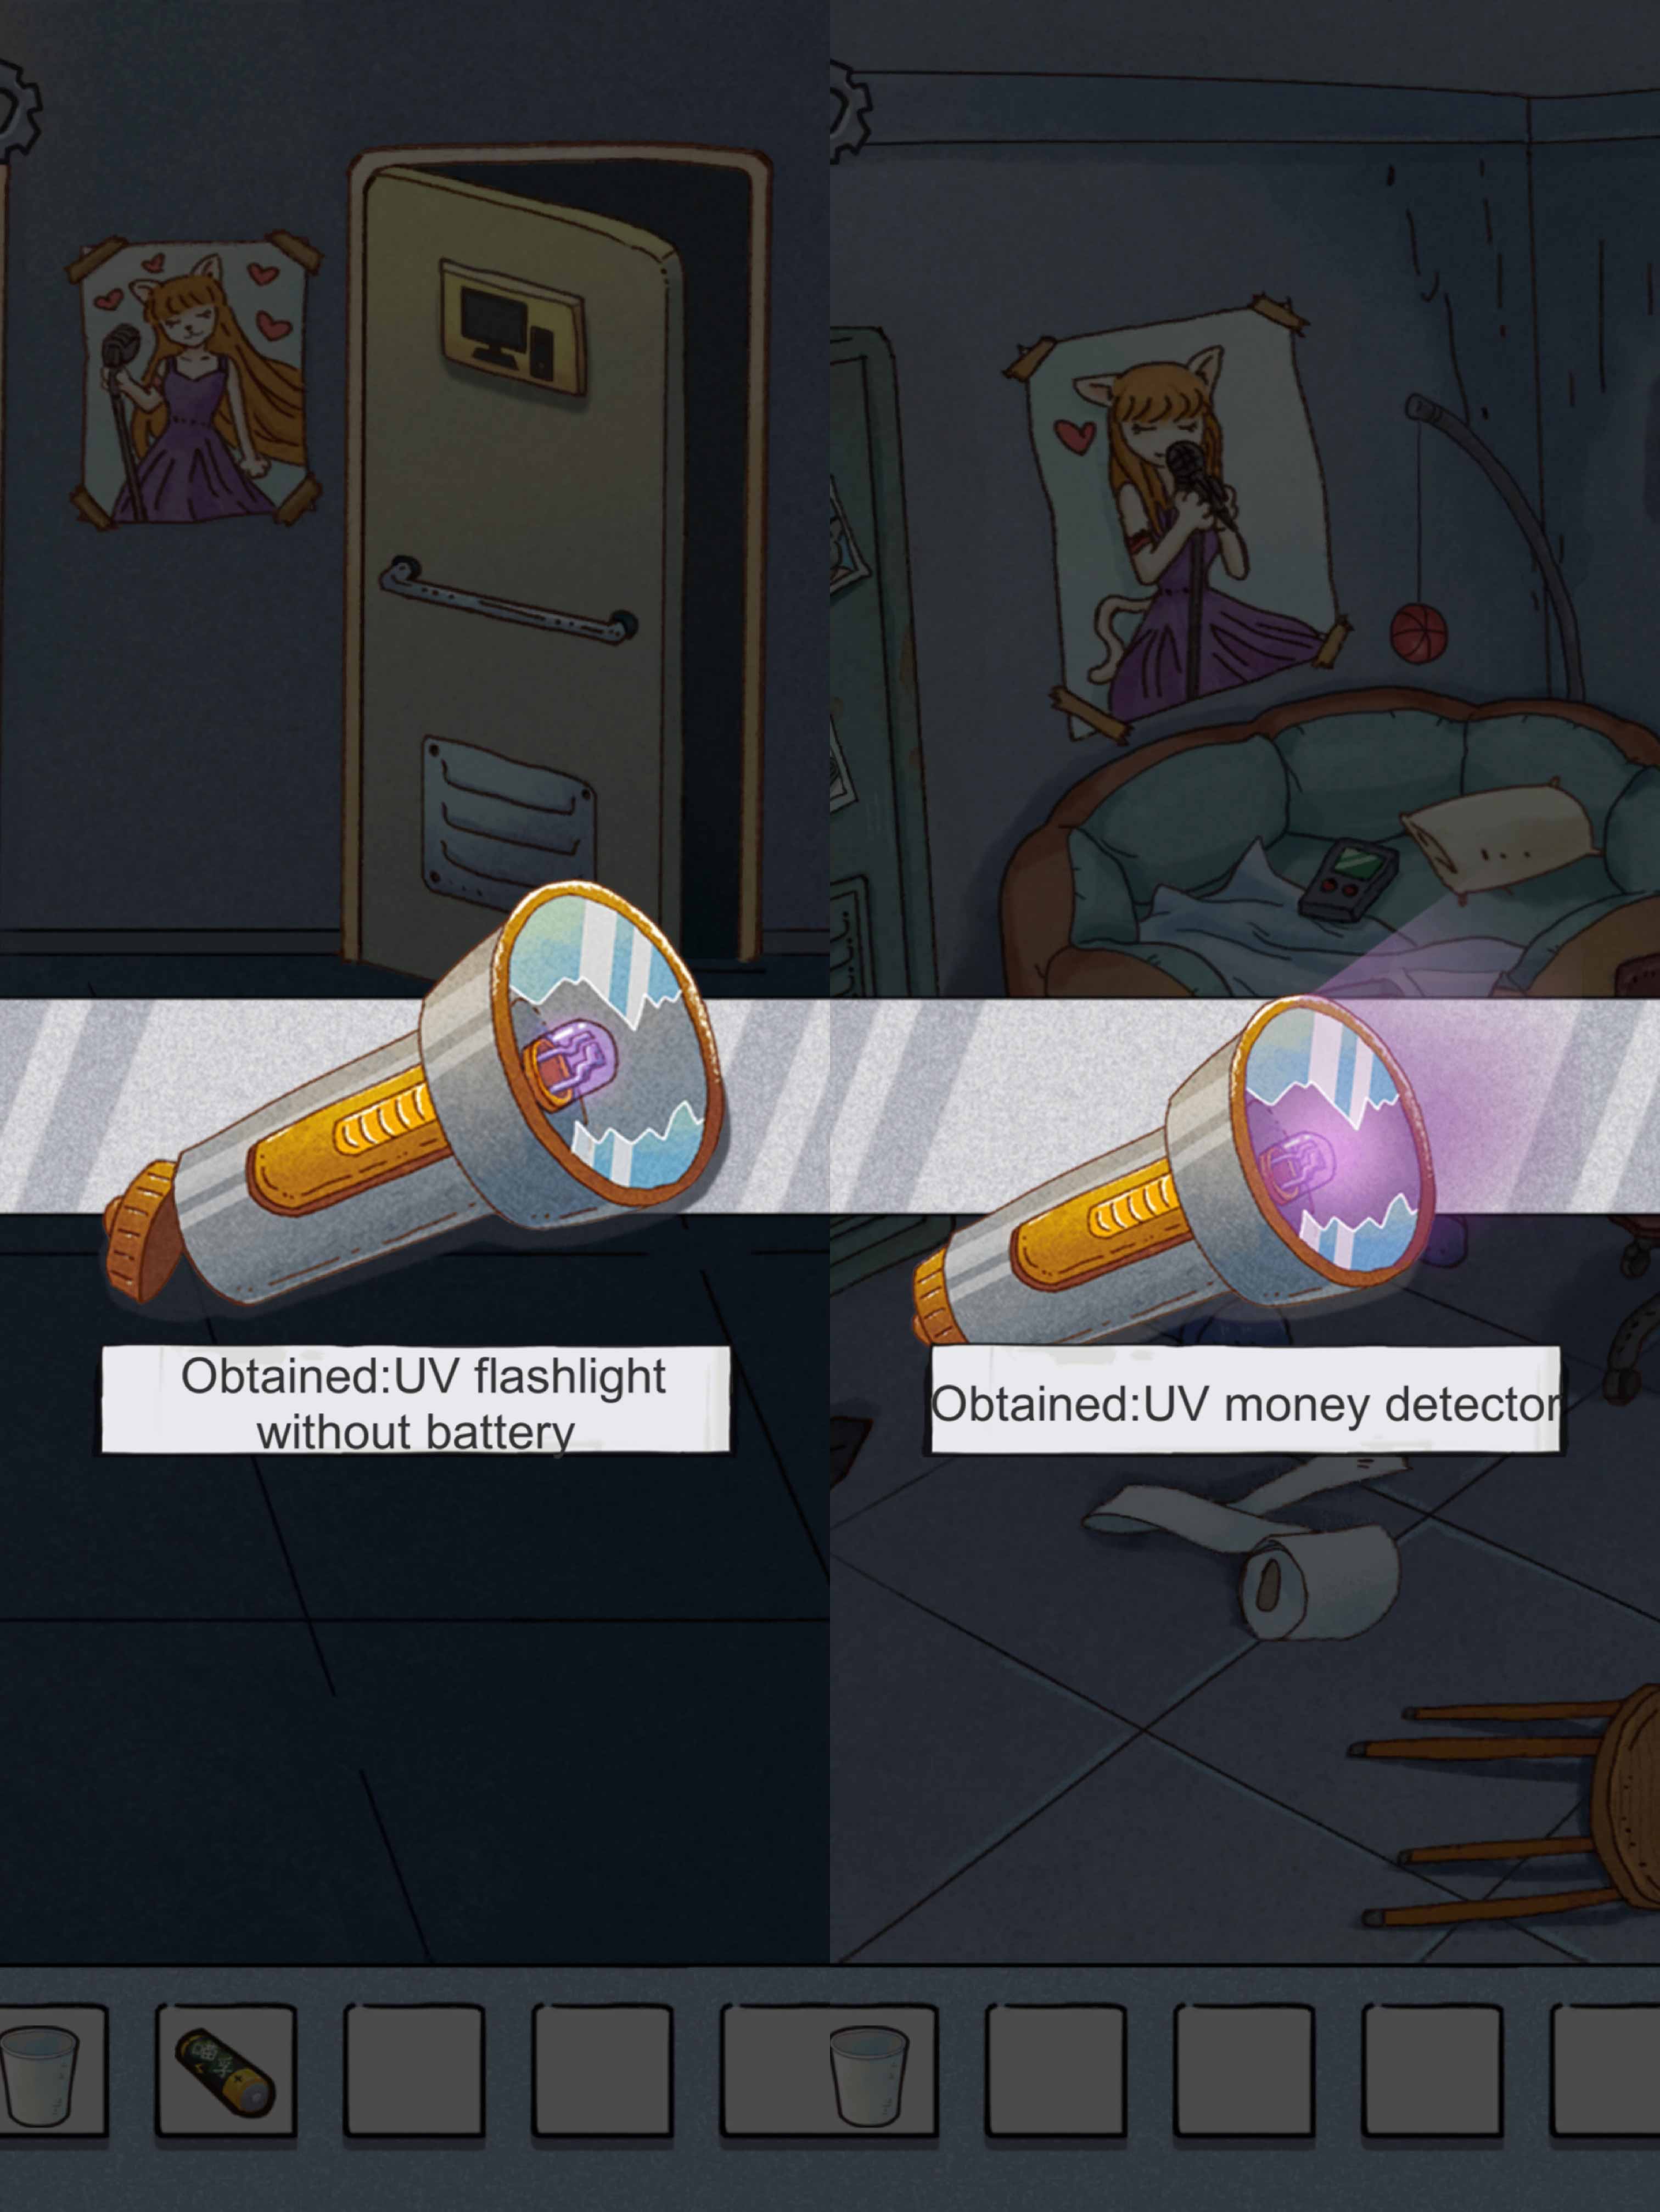
Find a broken money checker in the dustbin and use the screwdriver, you will get a bulb.
Find a flashlight in the corridor. And find a battery in a room with many servers and an engineer cat.
 By installing the bulb onto the flashlight, you can check 4 posters on the wall (2 in the living room, 2 in the
corridor). The number of finger from cat paw on the poster indicate the sequence of buttons.
By installing the bulb onto the flashlight, you can check 4 posters on the wall (2 in the living room, 2 in the
corridor). The number of finger from cat paw on the poster indicate the sequence of buttons.
 Press the buttons on the medic box 2-4-3-4. You get the syringe.
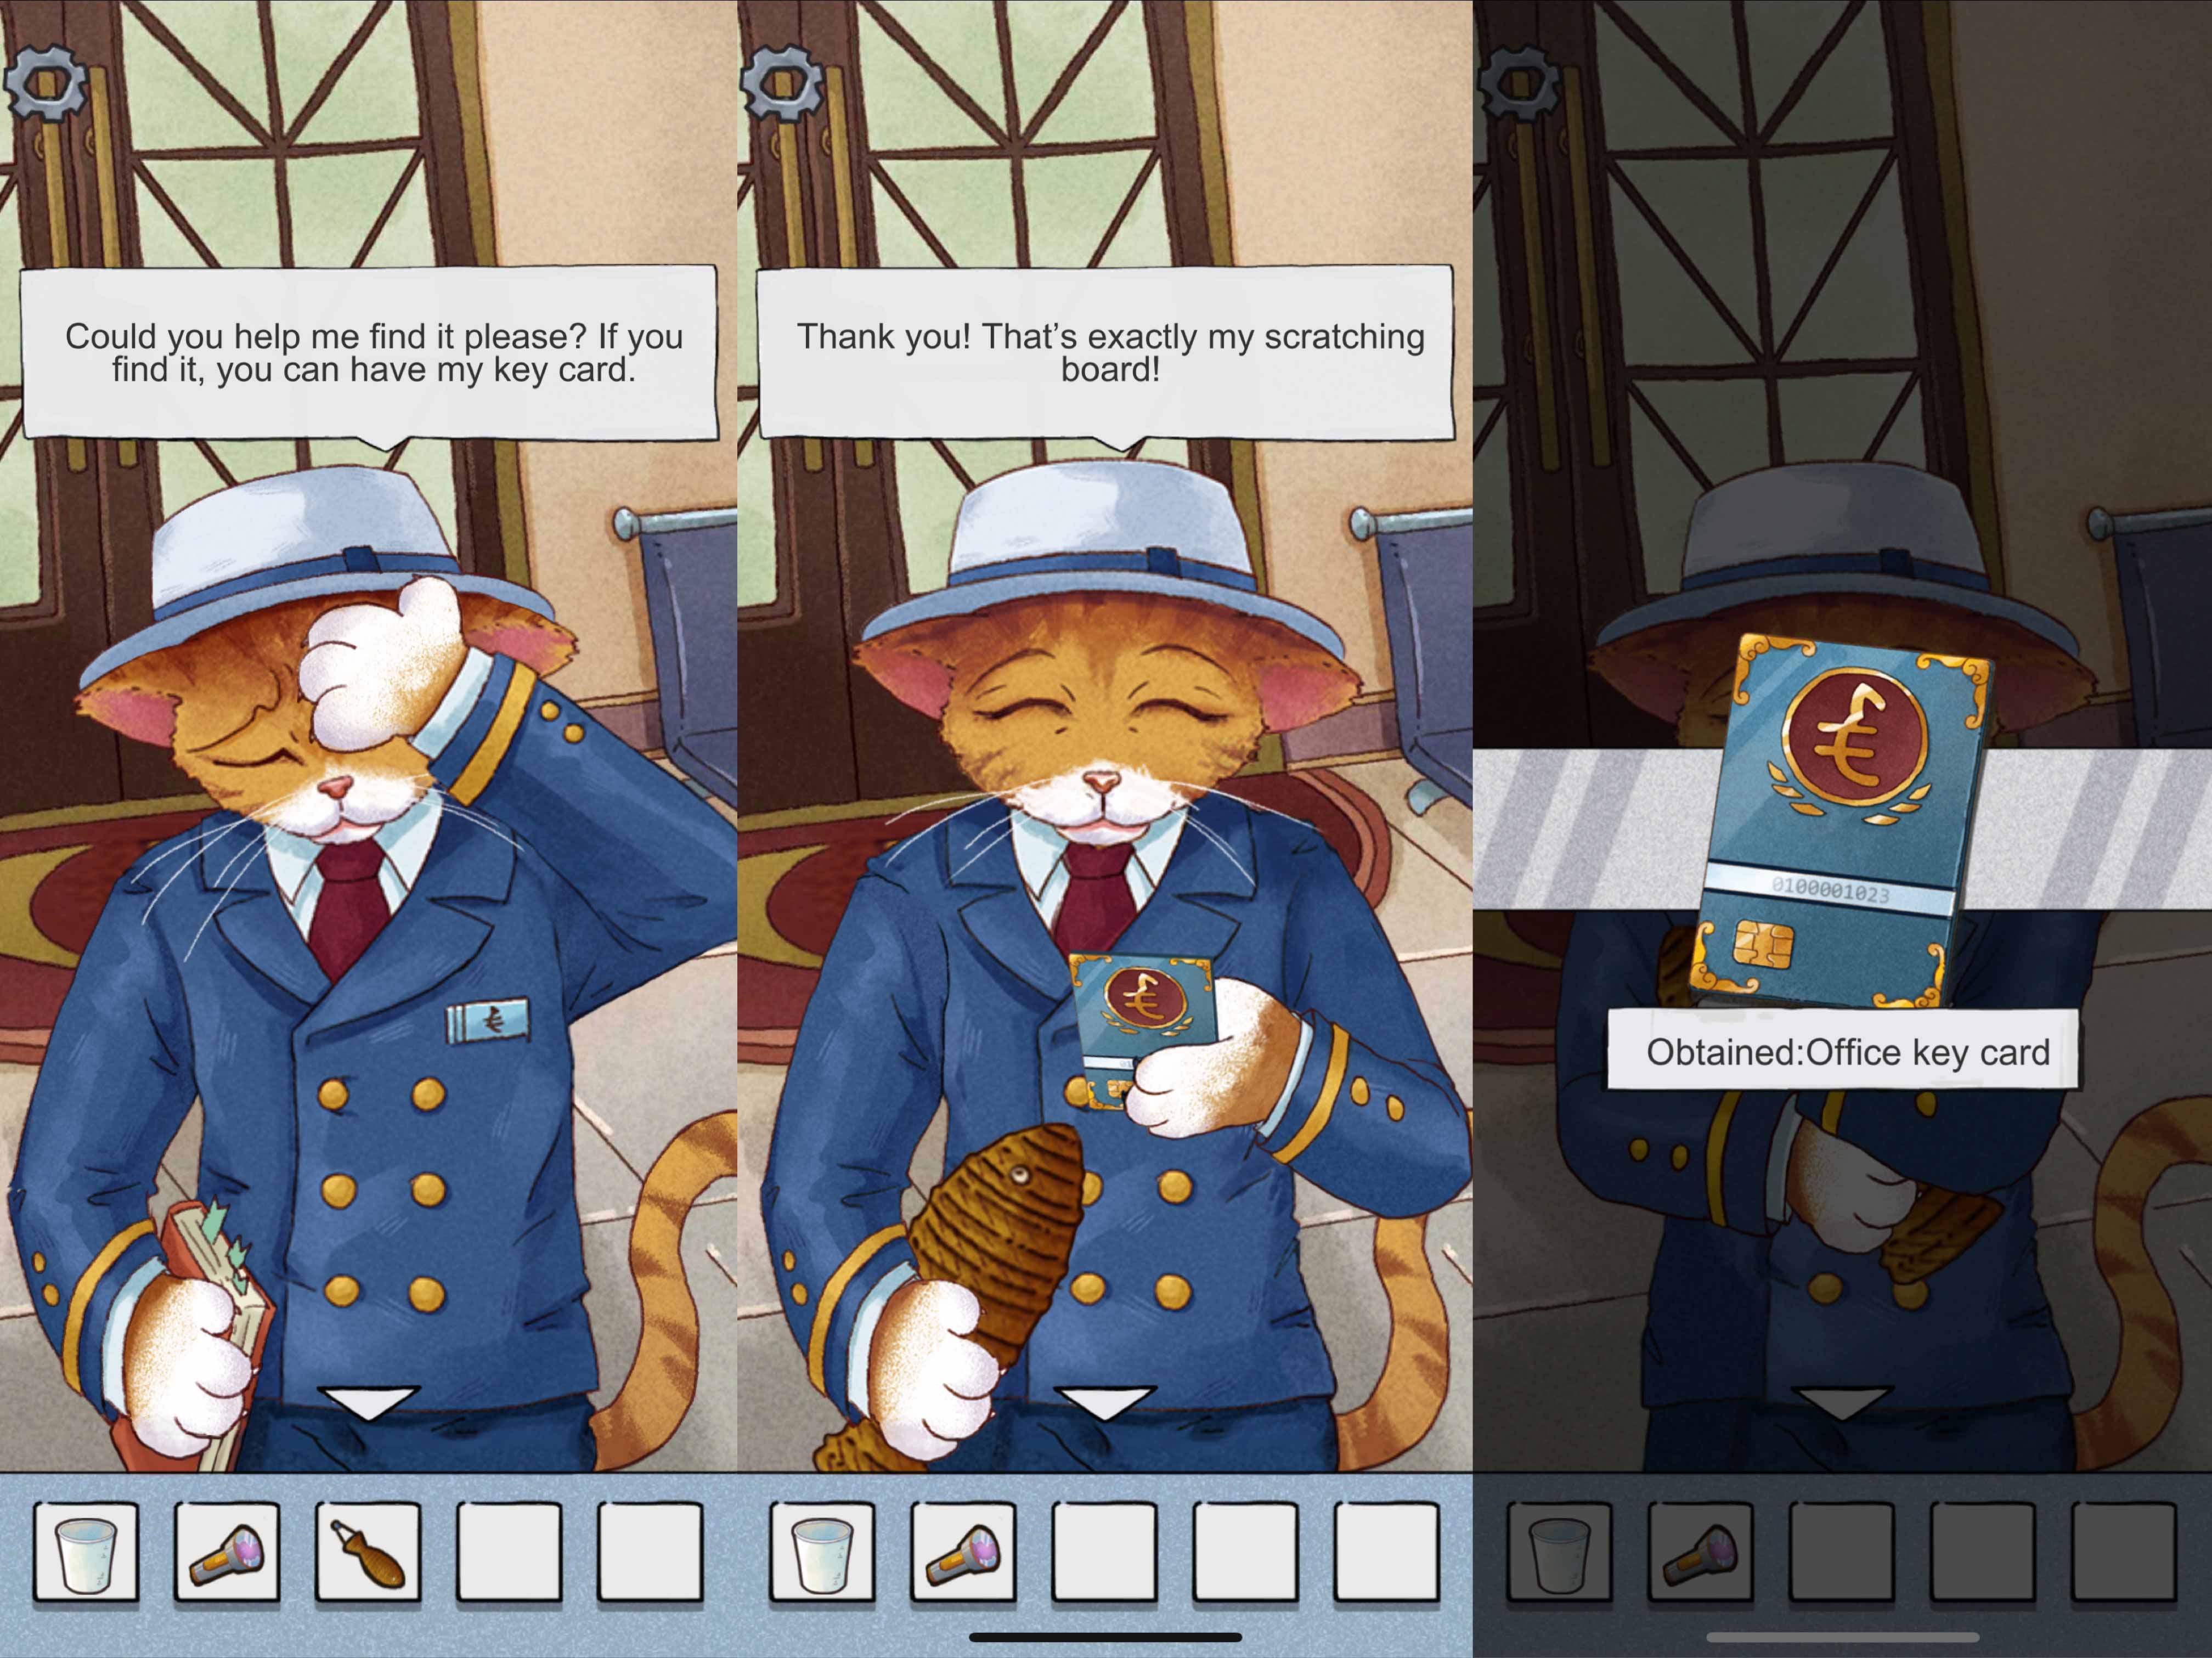
Wake up the security cat. He says he is dizzy and asks you for a cup of catnip tea. A cat scratching board can be found where he laid.
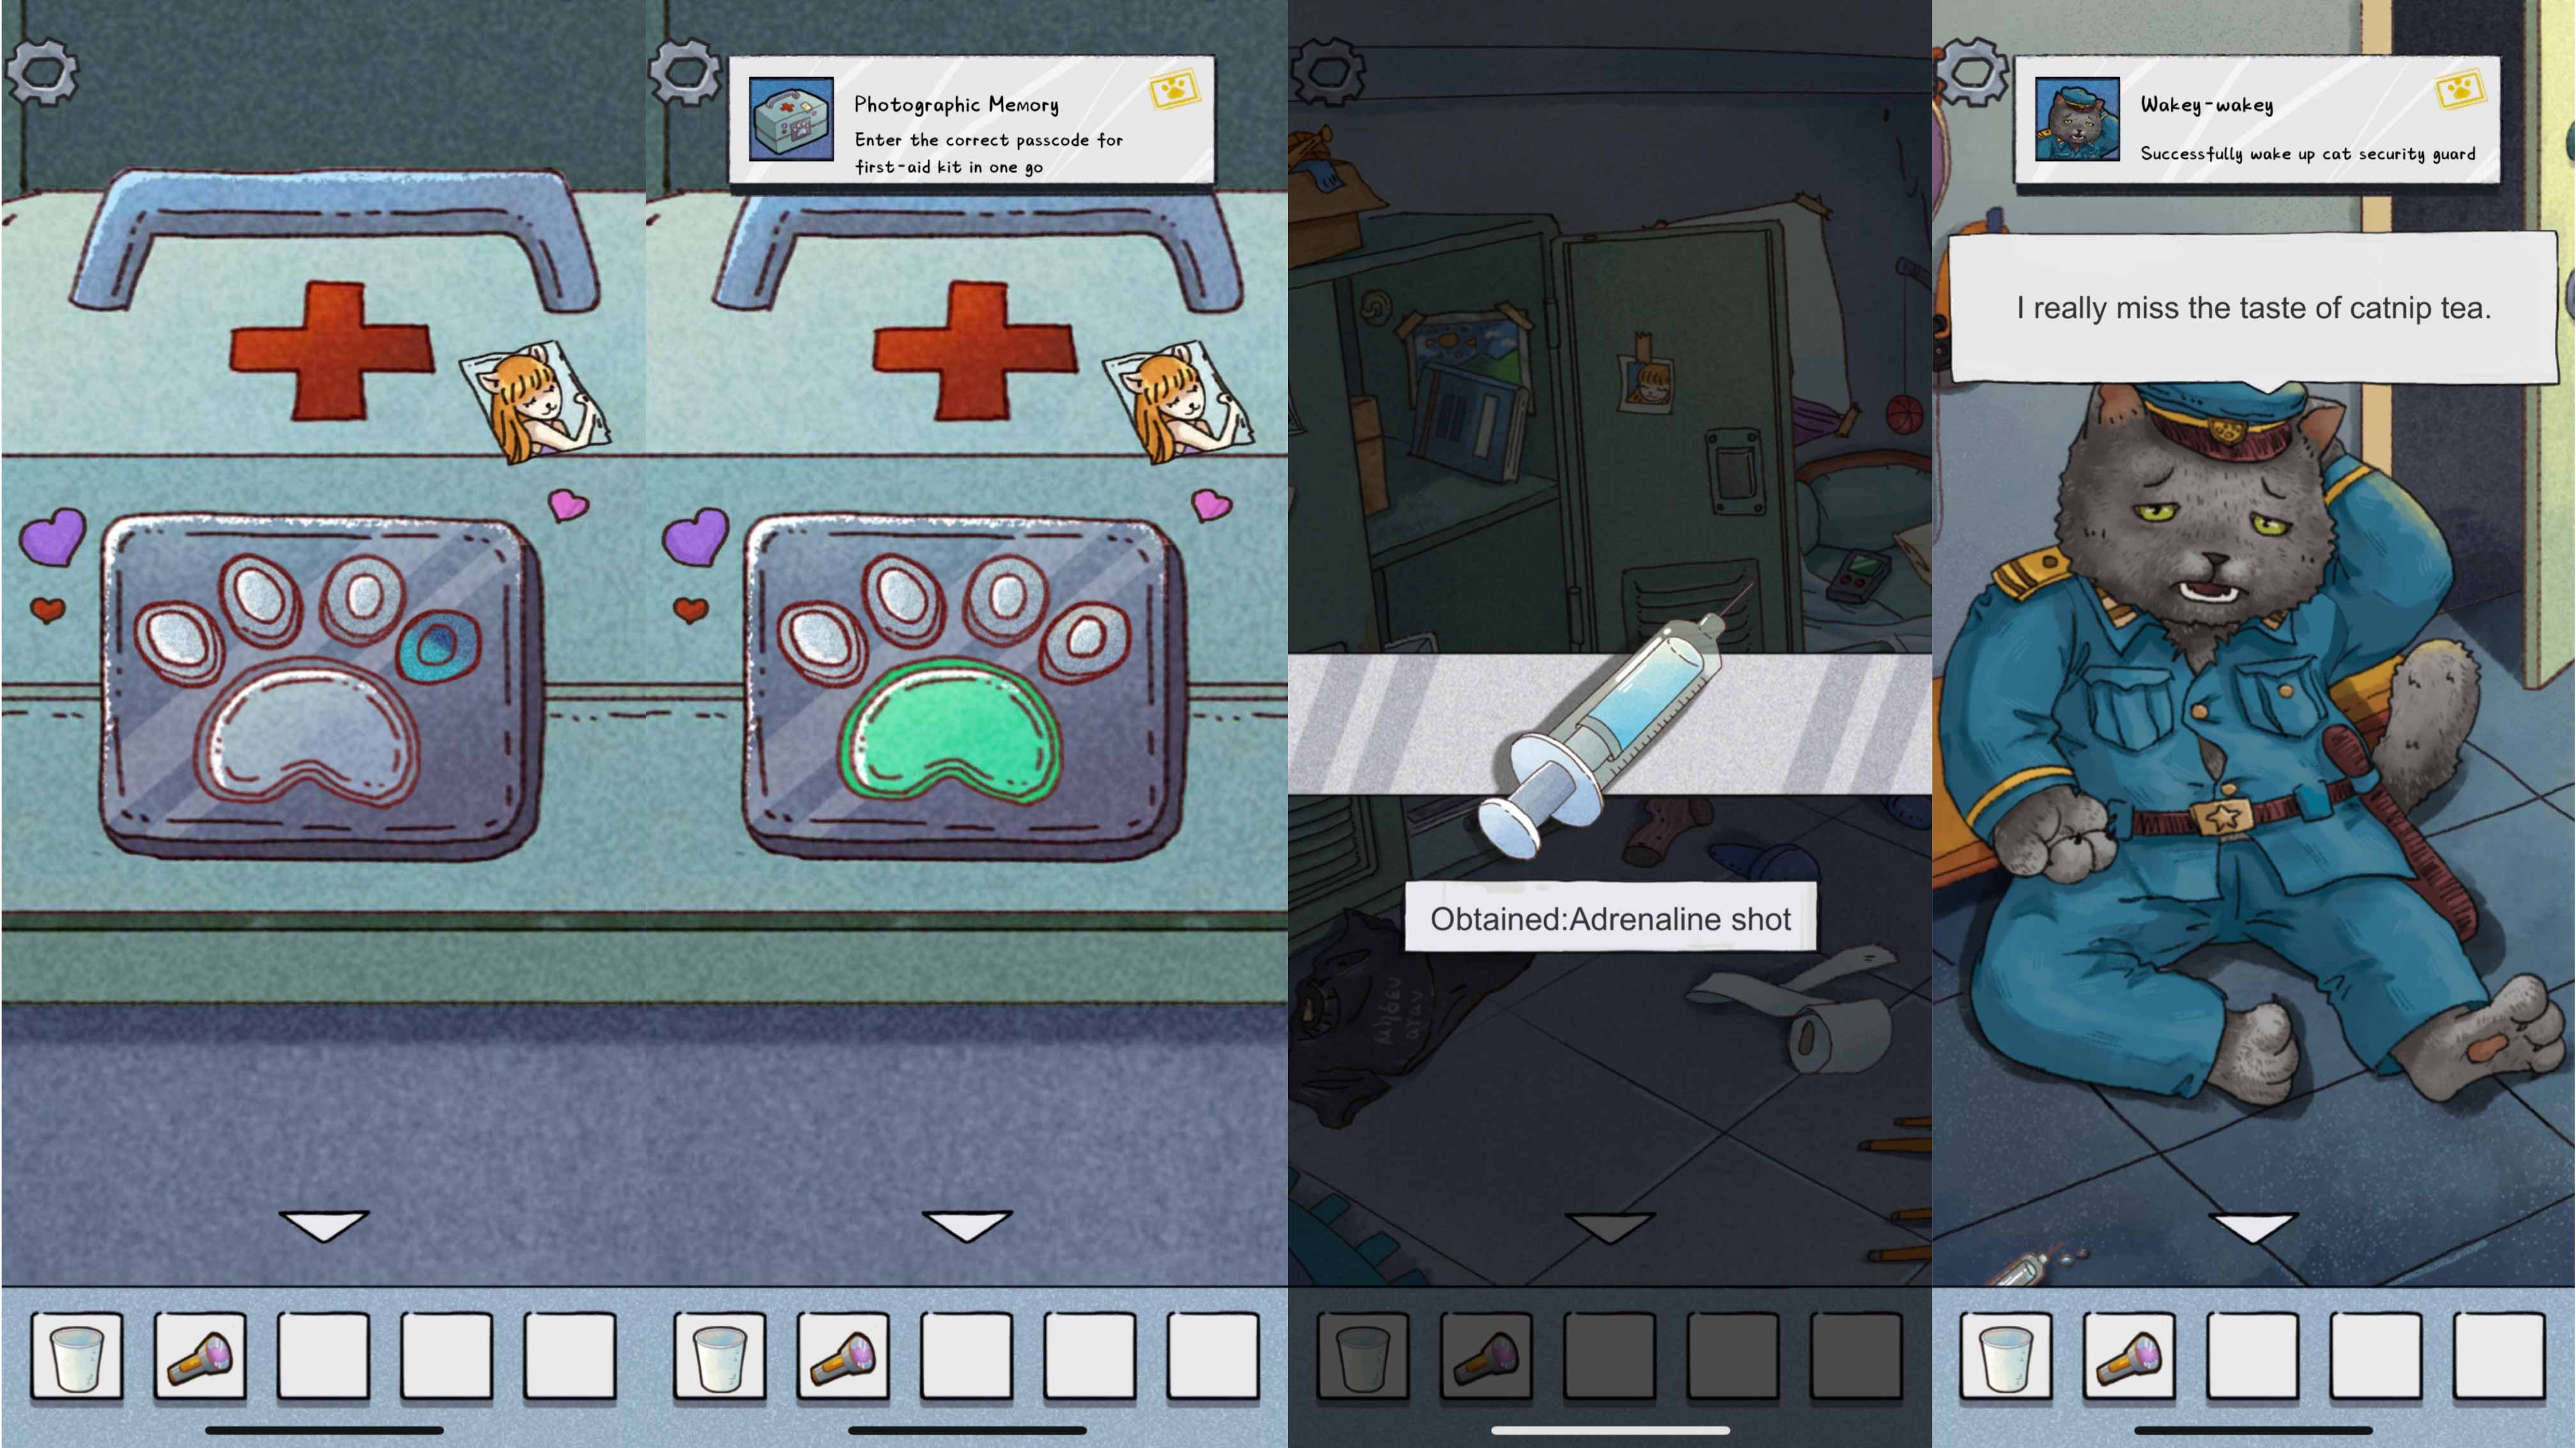
 Give the scratching board to the bank president. He will give you the card to his office.
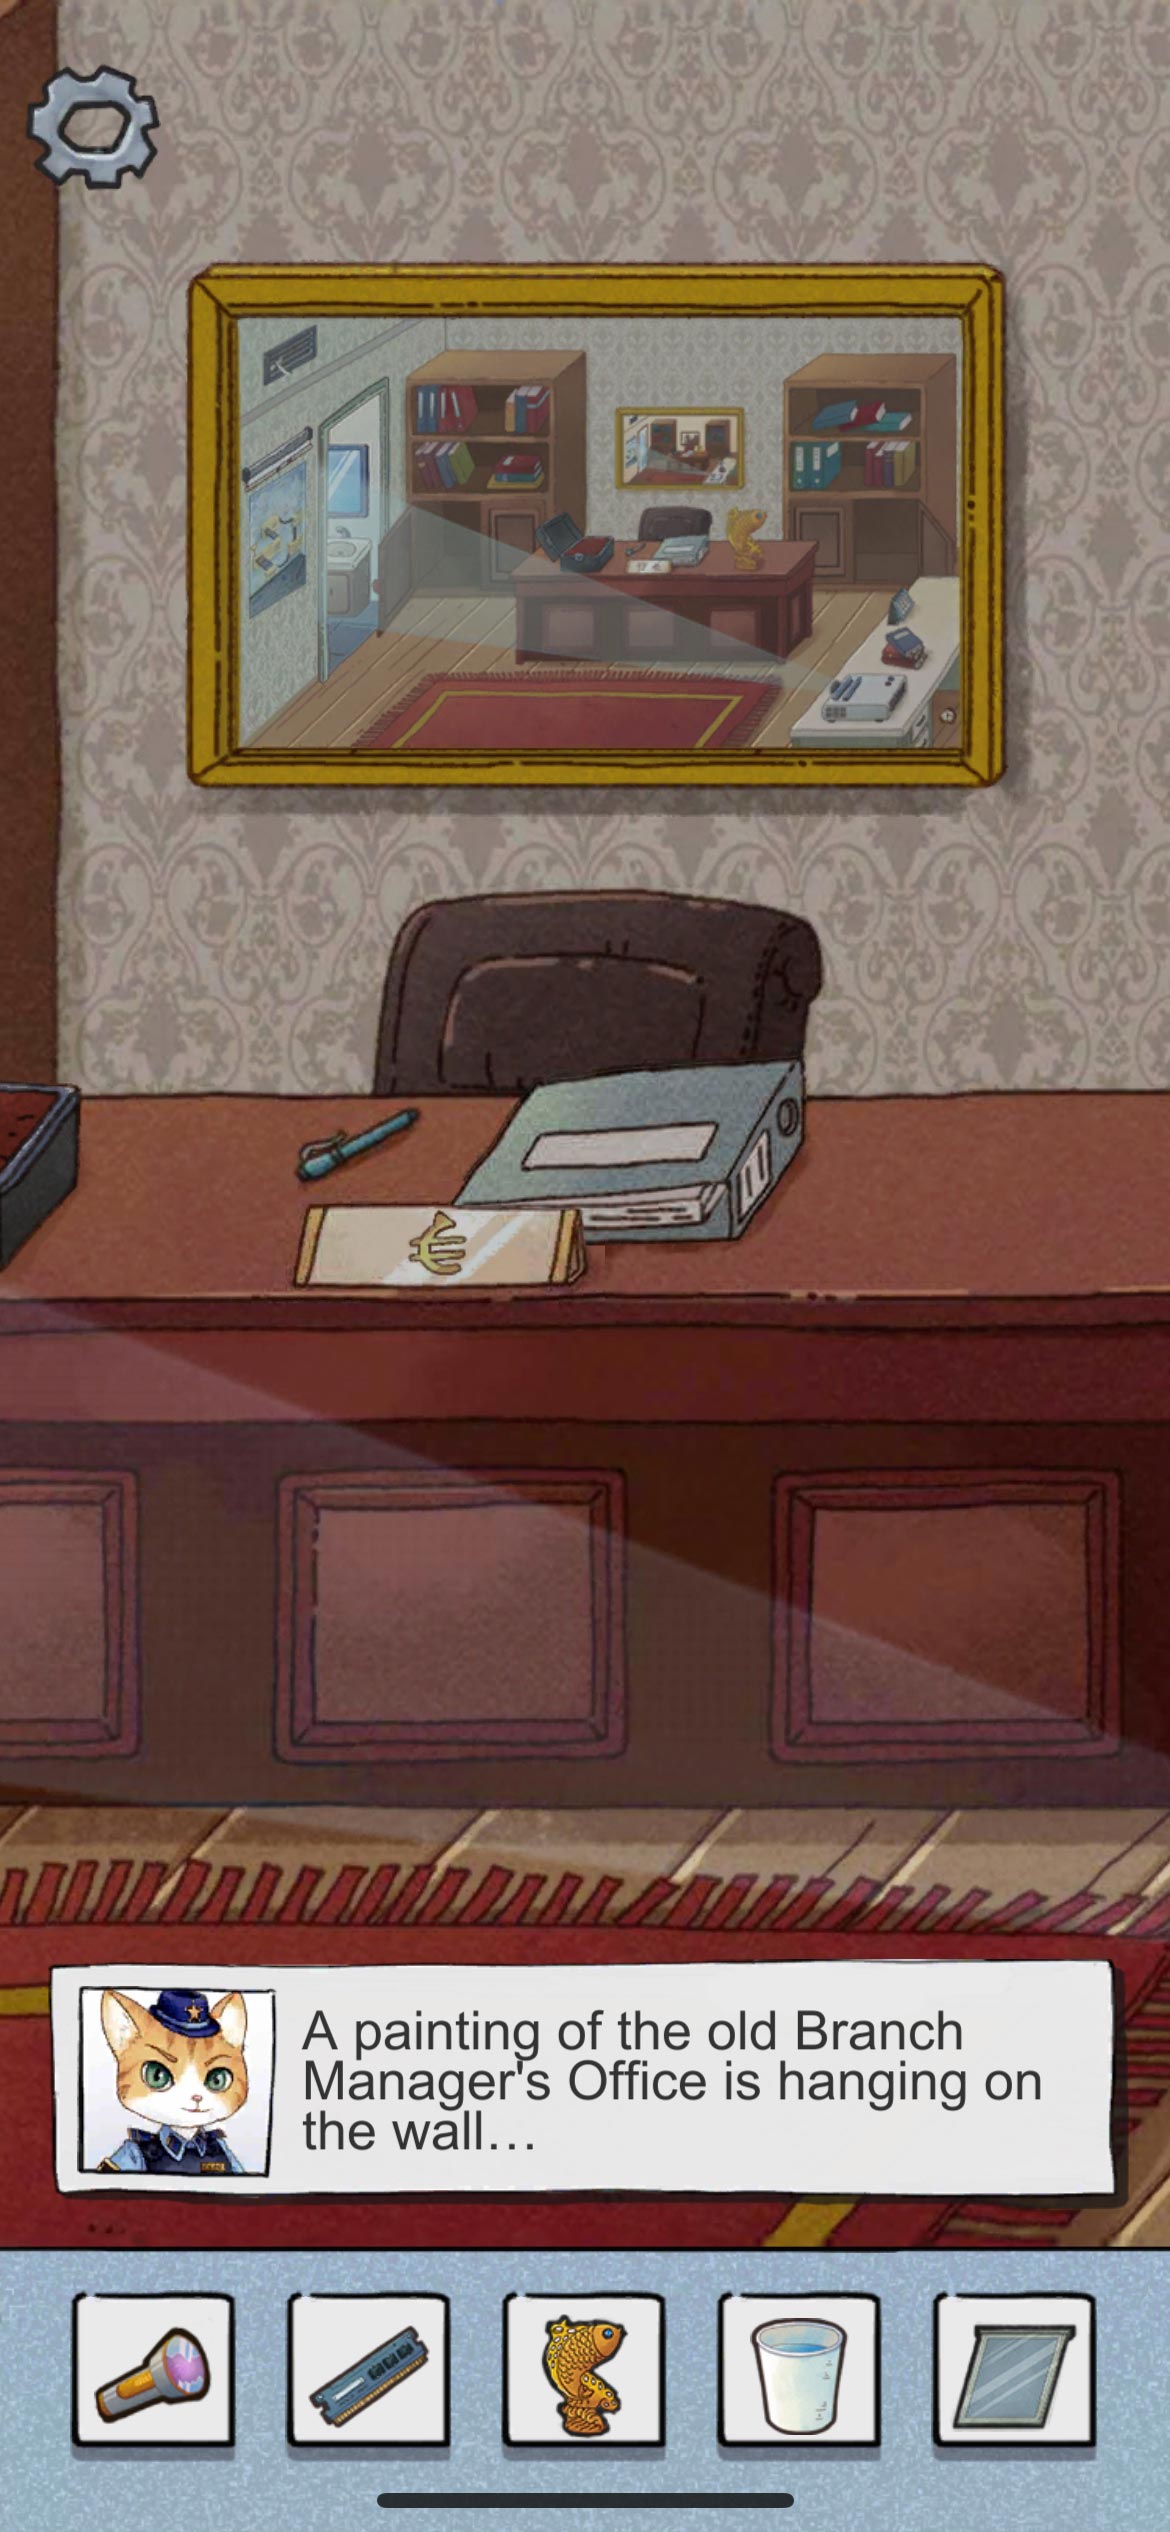
· President’s Office 1
In the president’s office. Check the file on his desk. There is a slide on the second page.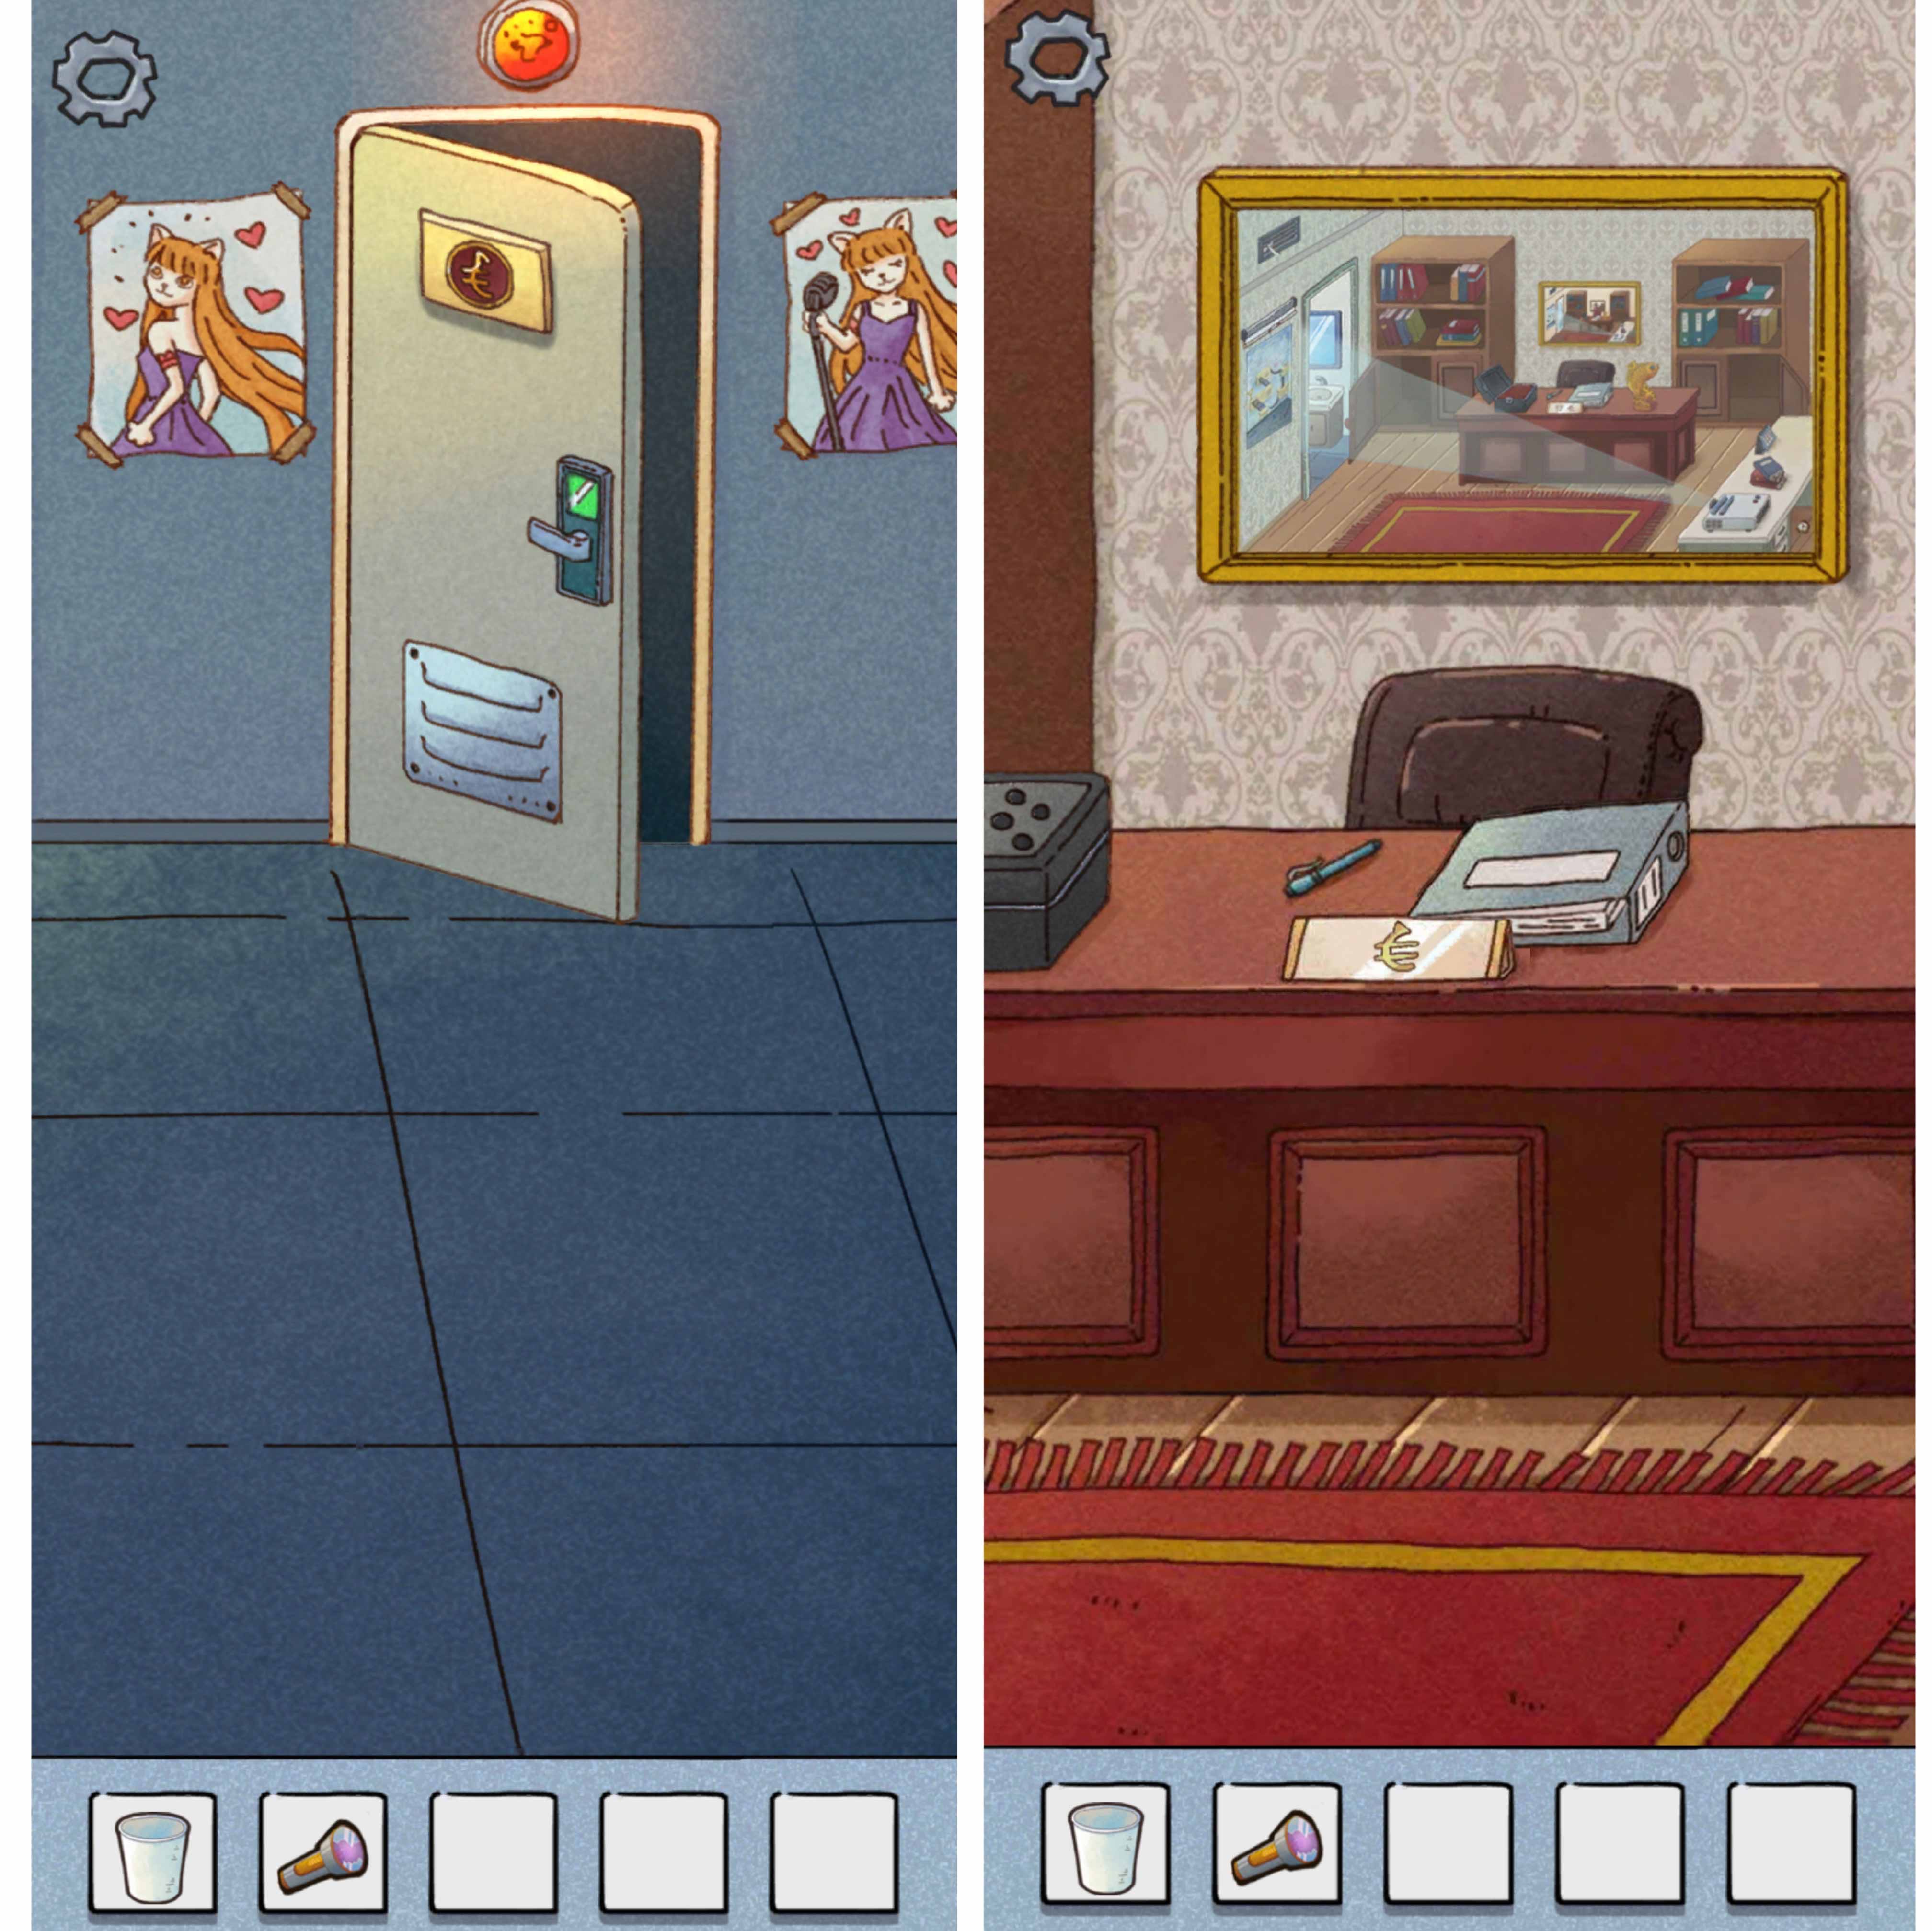
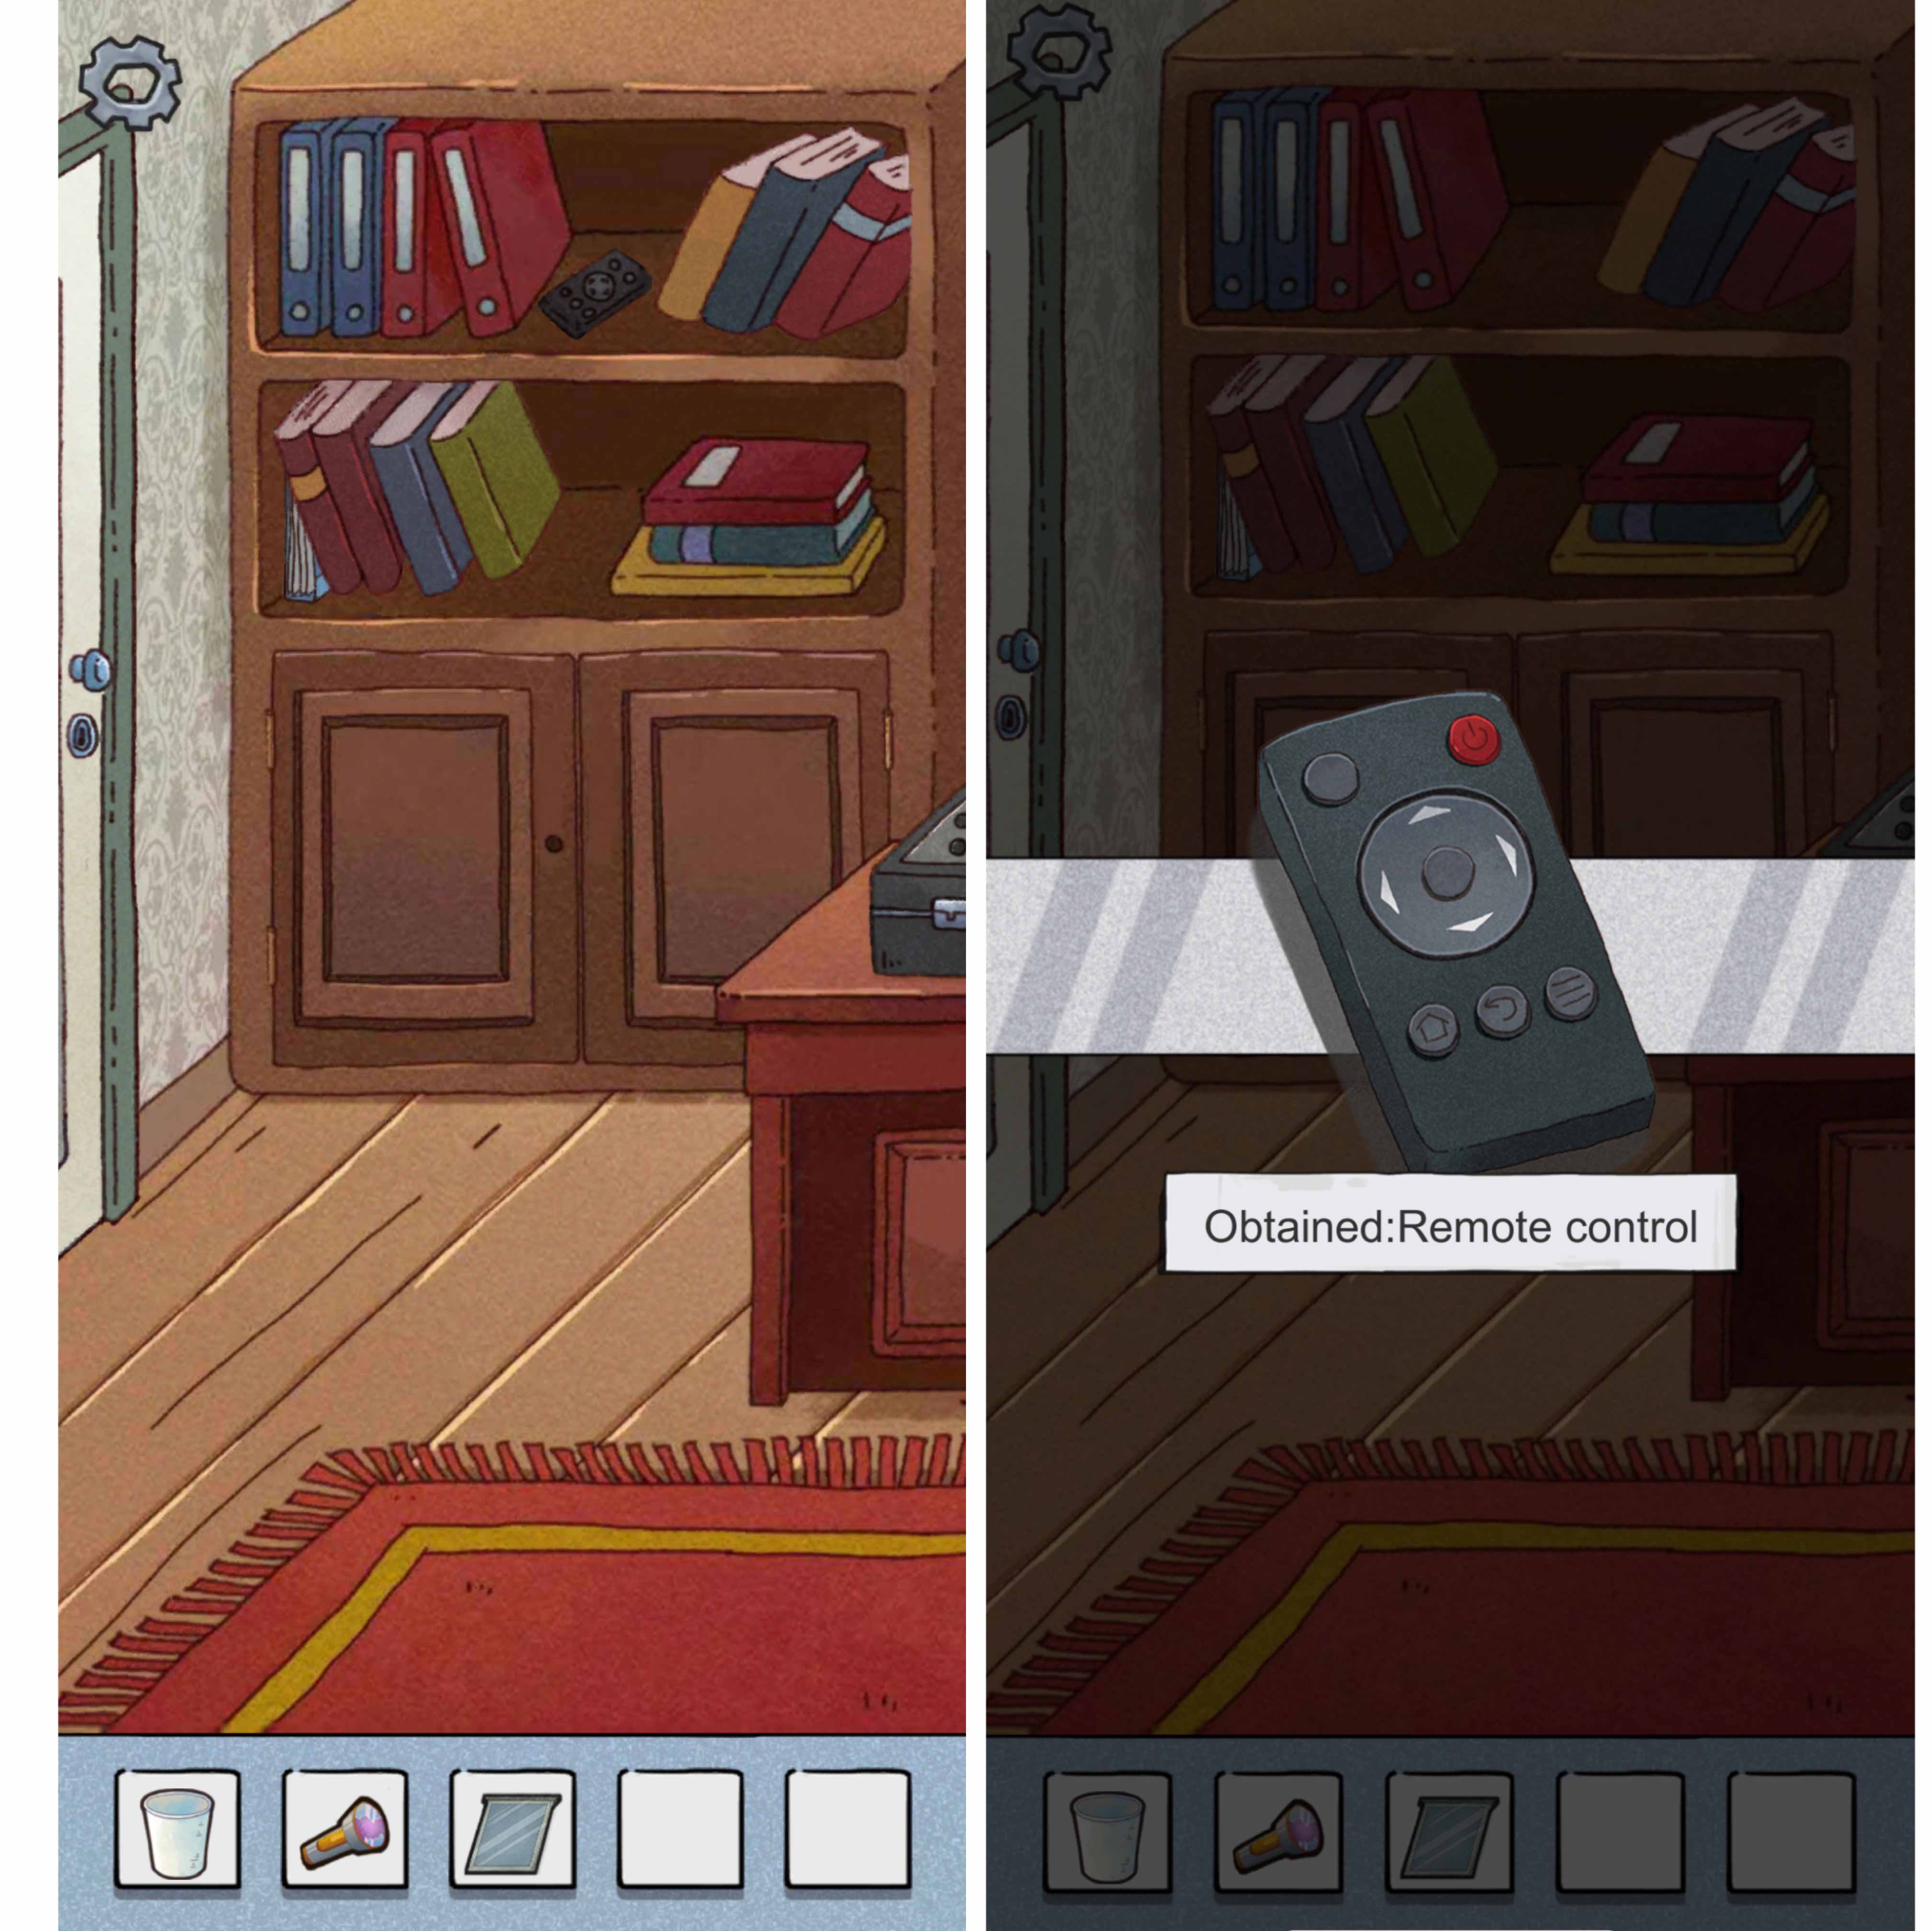
 Find the remote control on the shelf. And you can also find a memory stick.
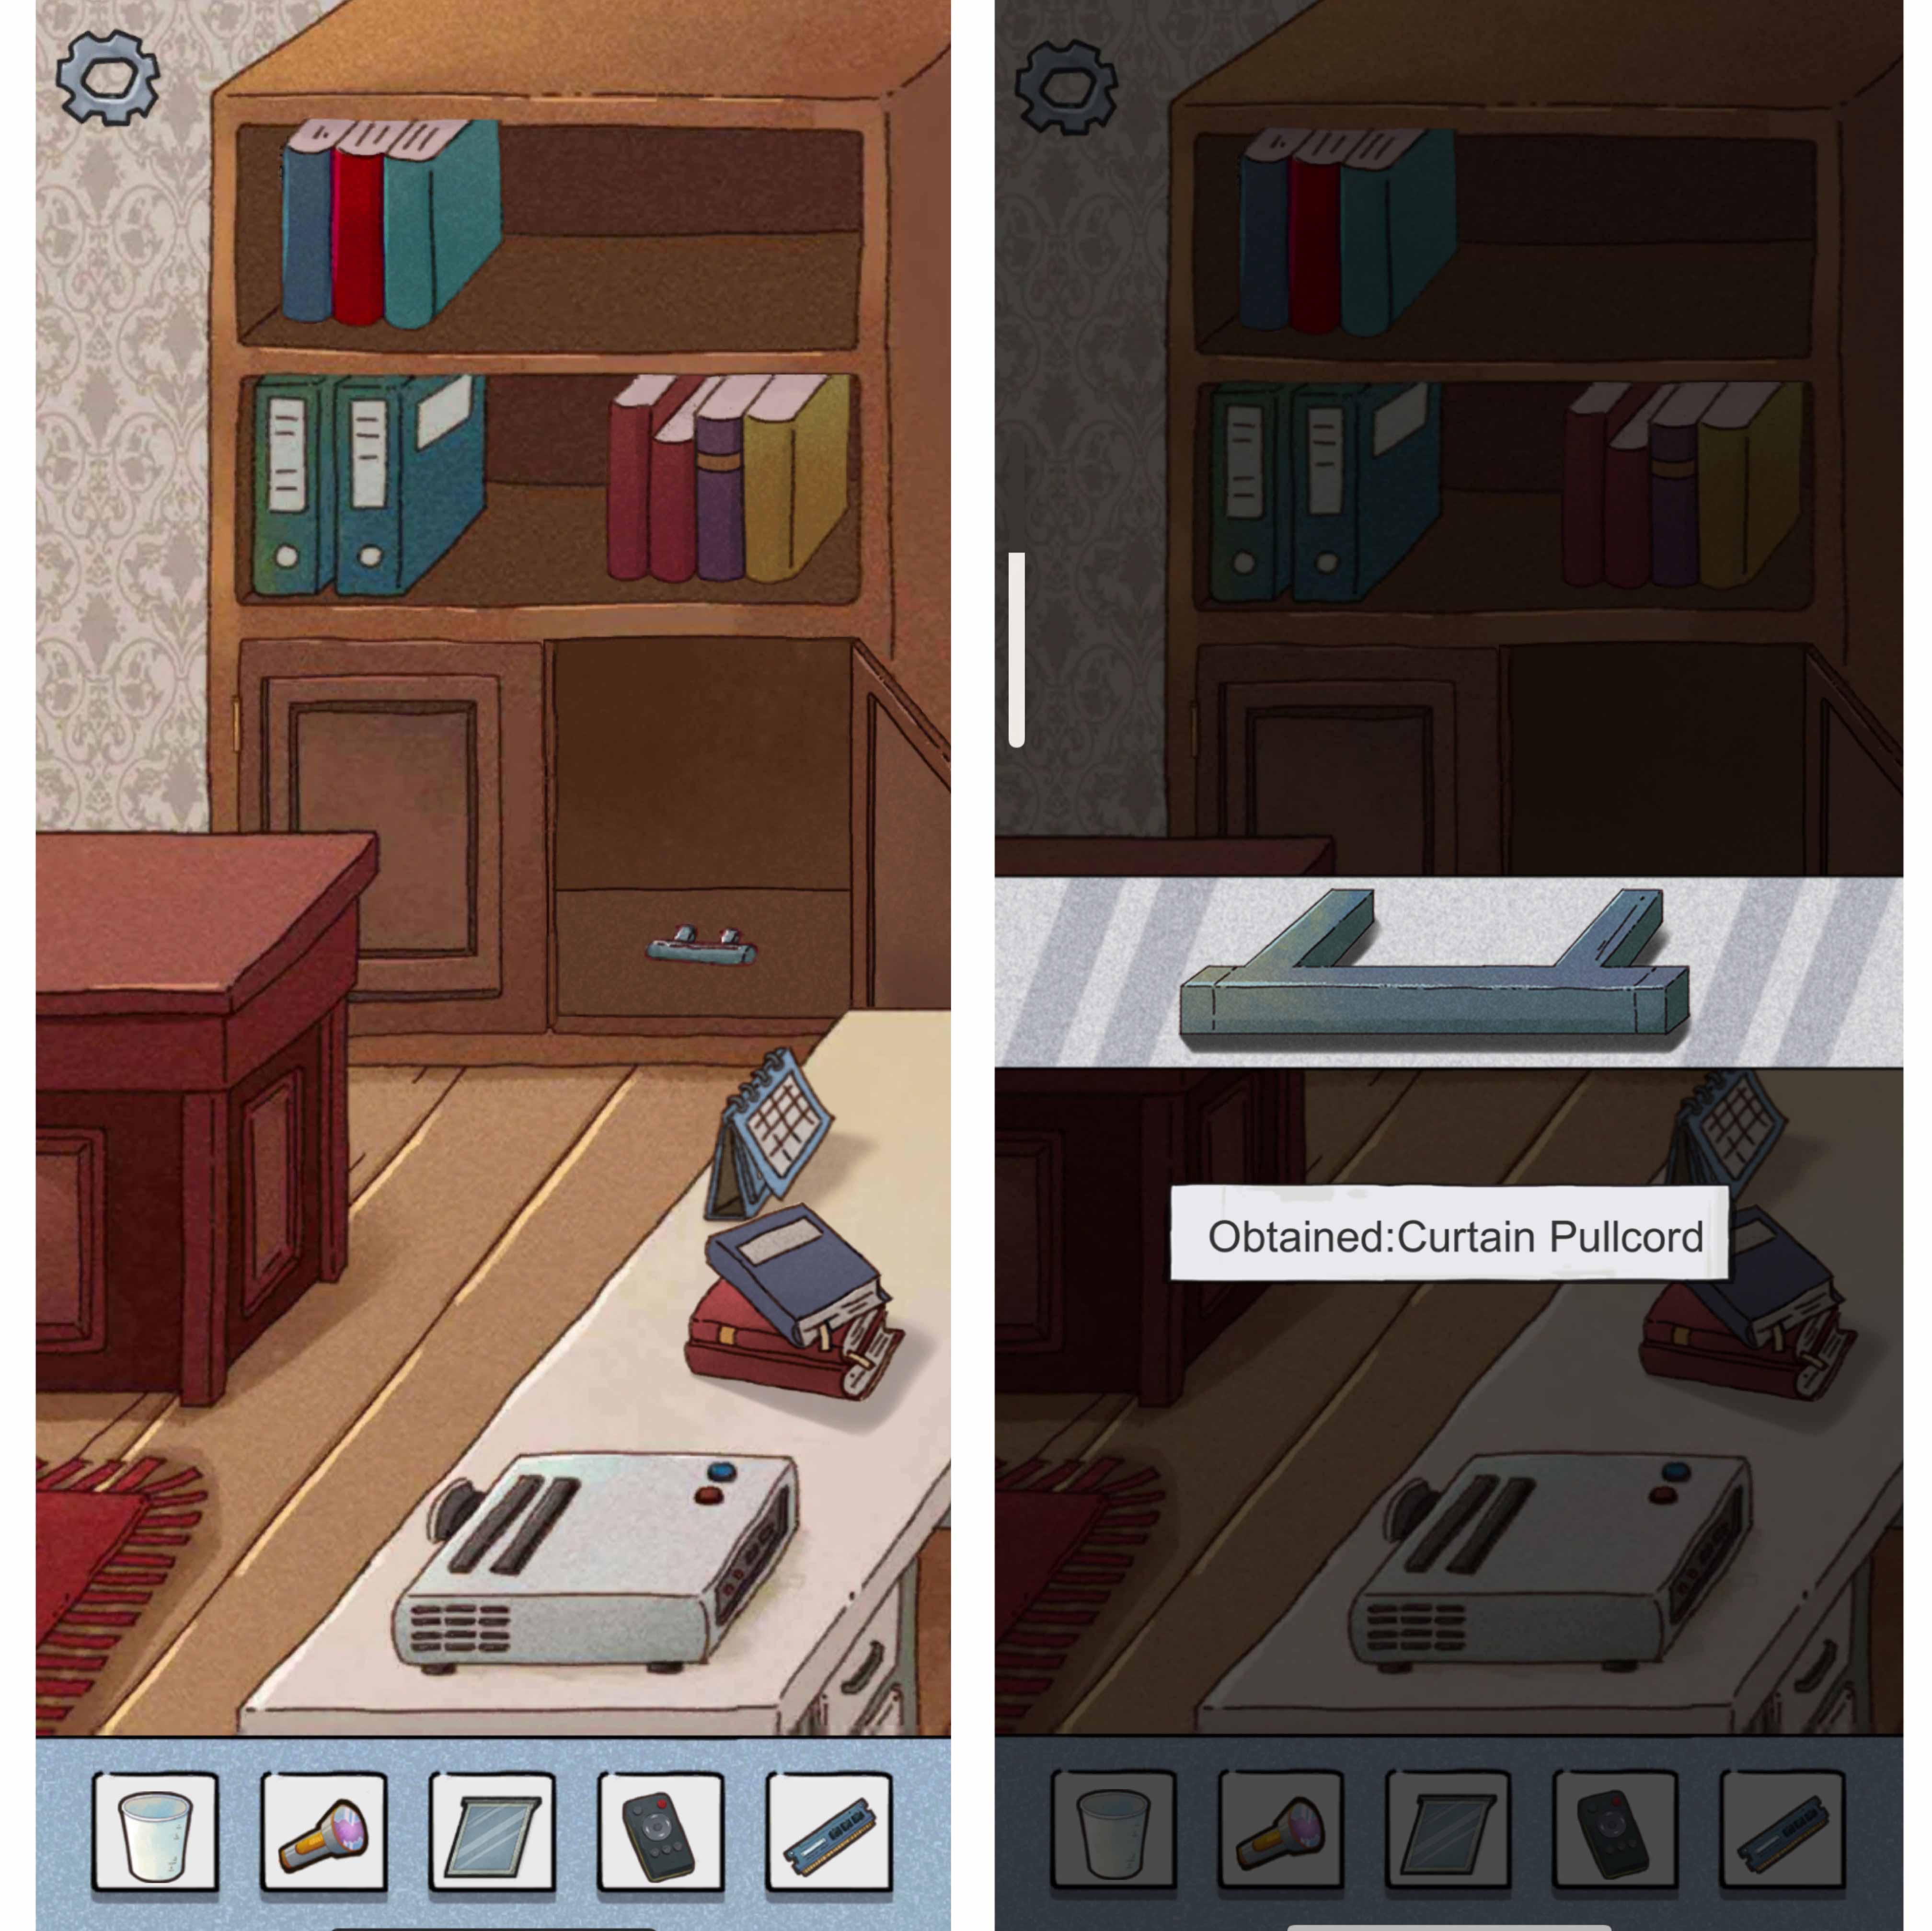
 Find the handle in the closet of the right shelf.
 Turn on the projector by using the remote control and insert the slide.
 Install the handle to the curtain and pull it down to a certain position where number 1-5 could be found near
these symbols: a cat head, a circle, a square, a heart and a pawn.
Install the handle to the curtain and pull it down to a certain position where number 1-5 could be found near
these symbols: a cat head, a circle, a square, a heart and a pawn.
 Find a box on the desk with a ball in it. Adjust your phone to roll the ball. Roll the ball to pass all 5 symbols
in the sequence of: circle, heart, cat head, square and pawn.
Find a box on the desk with a ball in it. Adjust your phone to roll the ball. Roll the ball to pass all 5 symbols
in the sequence of: circle, heart, cat head, square and pawn.
Then you get the key to the washroom.

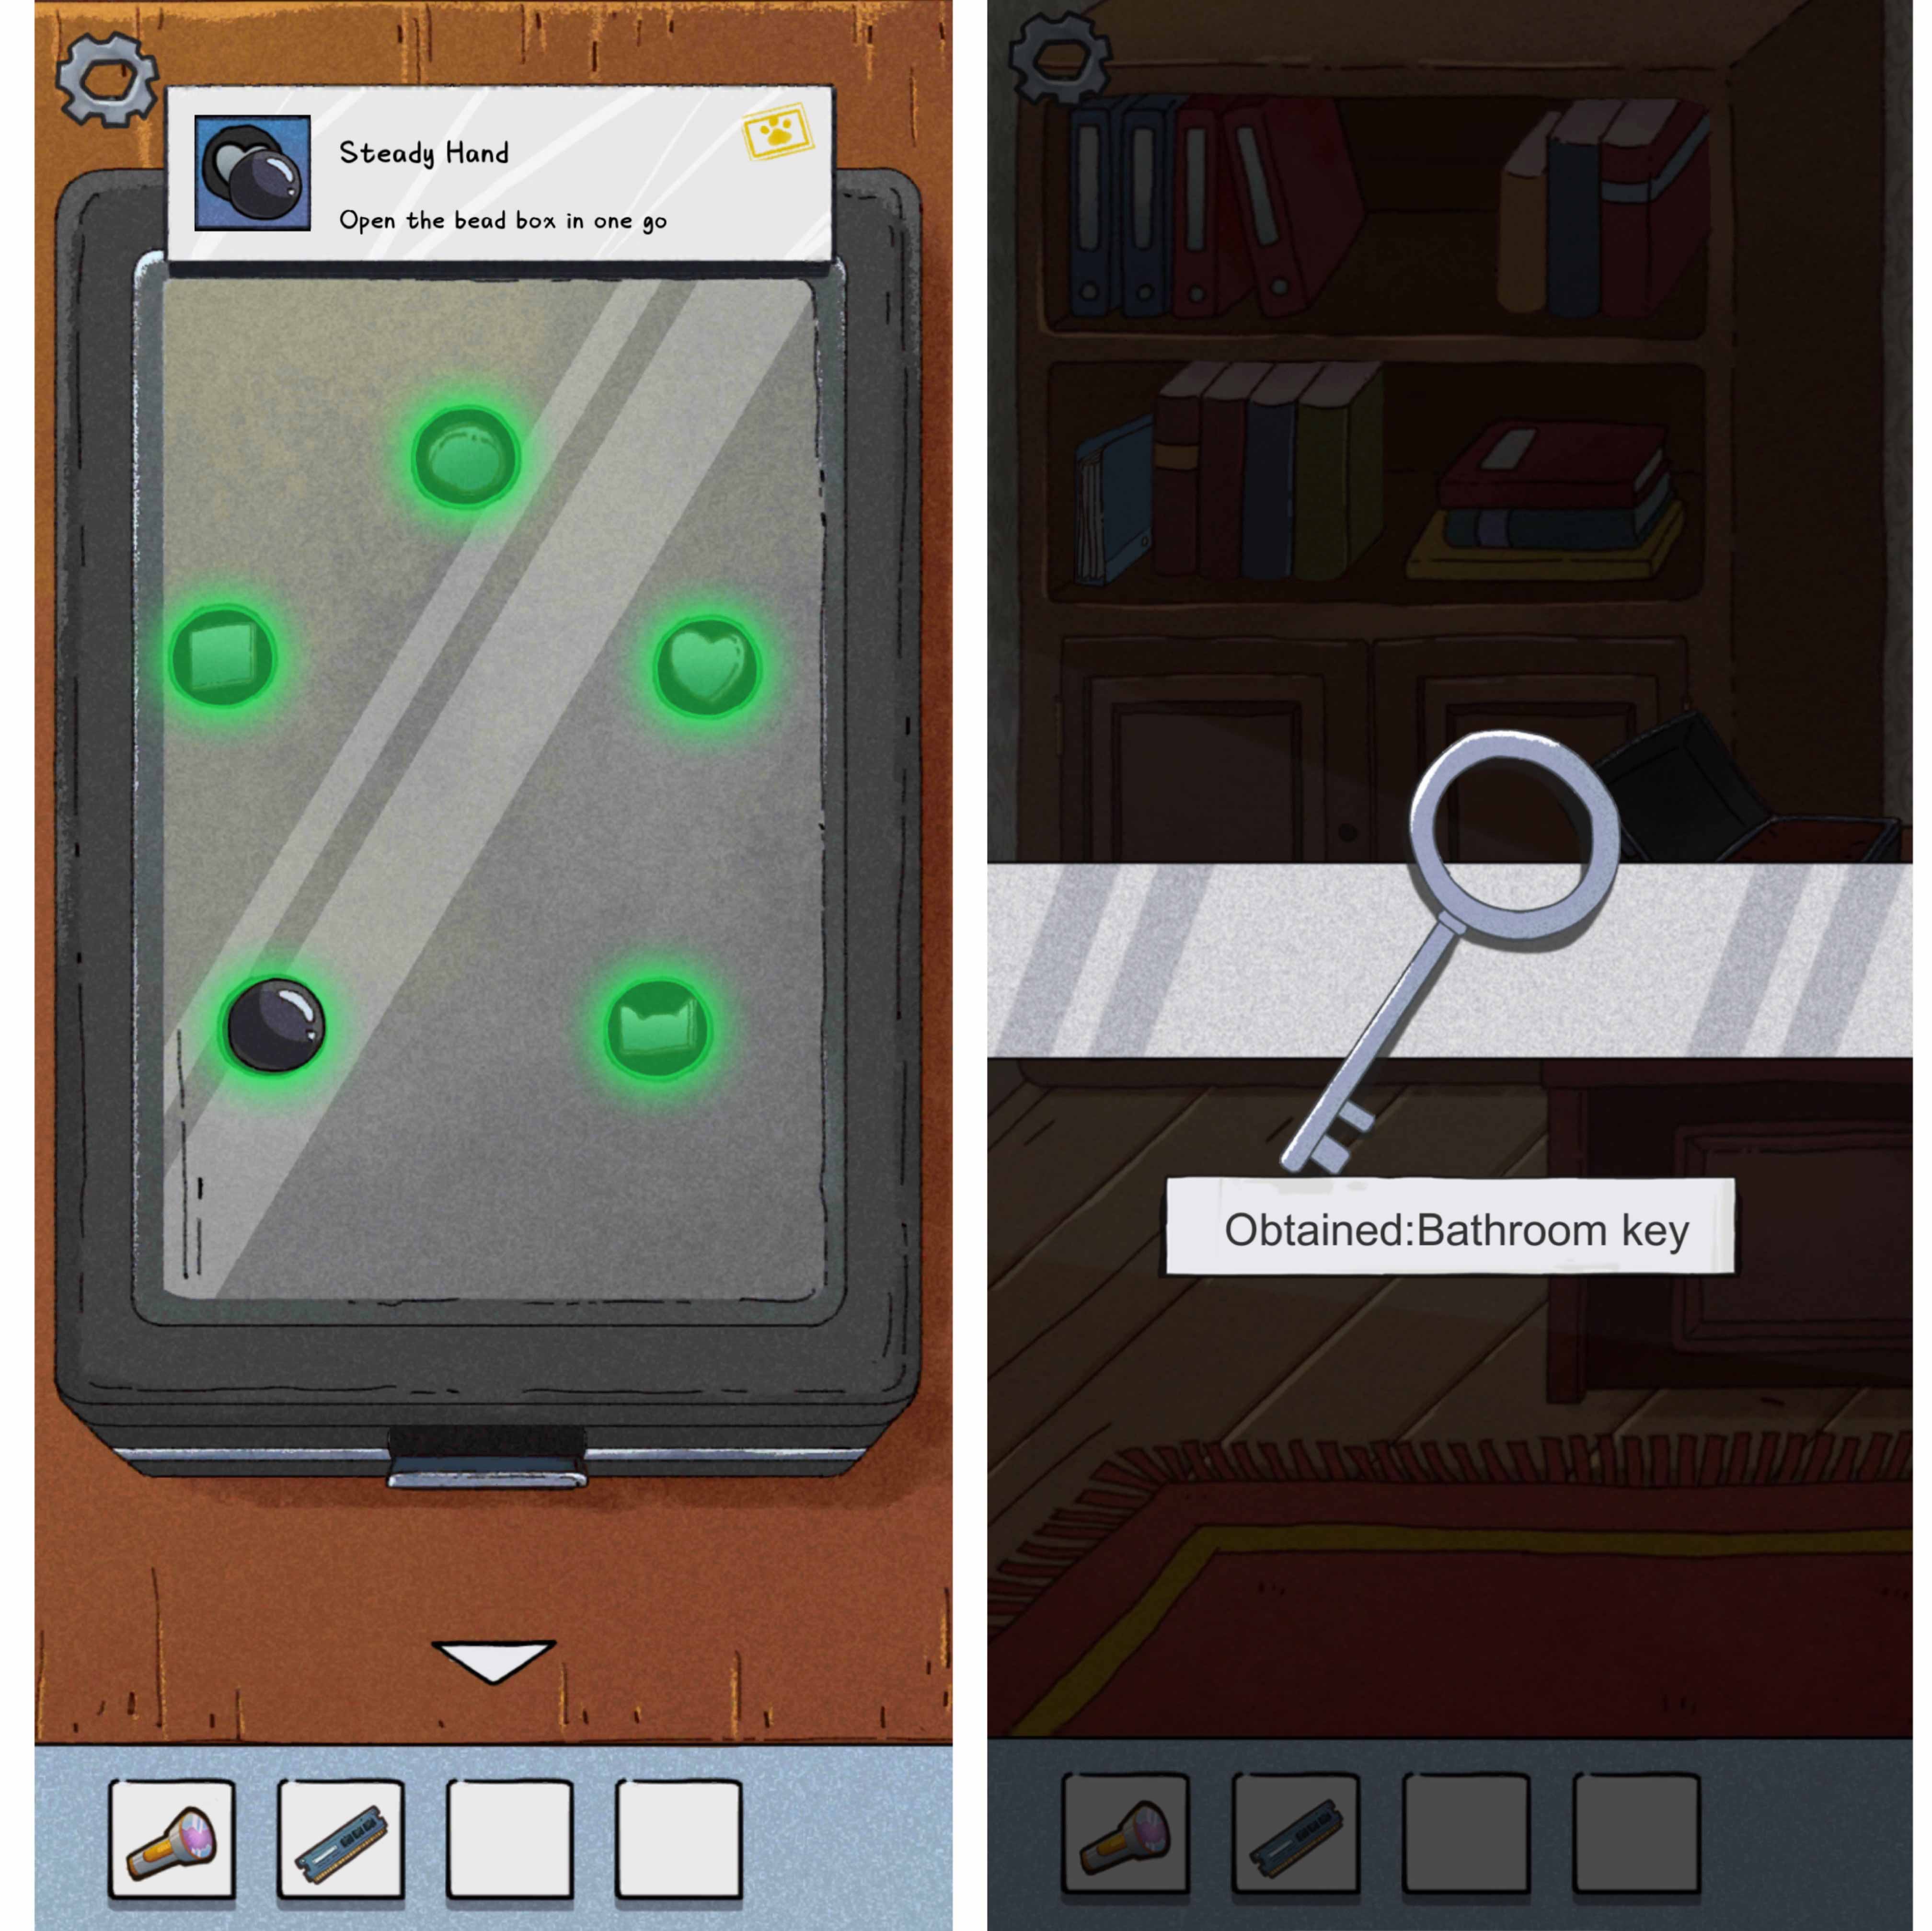
· Toilet
Open the desk below the mirror. You will find a shovel and a red handle.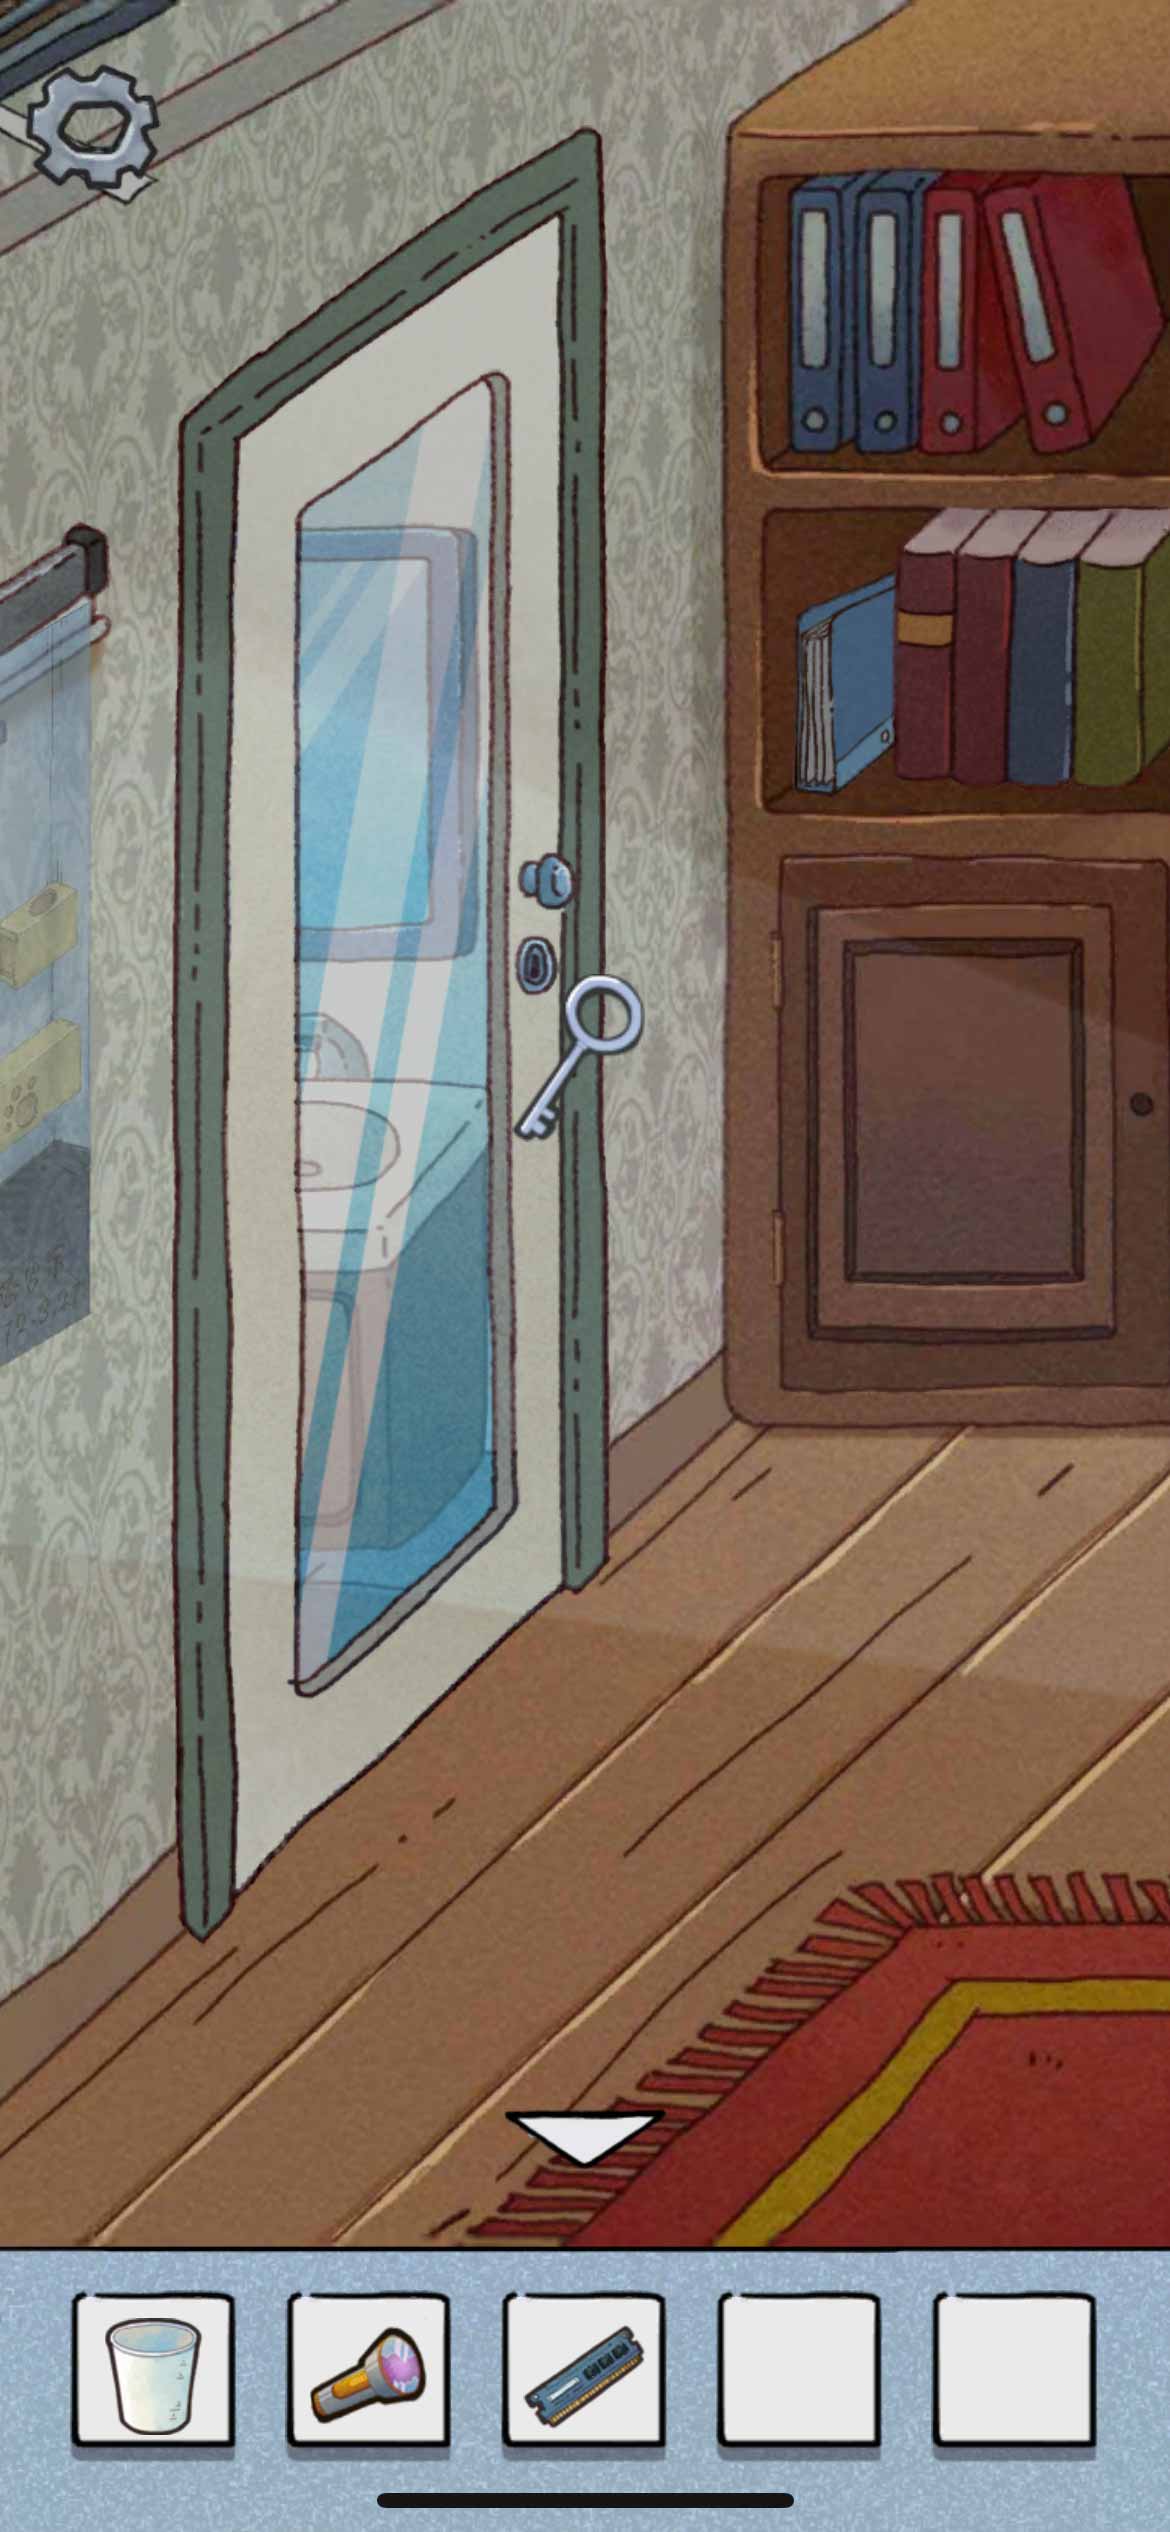
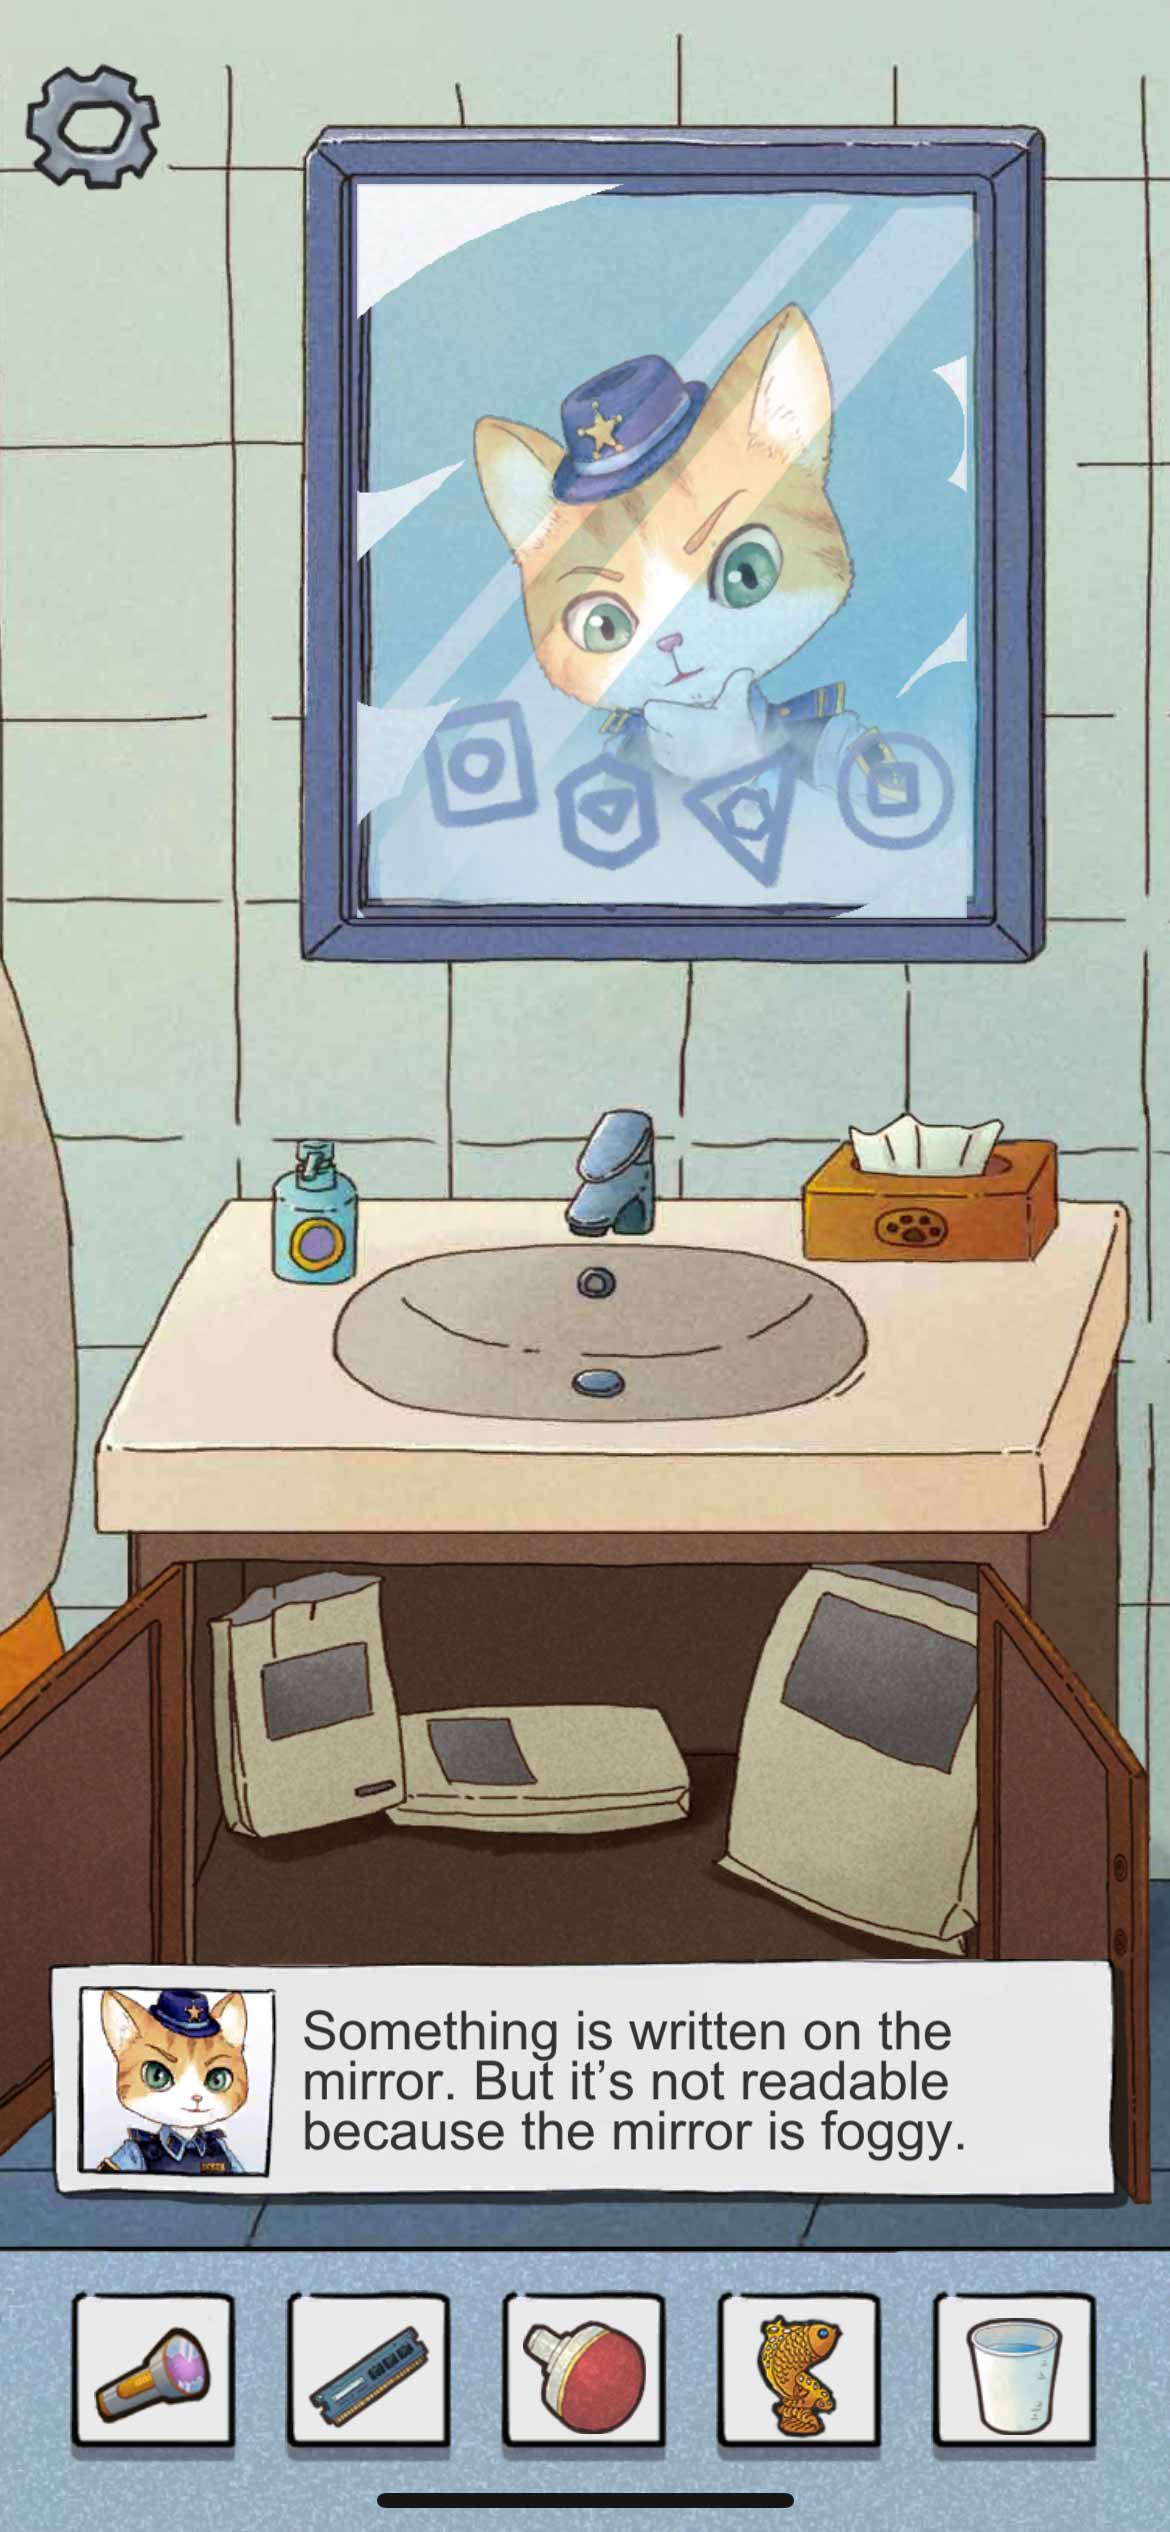
 Use the shovel to the cat litter sand and find a golden fish statue.
 Open the tap and use the empty cup to get a cup of water.
 Wipe the mirror to find combined symbols.
· President’s Office 2
Back to the office. Use the red handle to open the closet in the left shelf. Move 4 icons to their right positions according to the hints from the mirror. And you will get the second slide.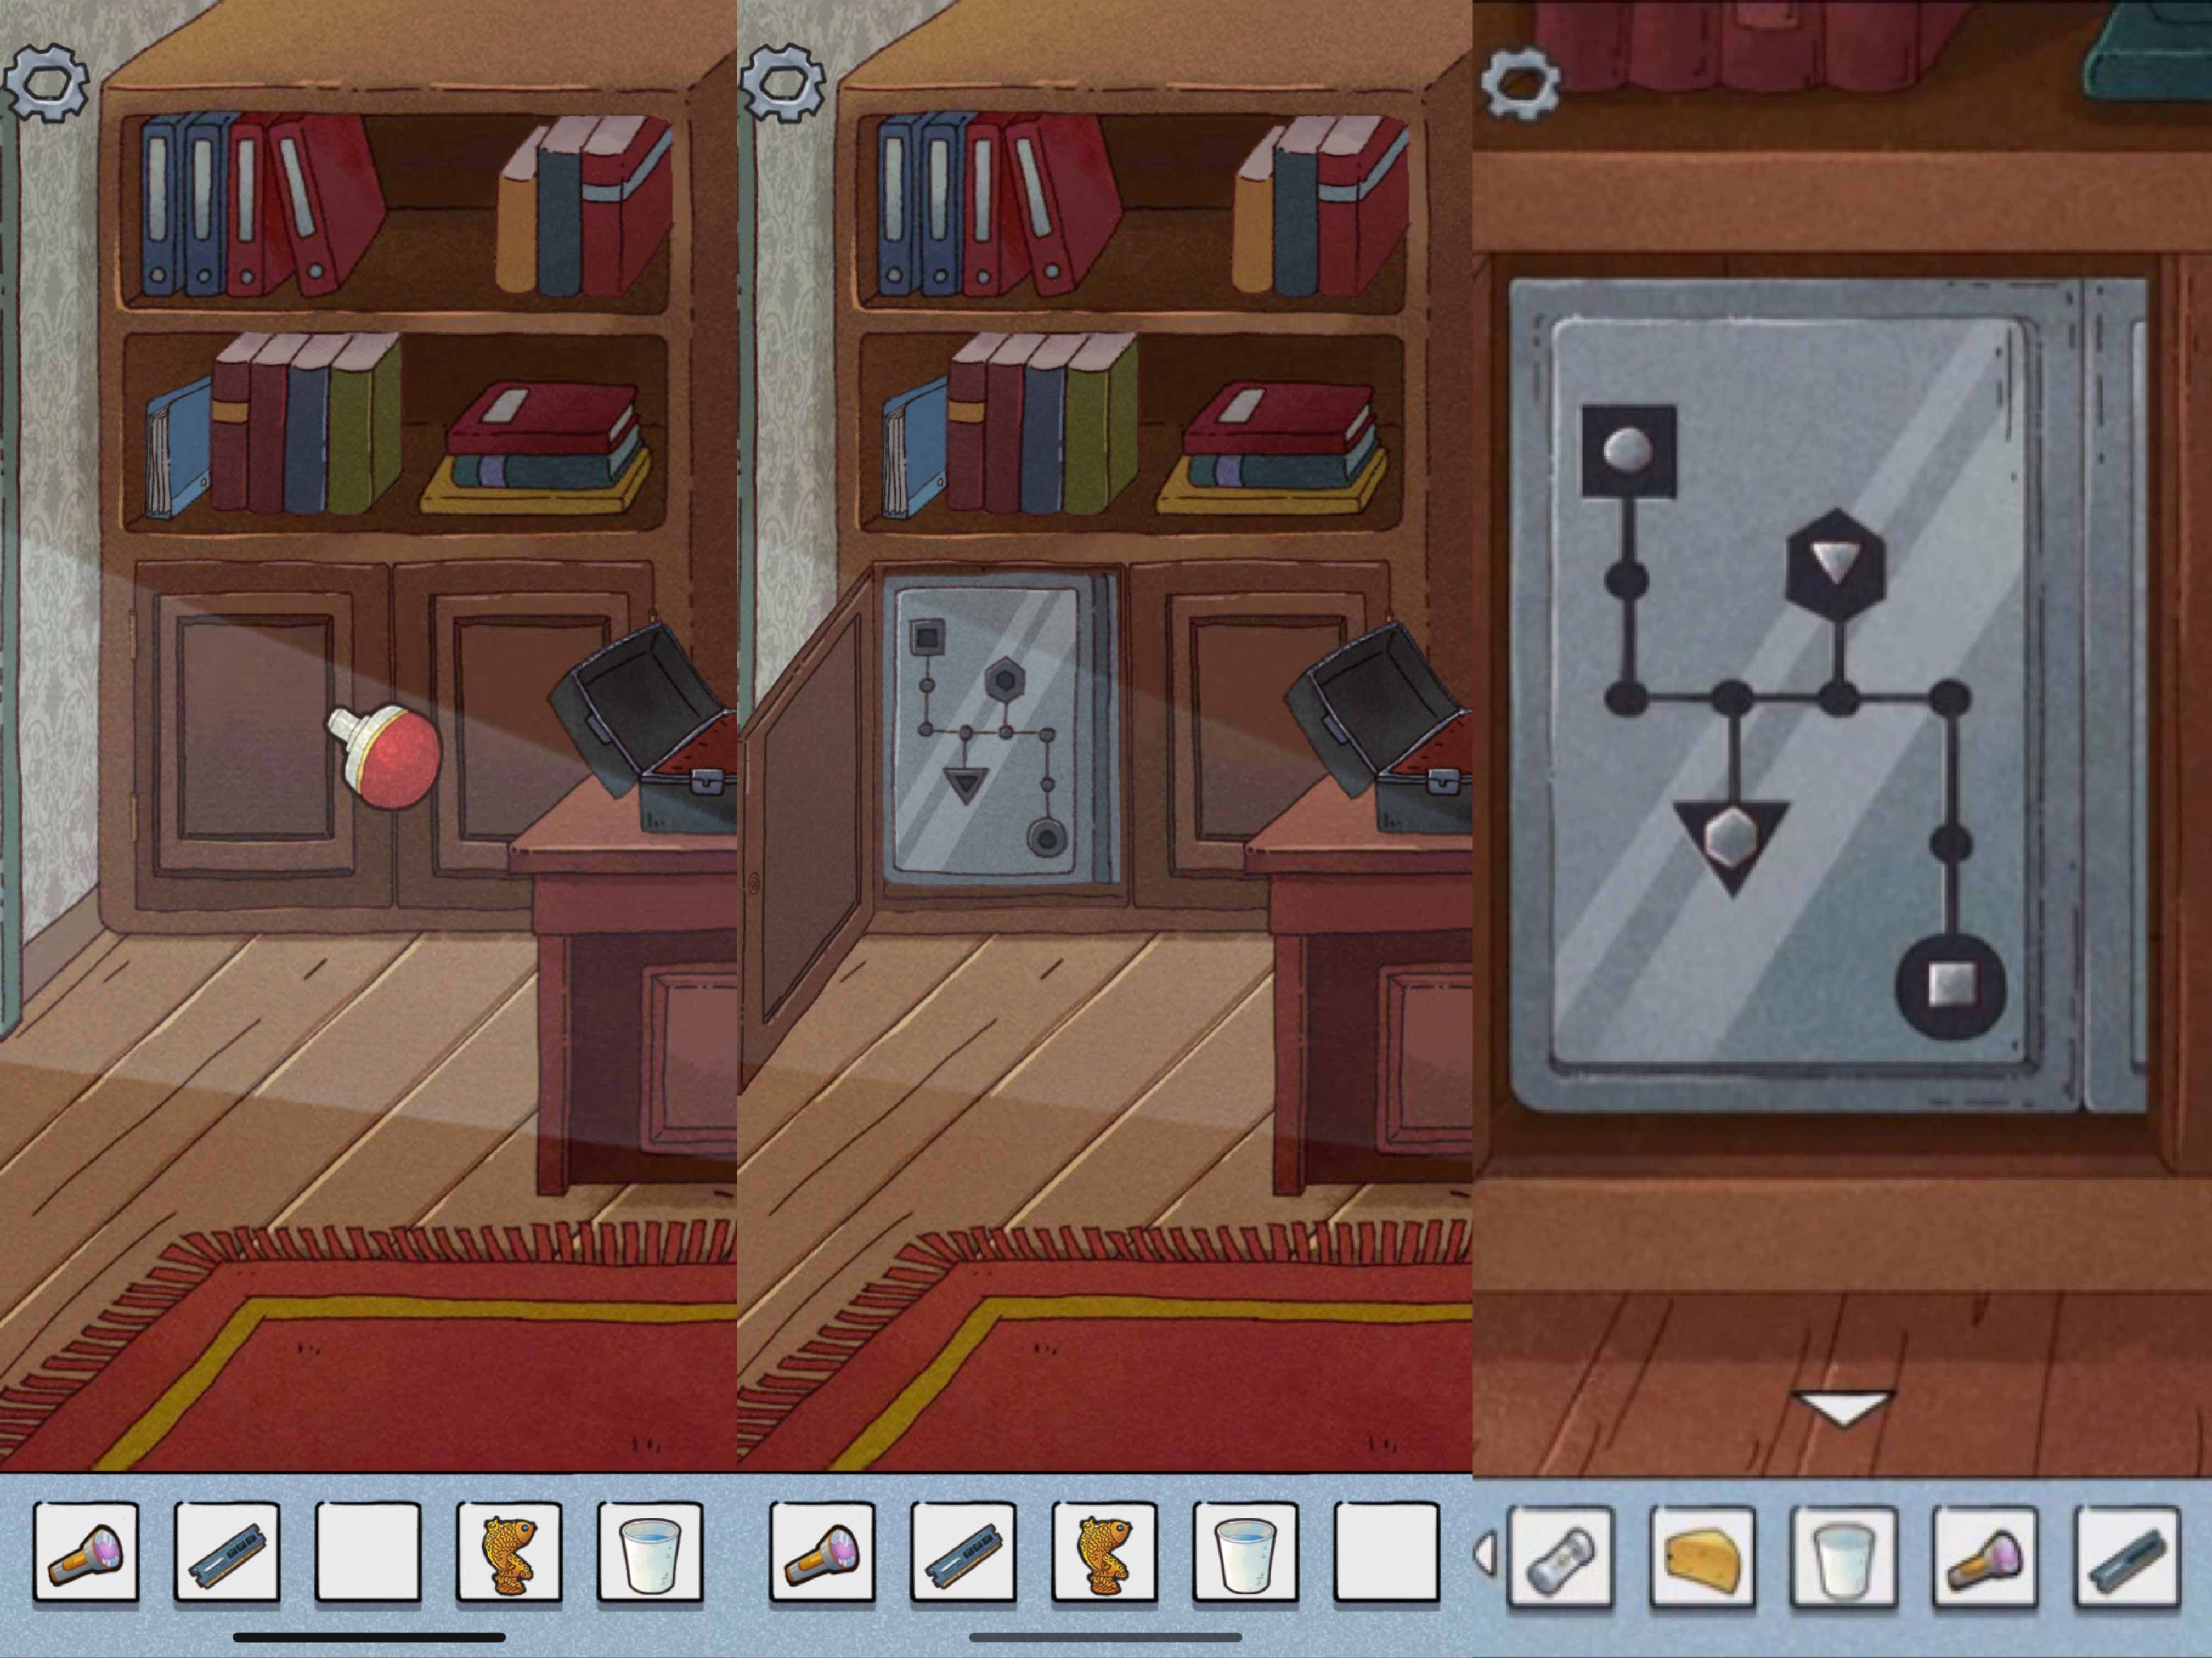
 Check the portrait on the wall of the office. Put the golden fish statue on the desk and adjust books on shelves
just as the way it looks like in the portrait.
Check the portrait on the wall of the office. Put the golden fish statue on the desk and adjust books on shelves
just as the way it looks like in the portrait.
 The portrait will move away and reveal a box in the wall.
 Insert the second slide and pull the screen curtain again to a position where a circle would encircle the cat
head.
Insert the second slide and pull the screen curtain again to a position where a circle would encircle the cat
head.
 Image on the screen will show a structure that you can find a start arrow and an end line. From the start to the
end, the number shows code 8314.
Image on the screen will show a structure that you can find a start arrow and an end line. From the start to the
end, the number shows code 8314.
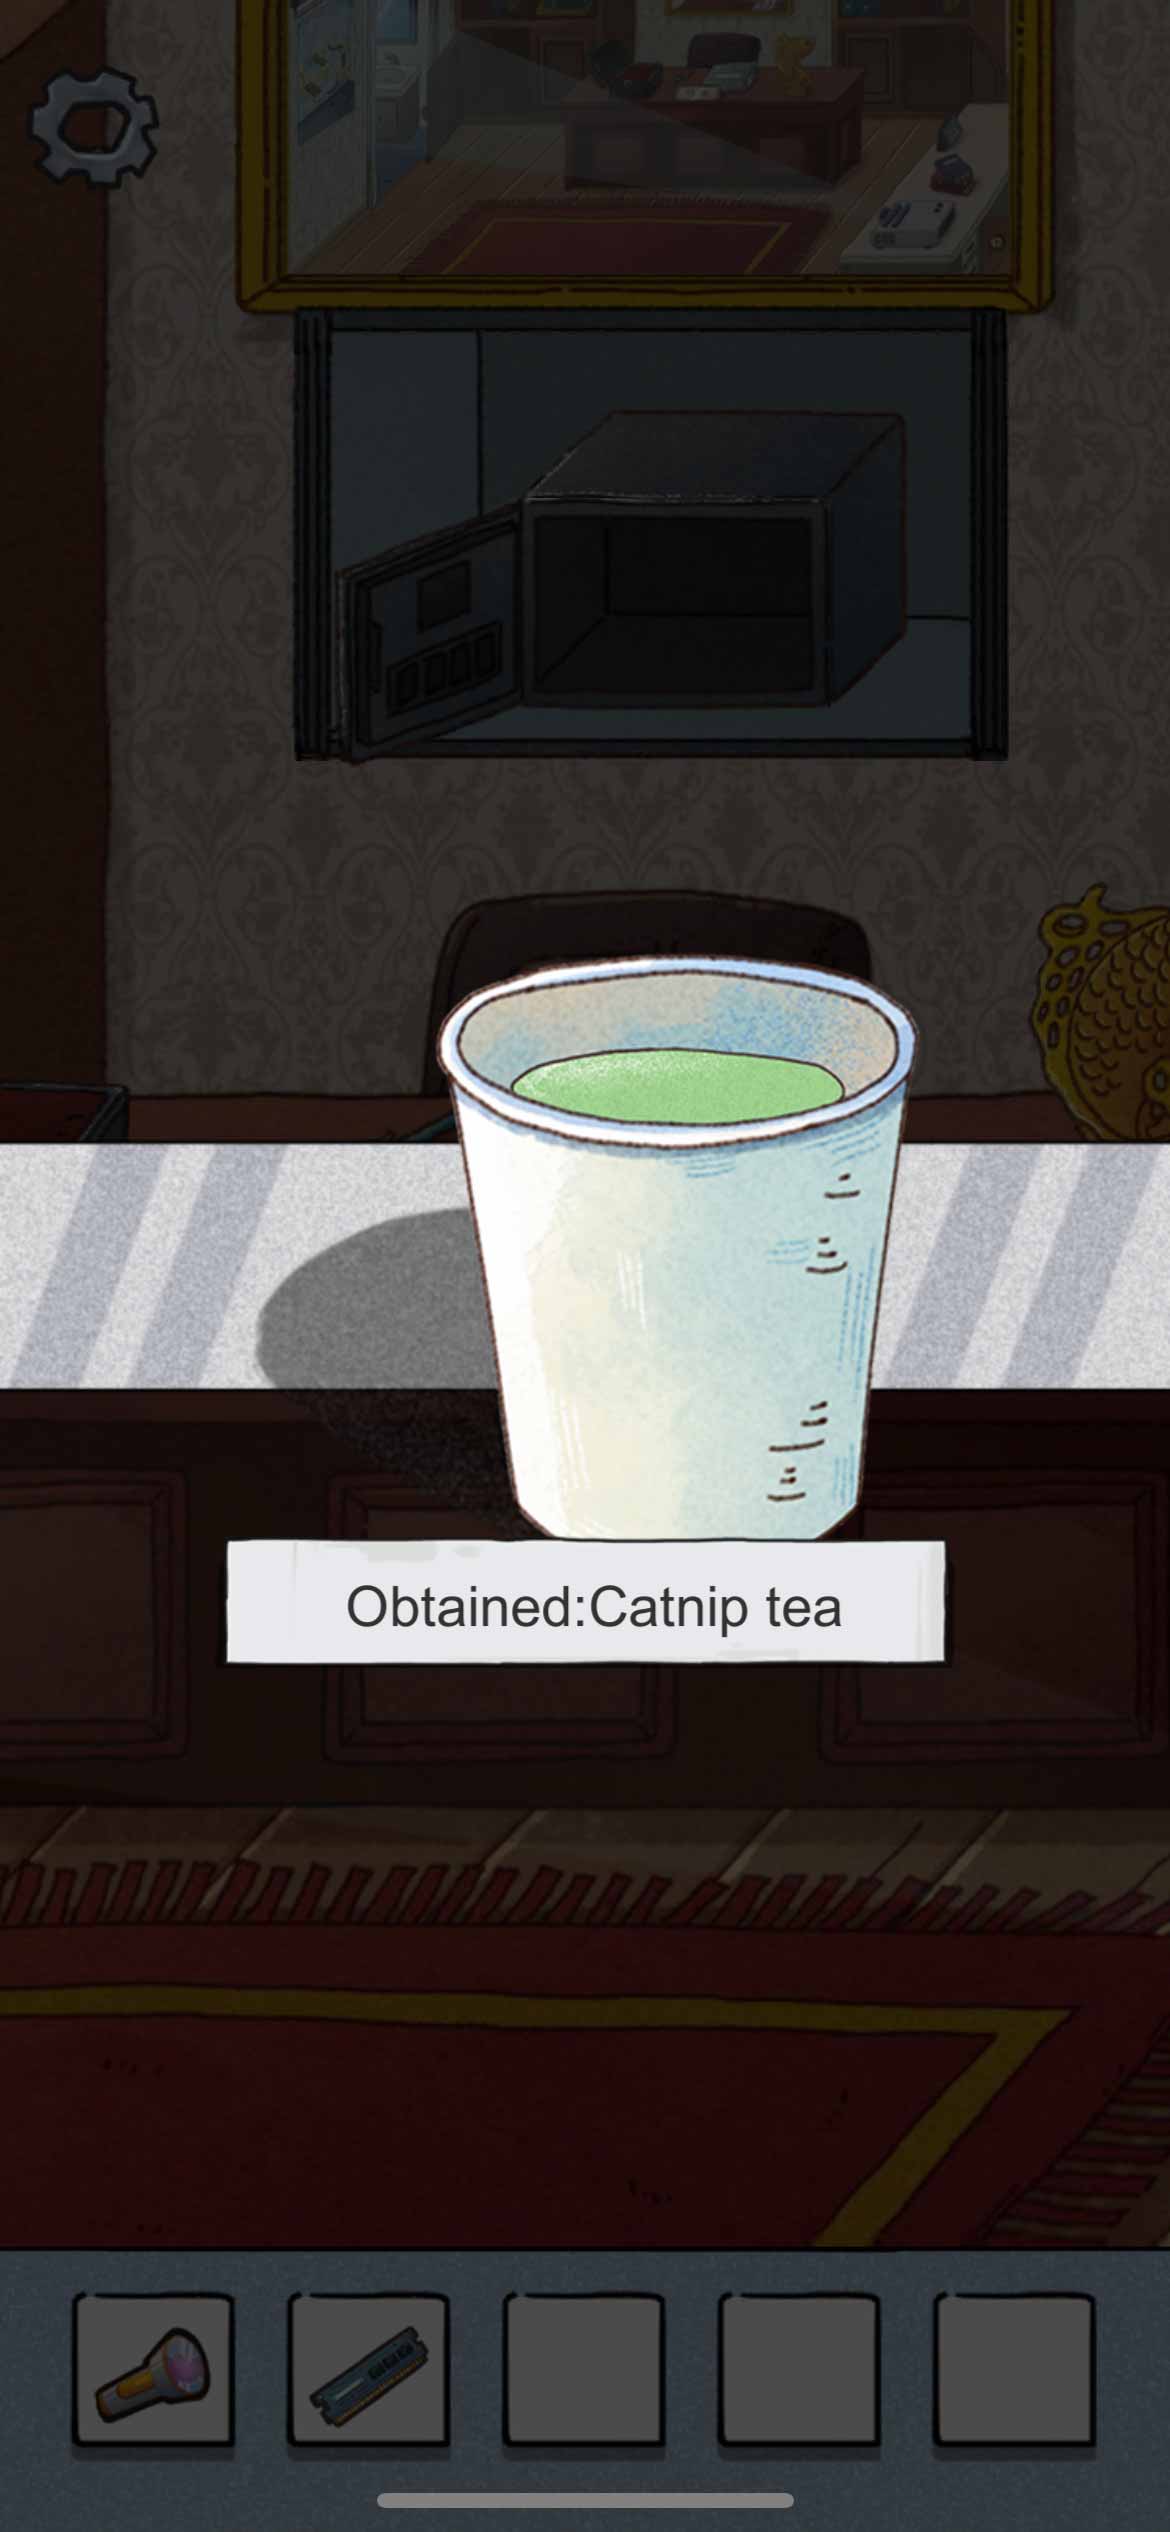
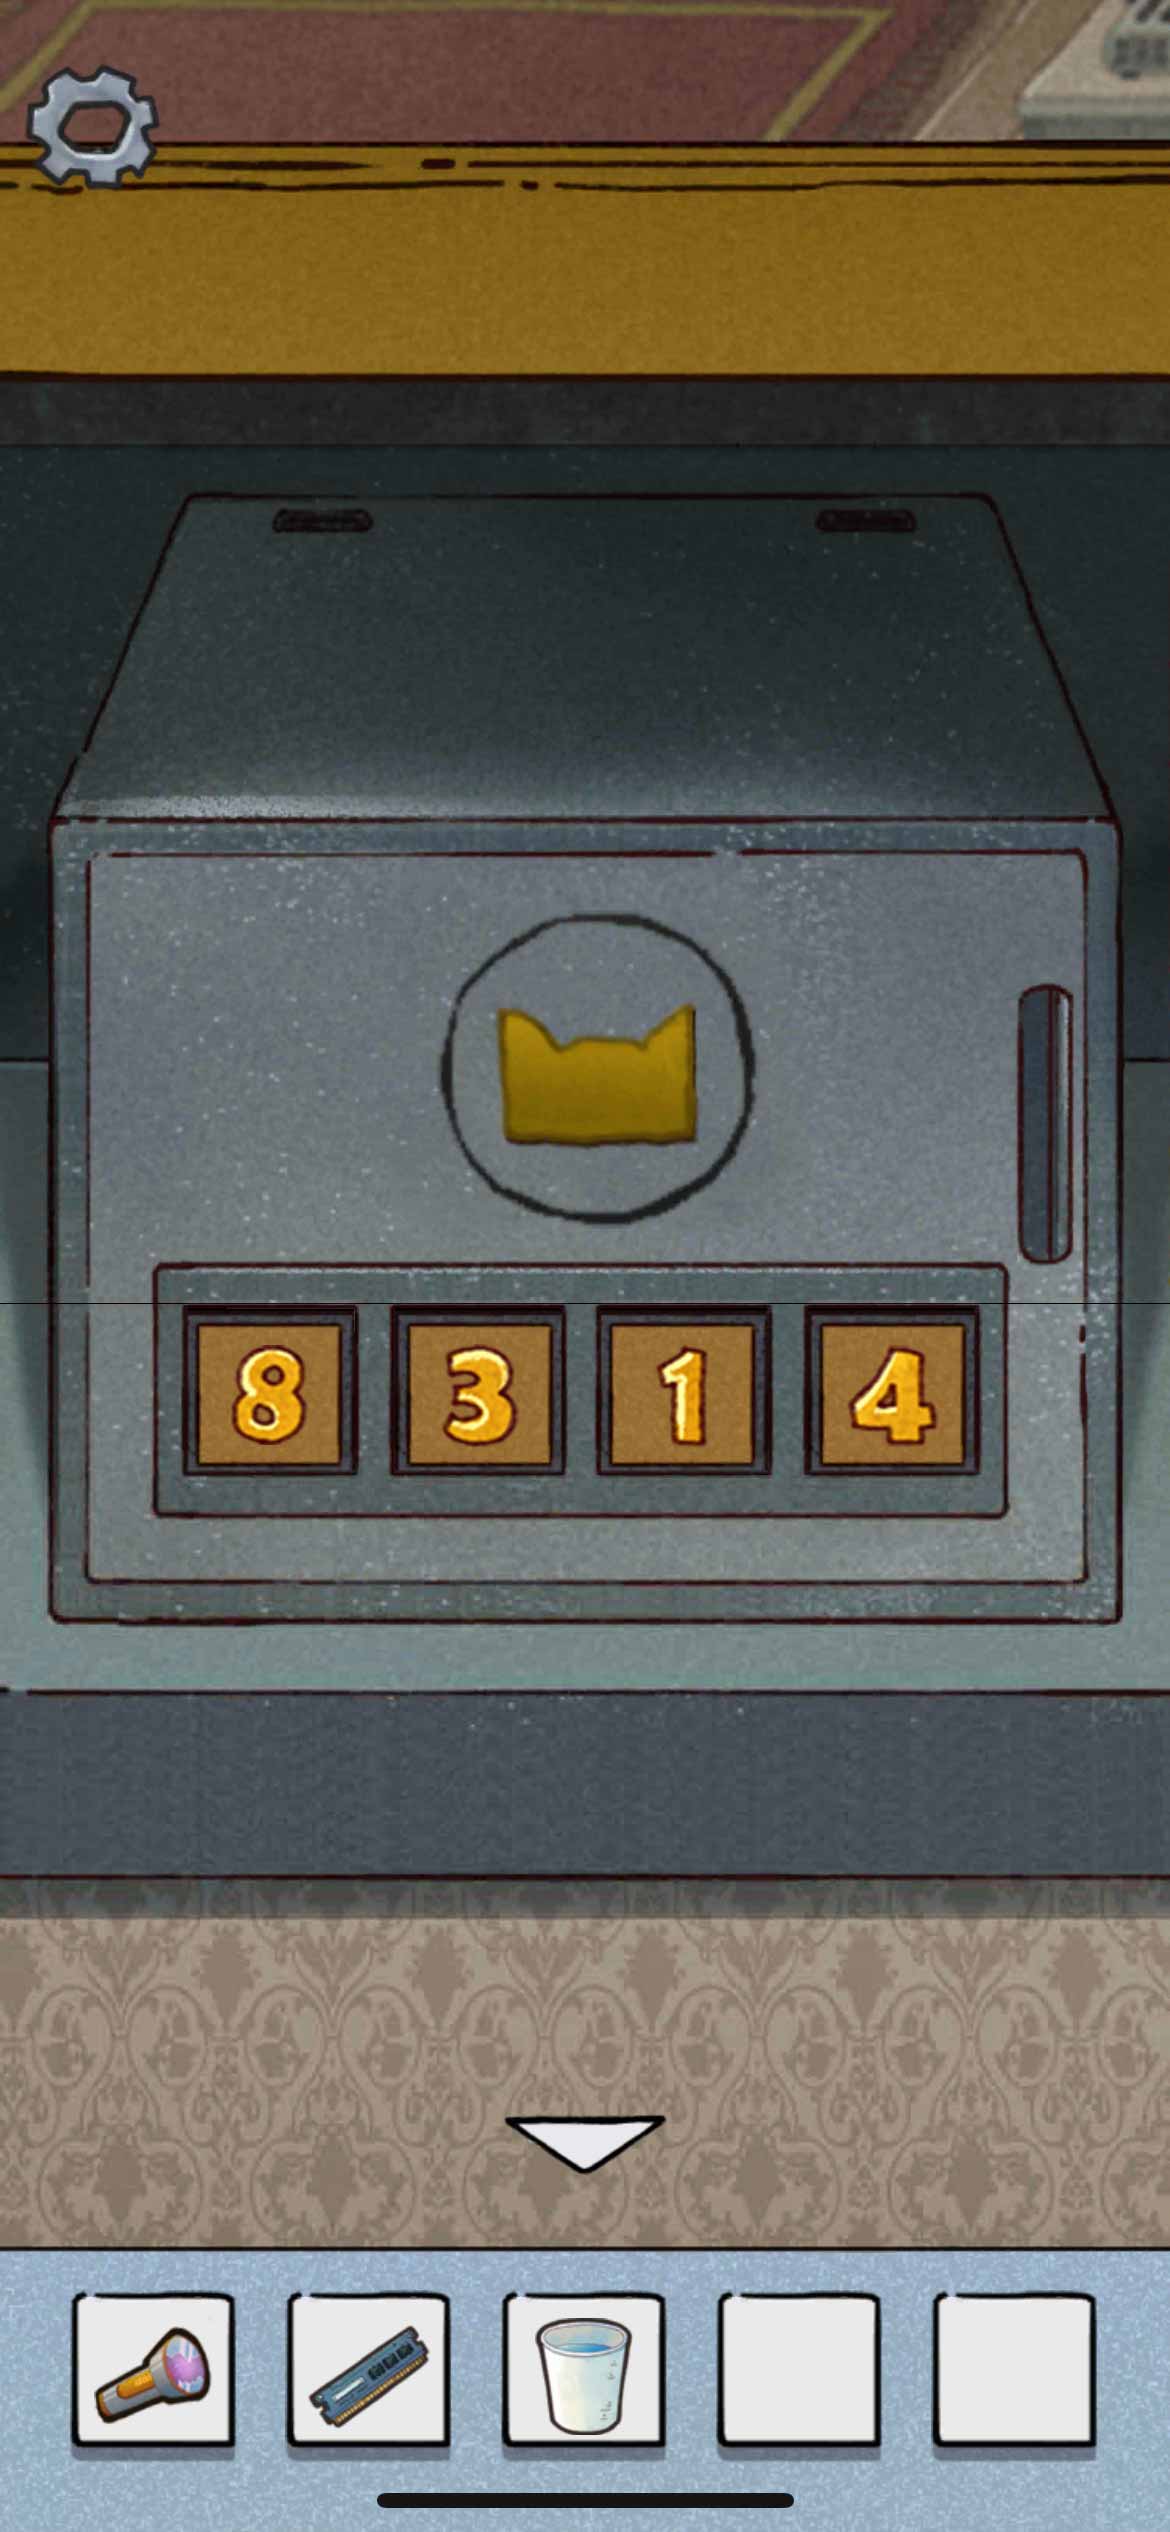 Enter the code and open the box, you get a can of catnip.
 Put the catnip into the cup of water. You get catnip tea.
· Surveillance Room
Give the catnip tea to the security cat. He uses his nose to open the monitoring room and then blacks out due to drinking too much catnip. It requires 4 chips to fix security monitors.
 Go to the servers’ room. Give the engineer cat your used flashlight so he will give a chip.
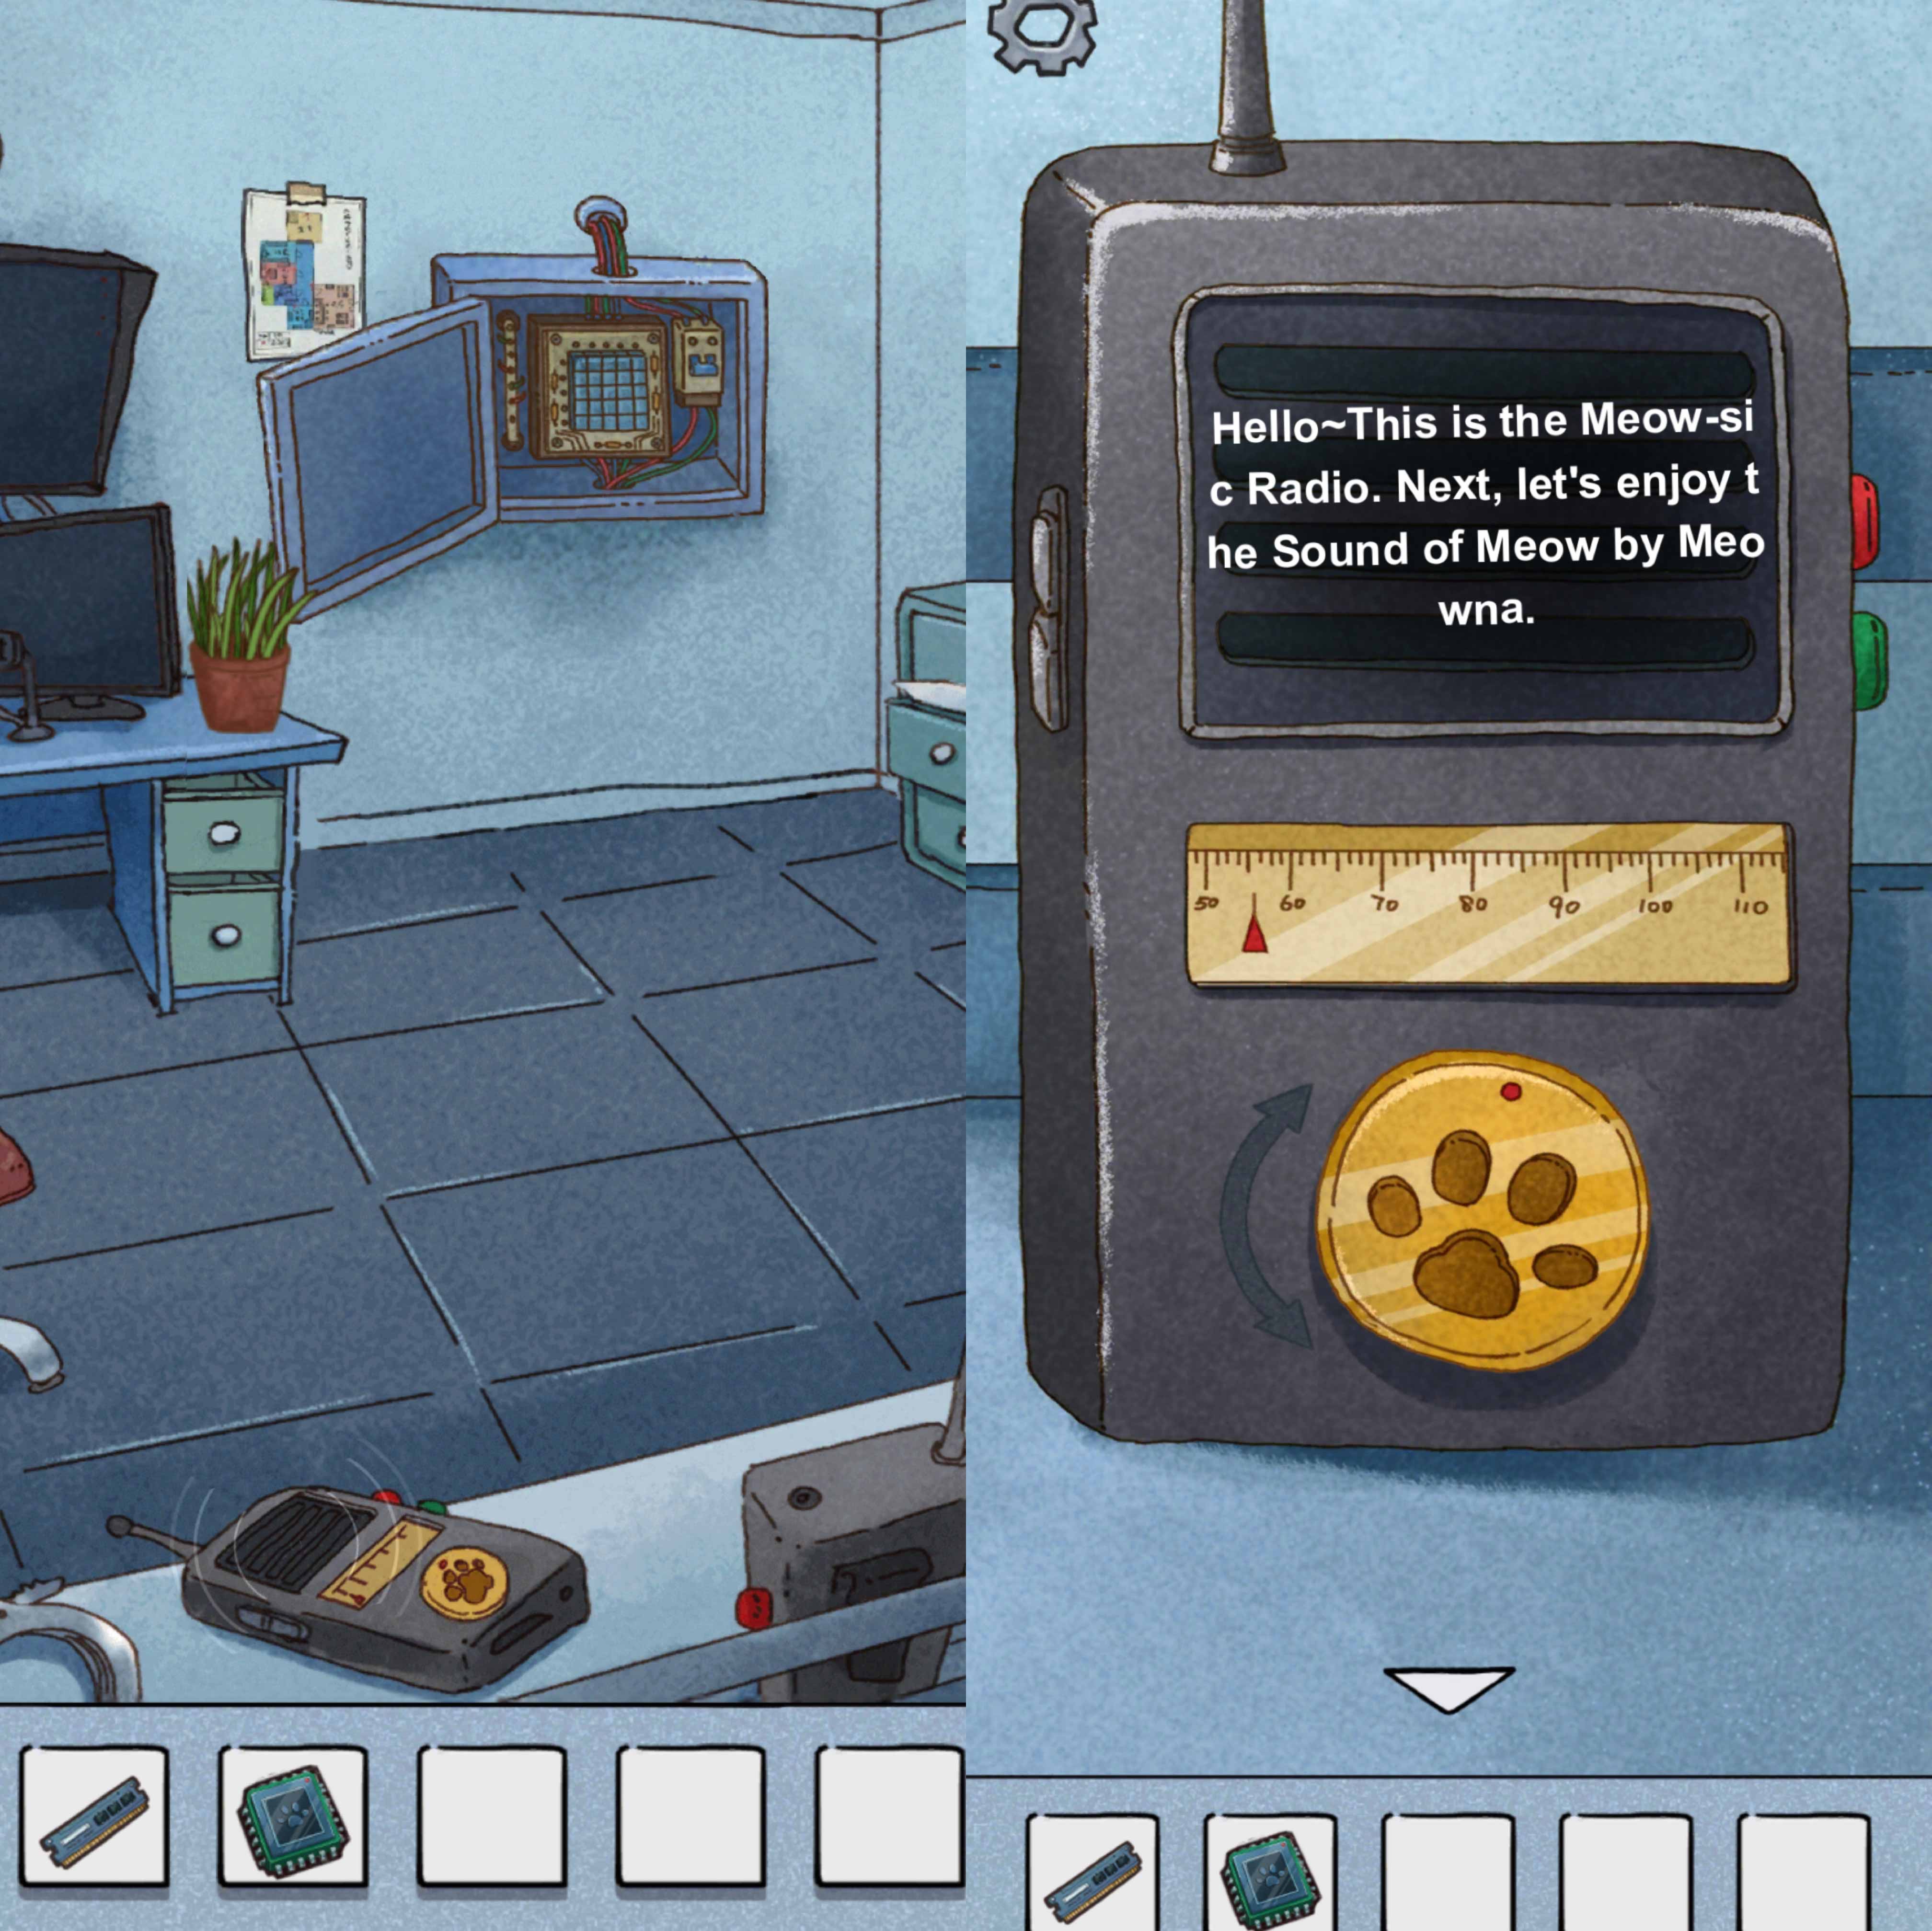
 Adjust the walkie – talkie by following hints step by step, and you will get the final hint “Kopi Luwak” or
literal meaning is “cat shit coffee”.
Adjust the walkie – talkie by following hints step by step, and you will get the final hint “Kopi Luwak” or
literal meaning is “cat shit coffee”.
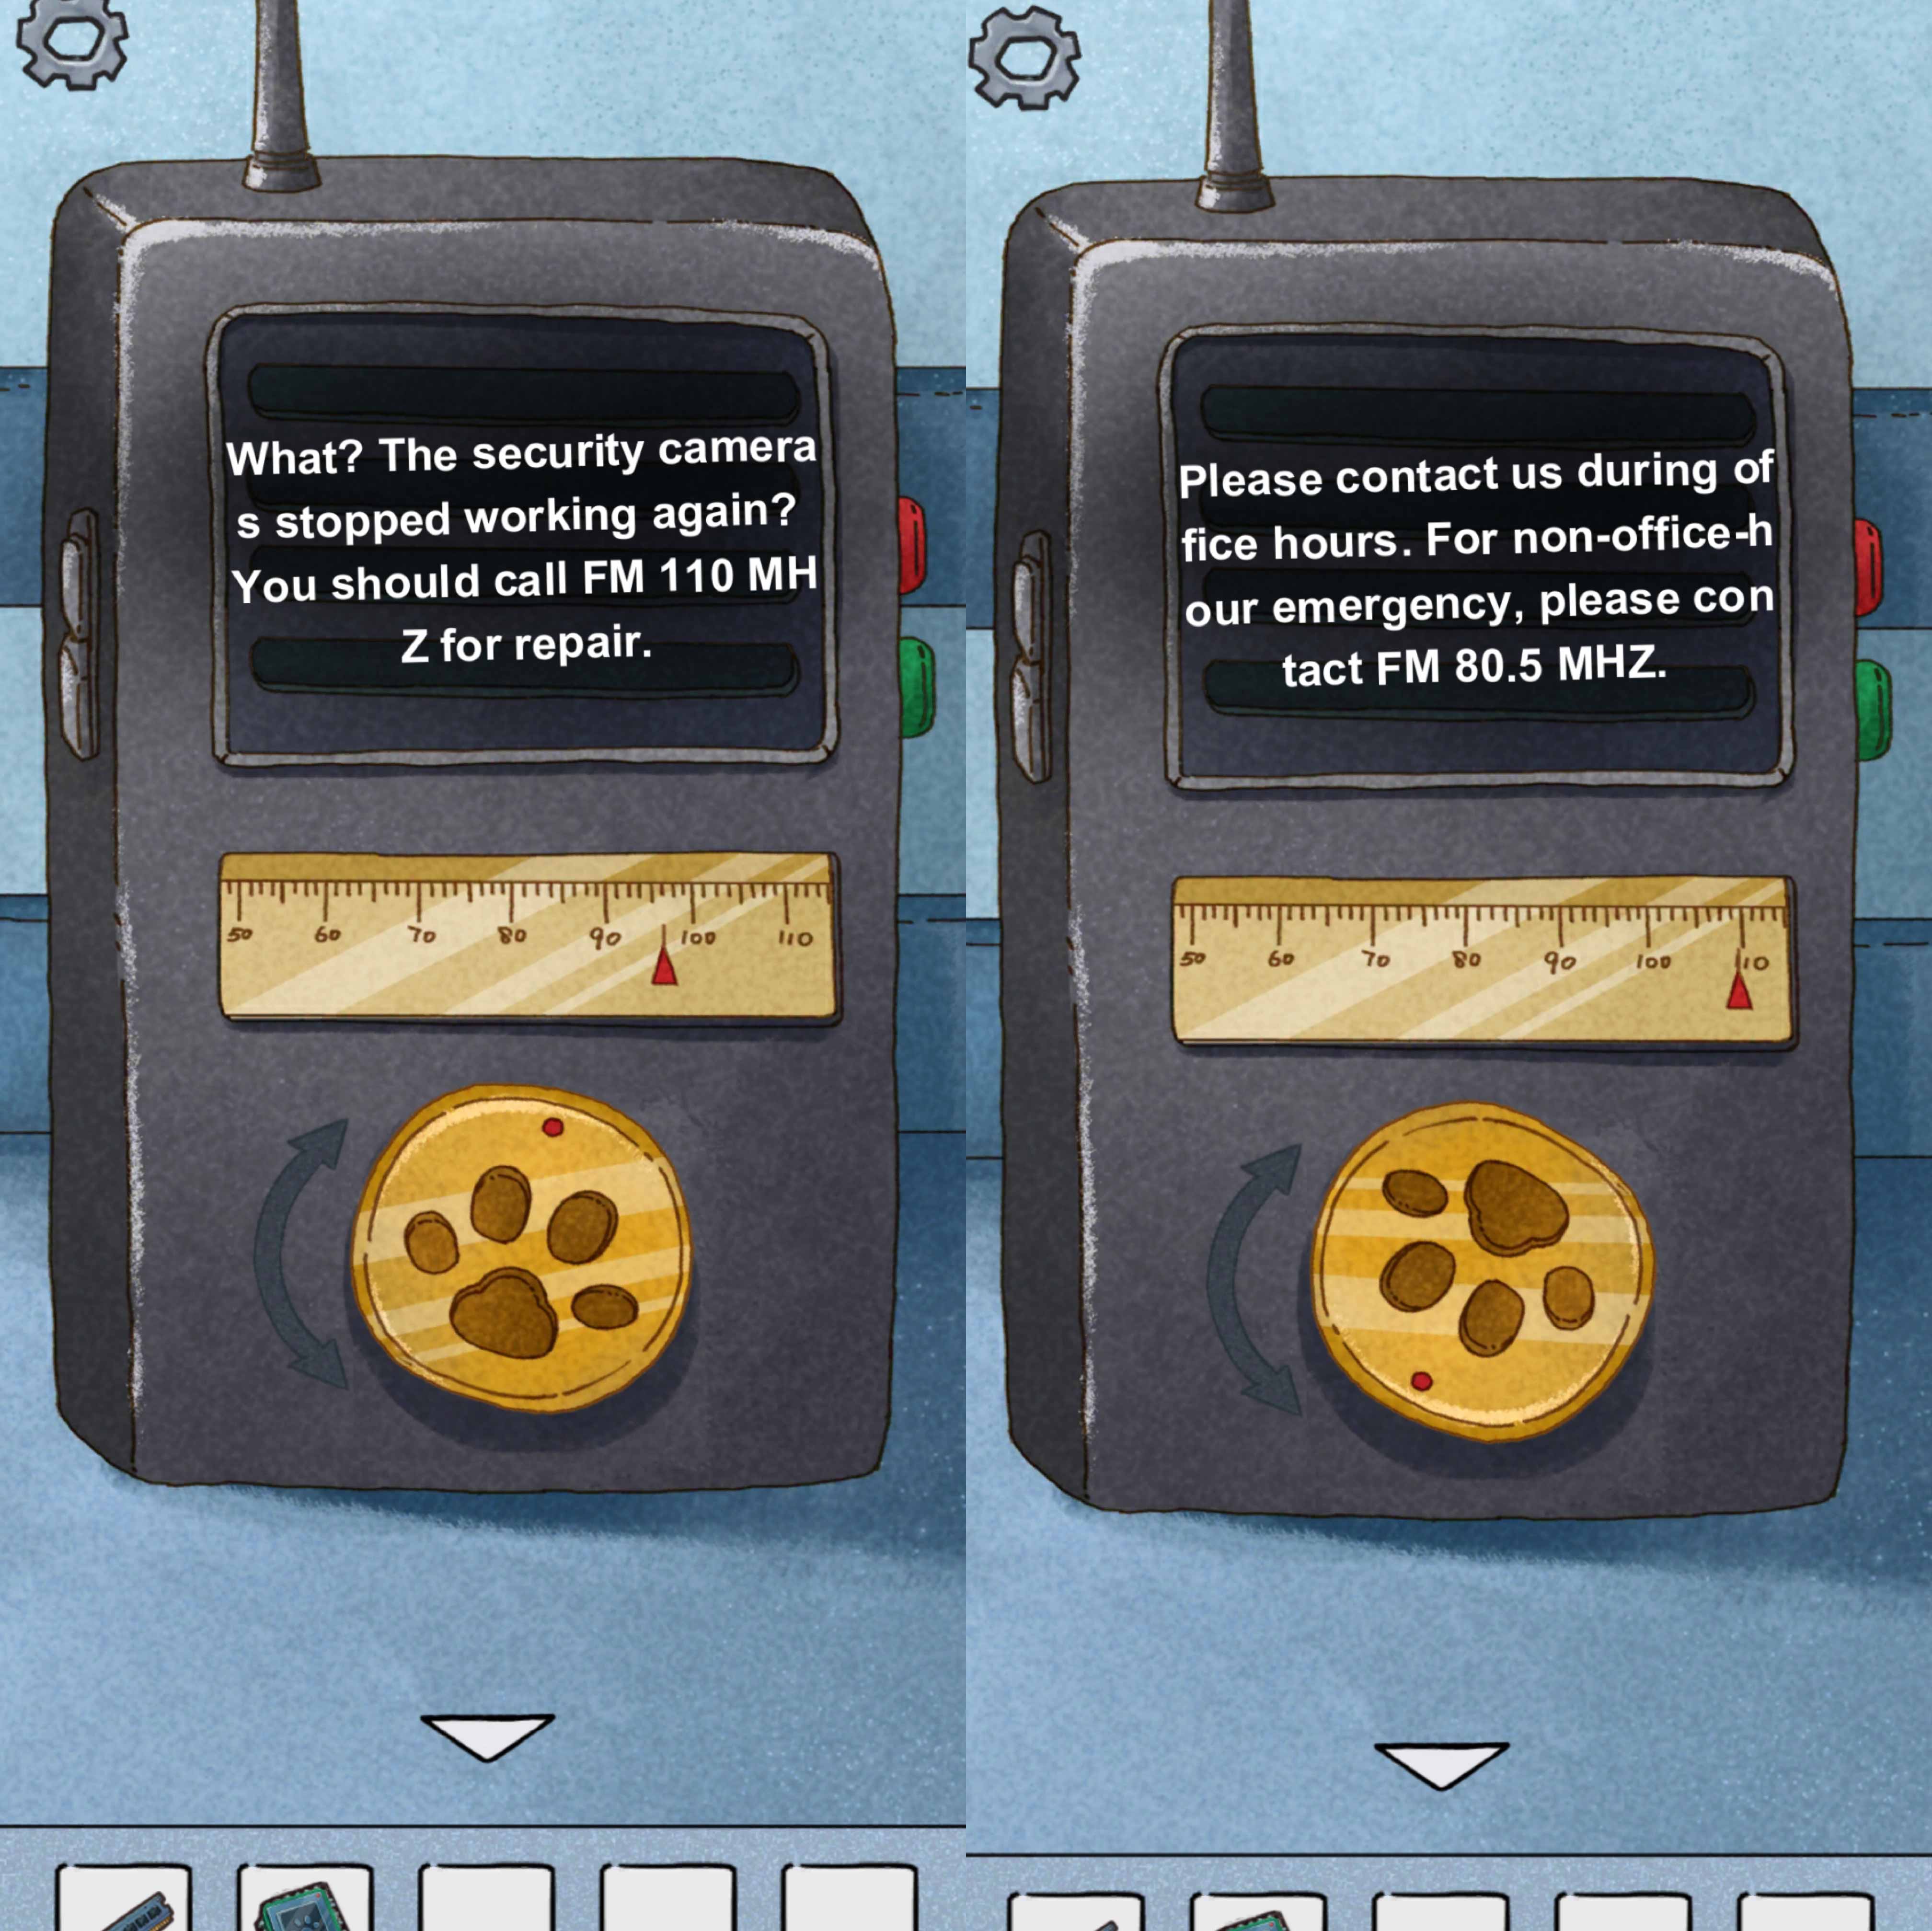
 Adjust the lock on the ventilation shaft by “Cat” “Shit” and “Coffee”, you will get another chip.
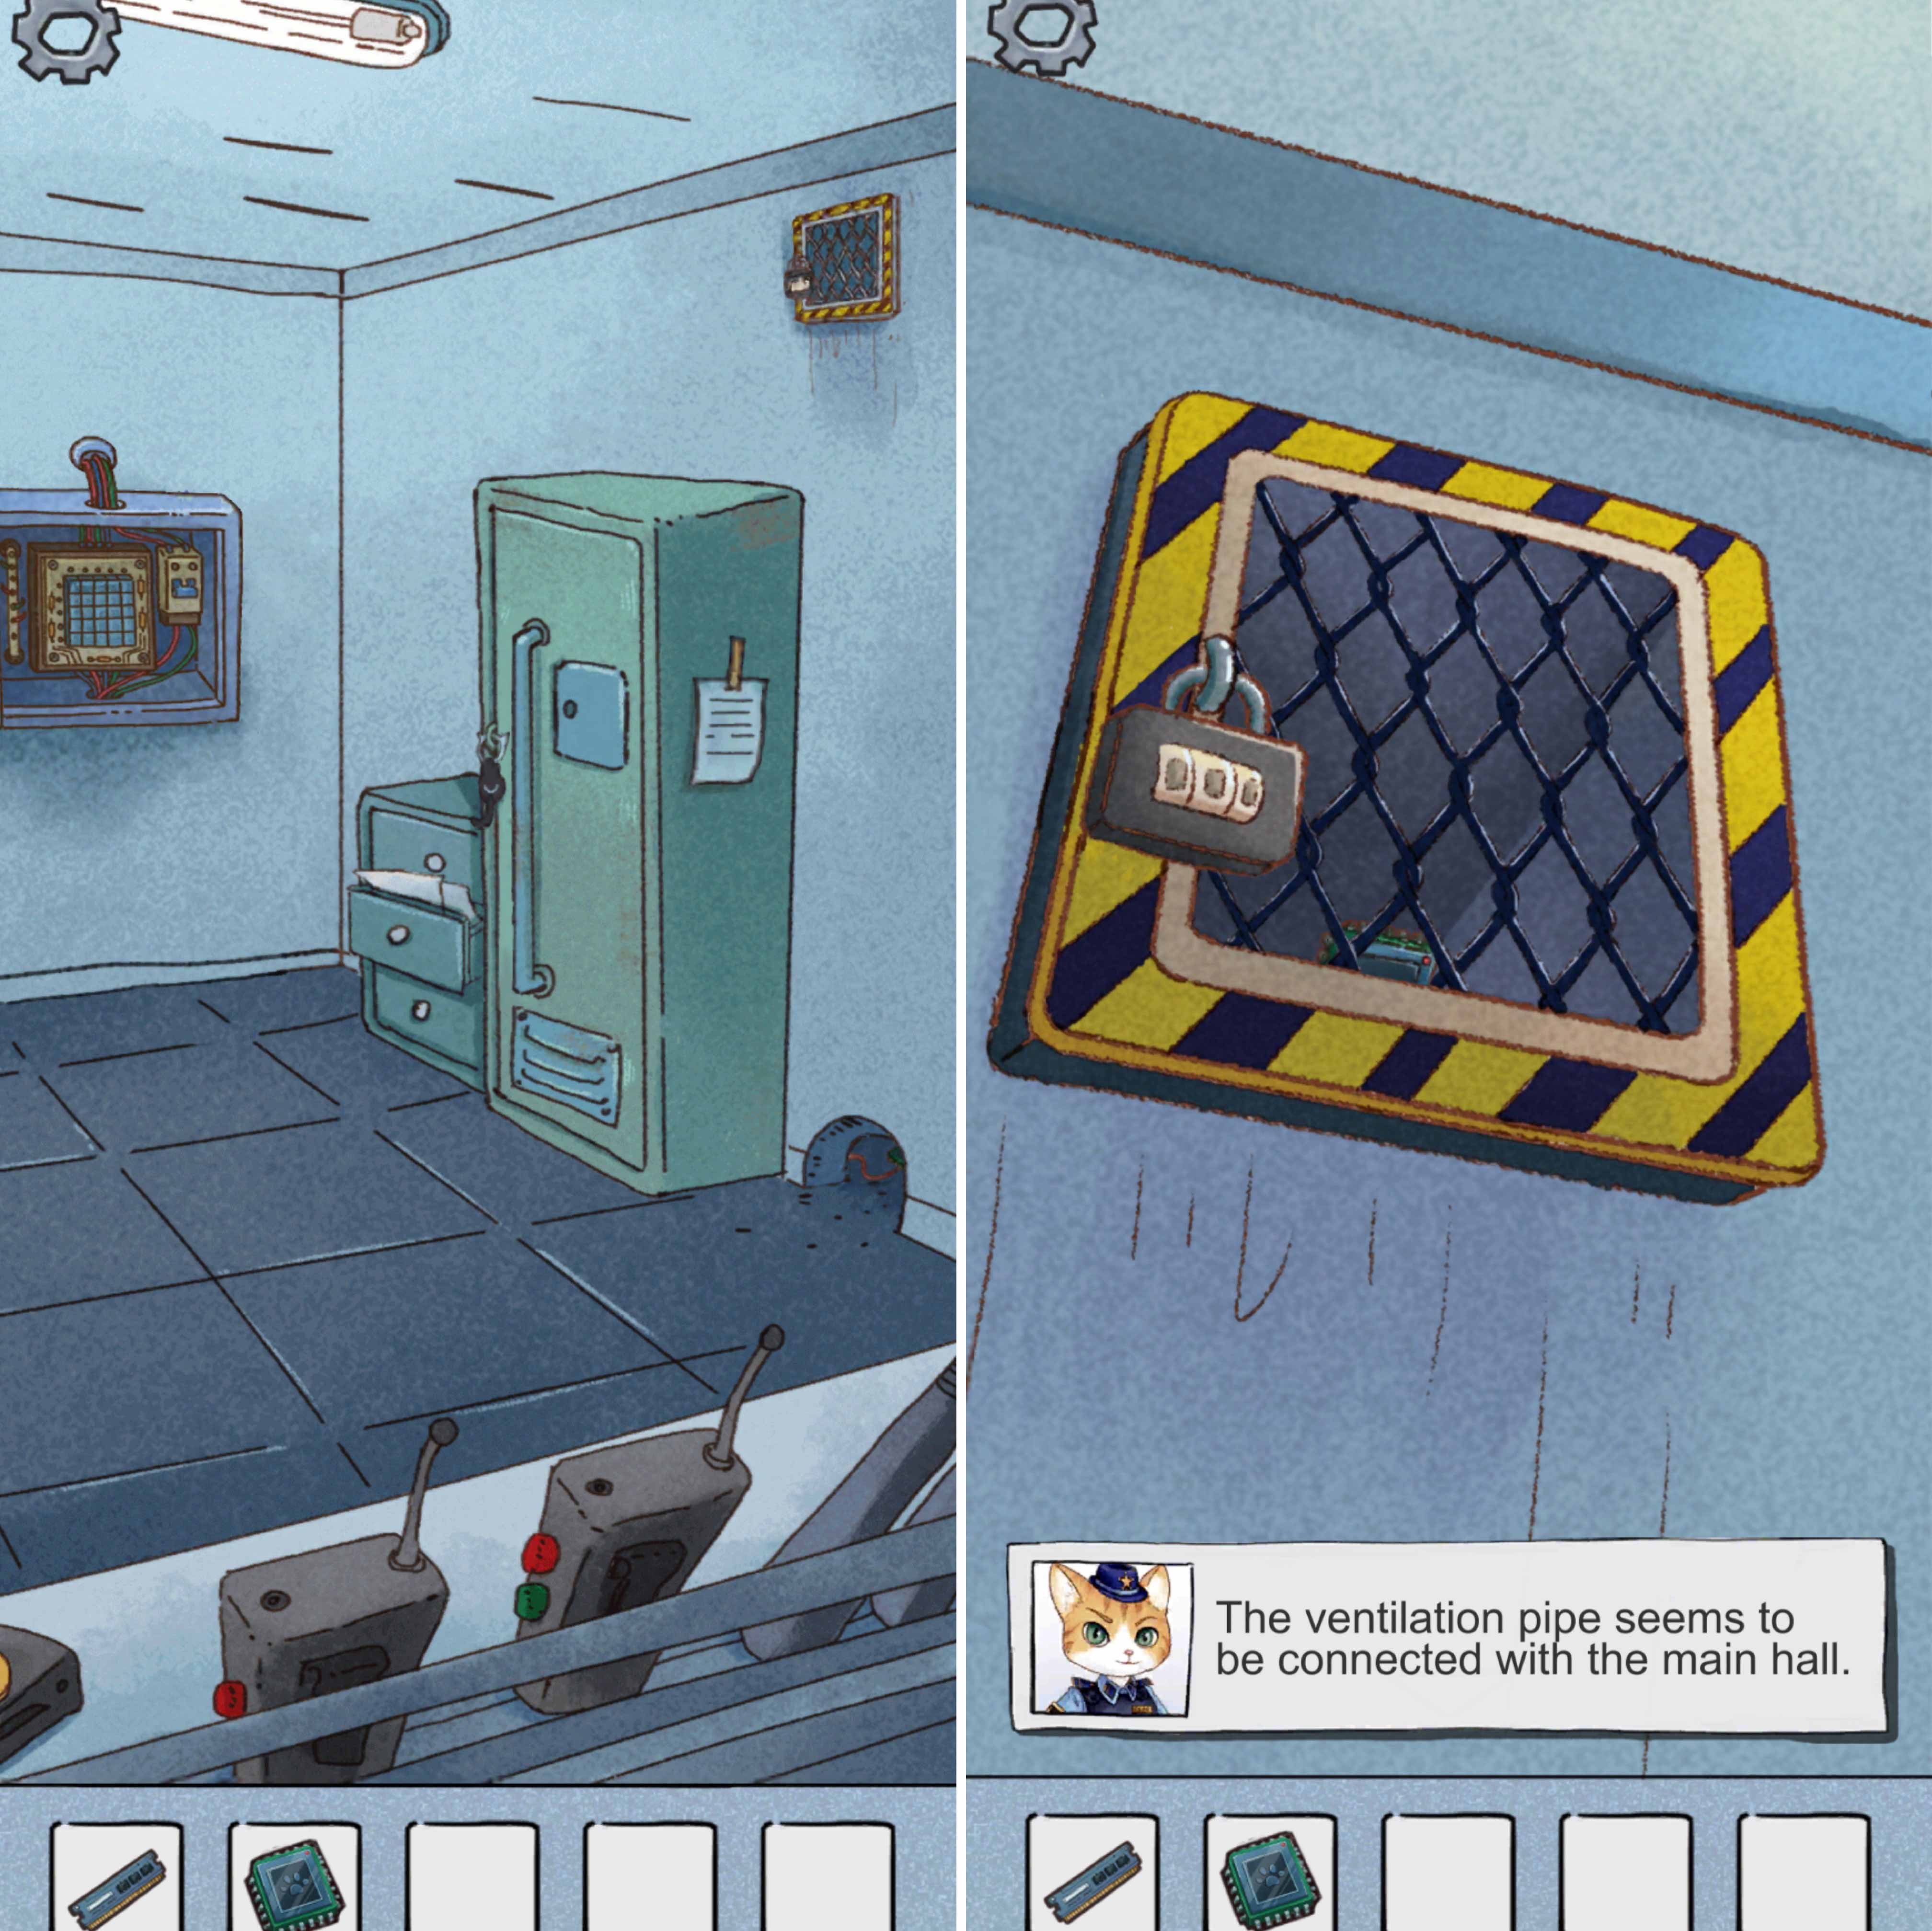
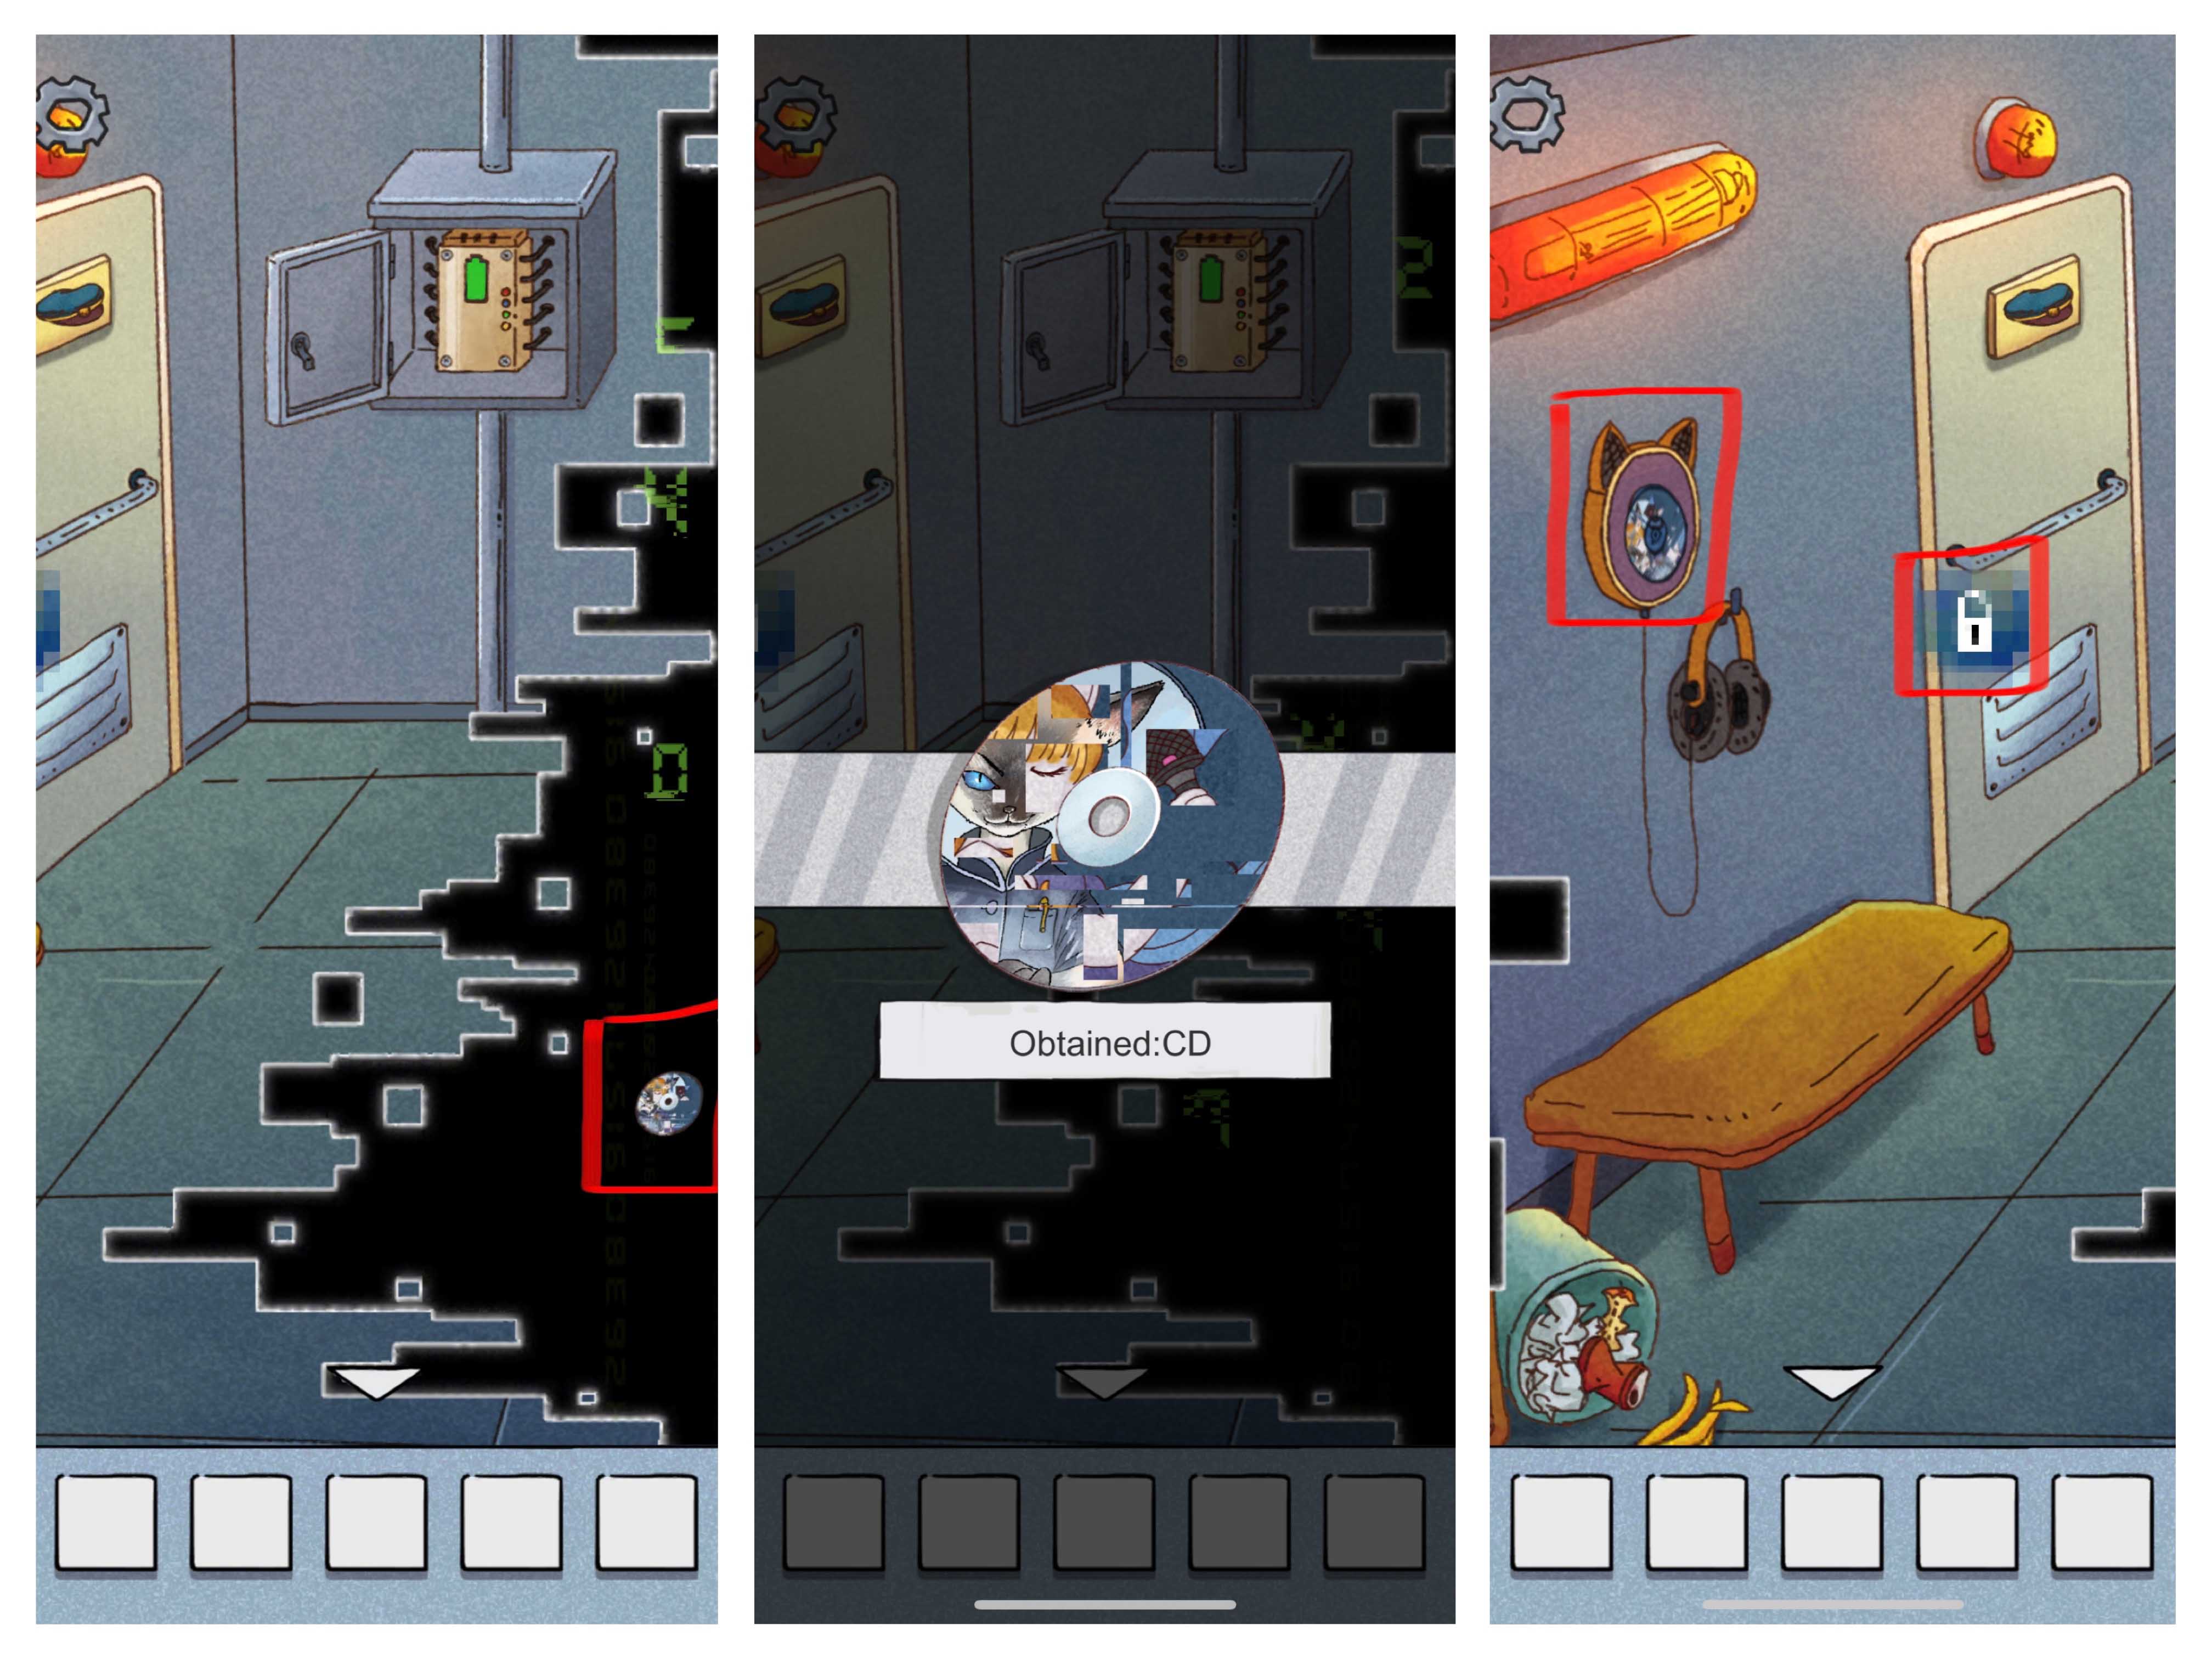
 Find a CD and a chip in the drawer and put the CD in the CD player in the corridor.
The blacked-out security cat will wave his tail in sleep. Remember how he waves.
 Find the lock with a cat tail shape handle in the monitoring room. Pull the handle in the way that the security
cat waves his tail. The correct sequence is Right-Left-Left-Right-Right-Left.
Find the lock with a cat tail shape handle in the monitoring room. Pull the handle in the way that the security
cat waves his tail. The correct sequence is Right-Left-Left-Right-Right-Left.
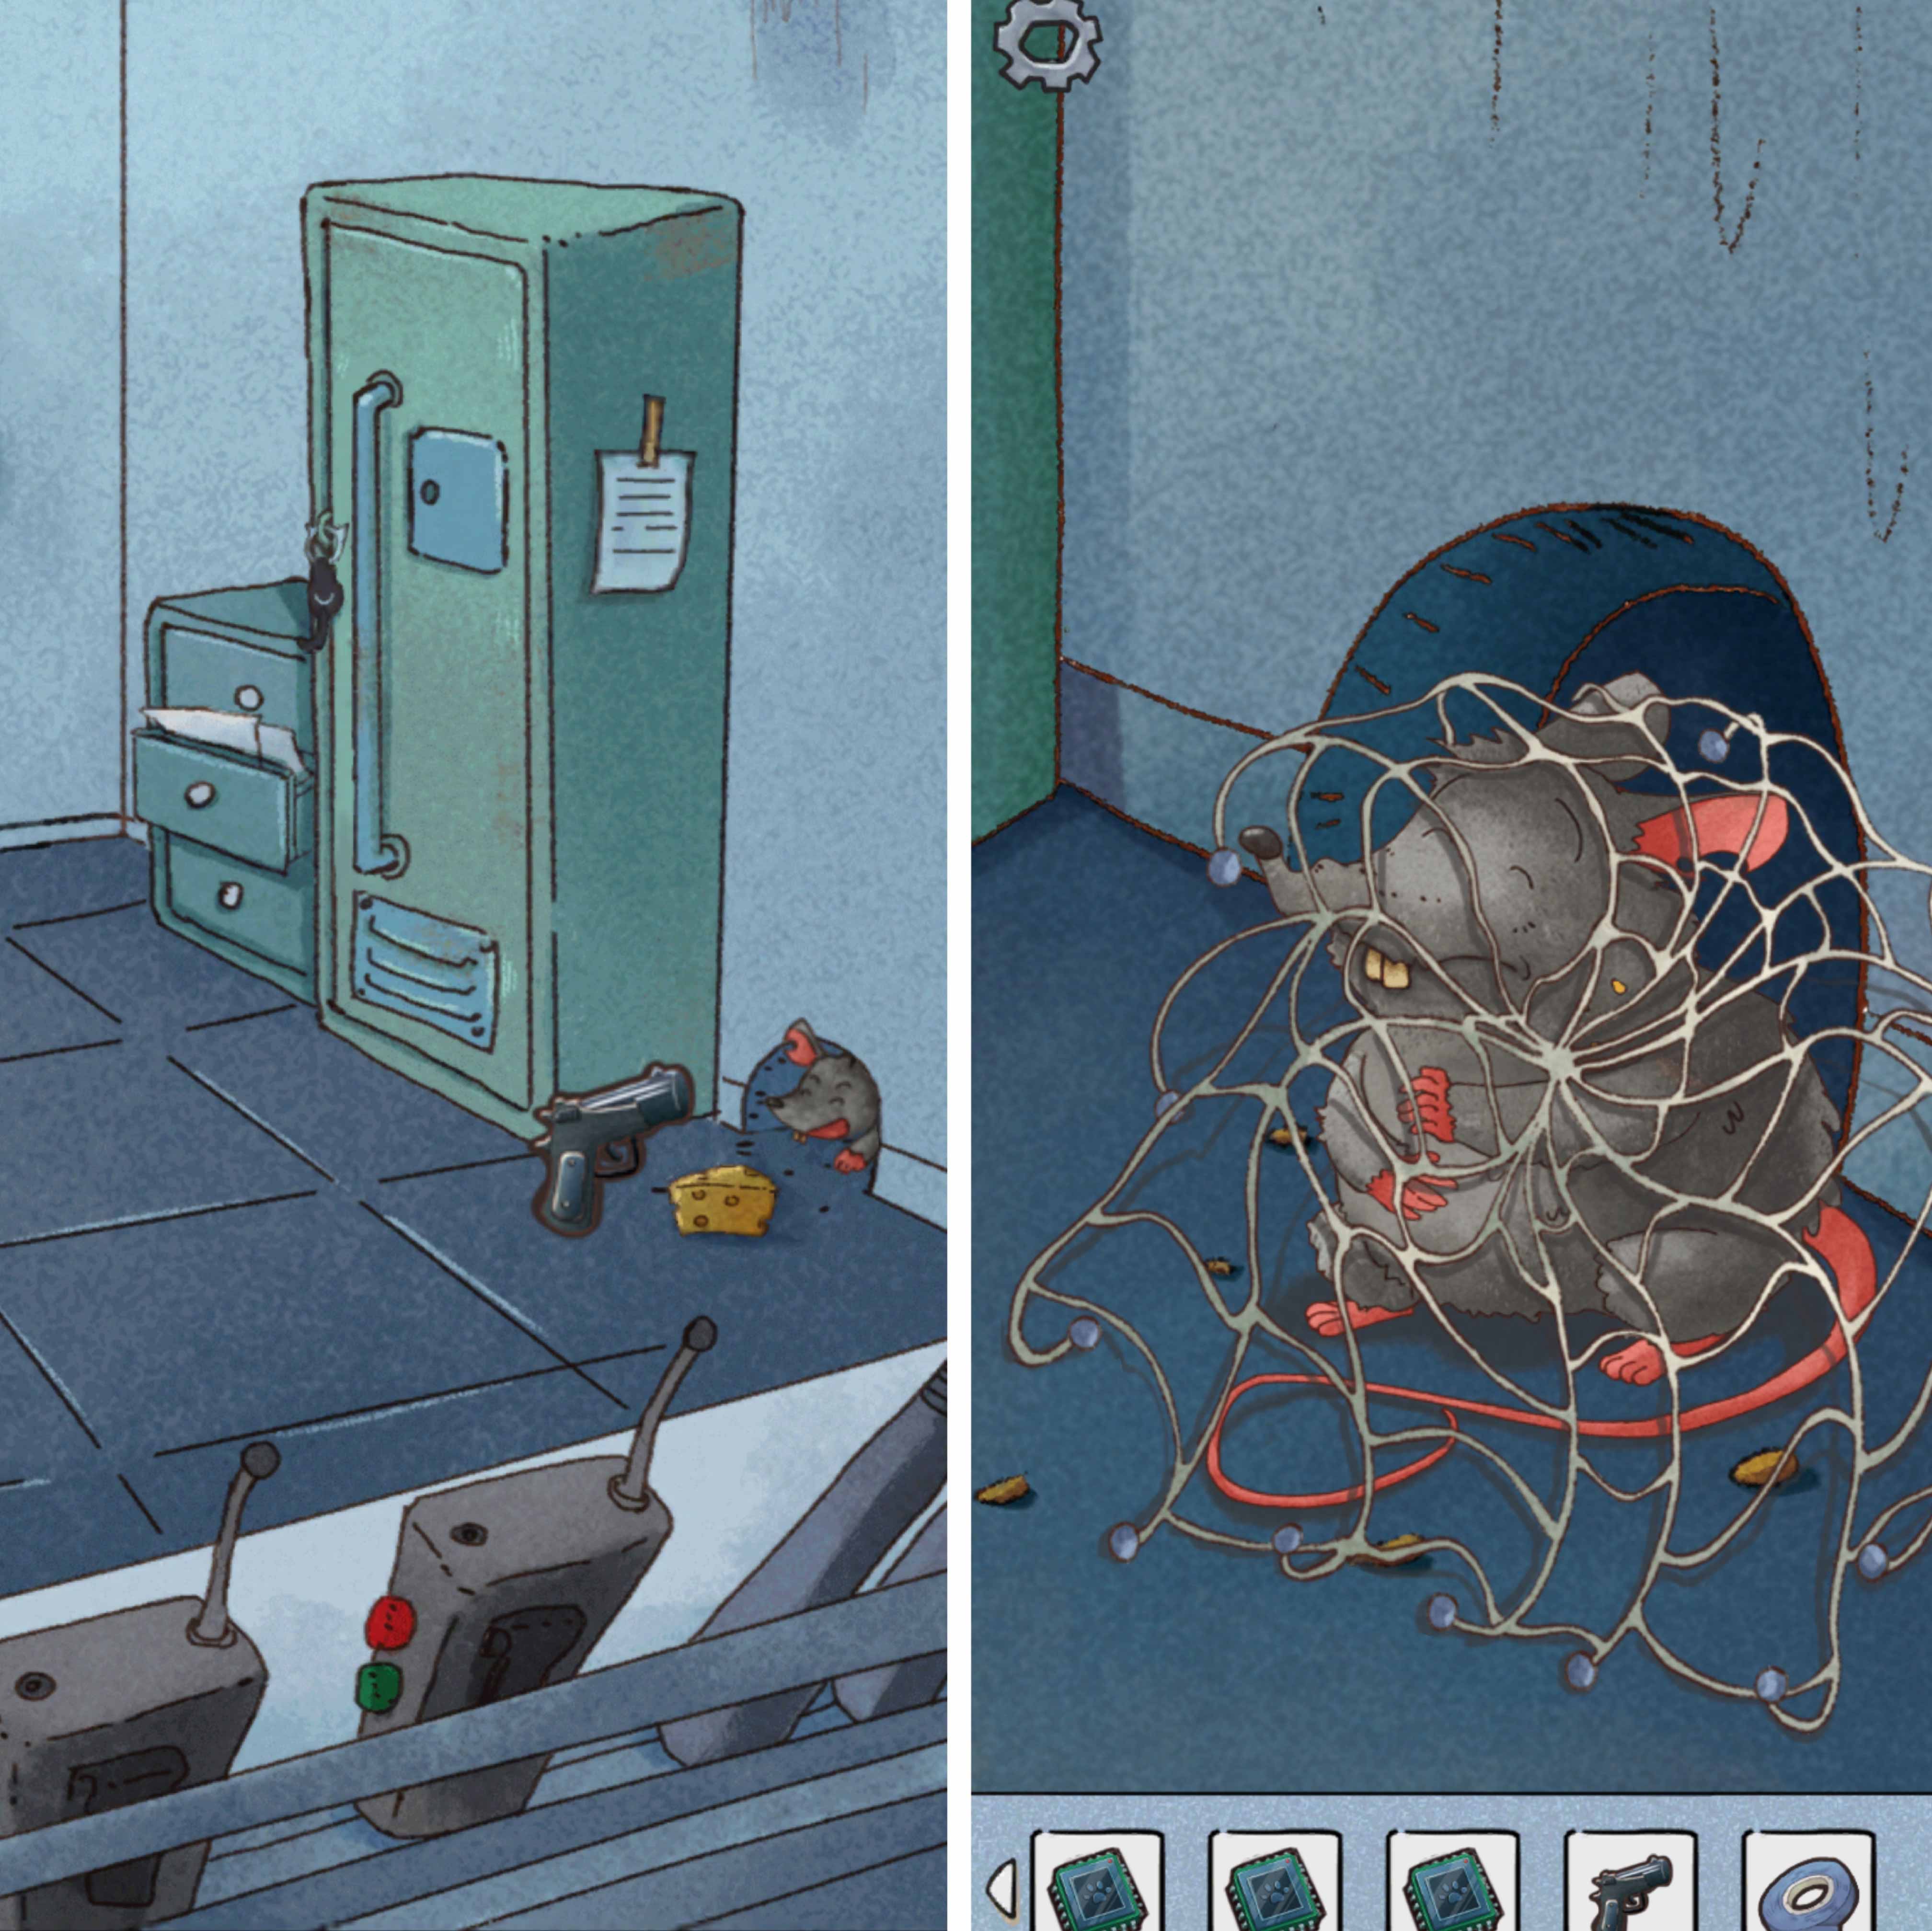
Open the closet, you will find a capture gun and a tape.
 You will see a mouse hidden in a small cave to the right of the closet. Find a cheese on the desk in the living
room. Put the cheese in front of the cave and lure the mouse out.
You will see a mouse hidden in a small cave to the right of the closet. Find a cheese on the desk in the living
room. Put the cheese in front of the cave and lure the mouse out.
 Use the capture gun to capture the mouse, but release it back. It will help you to get a chip in return.
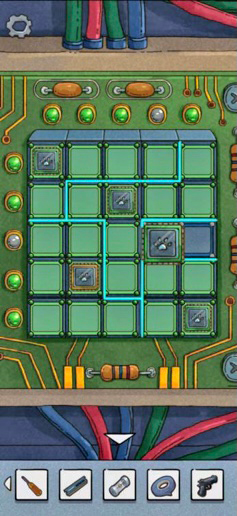
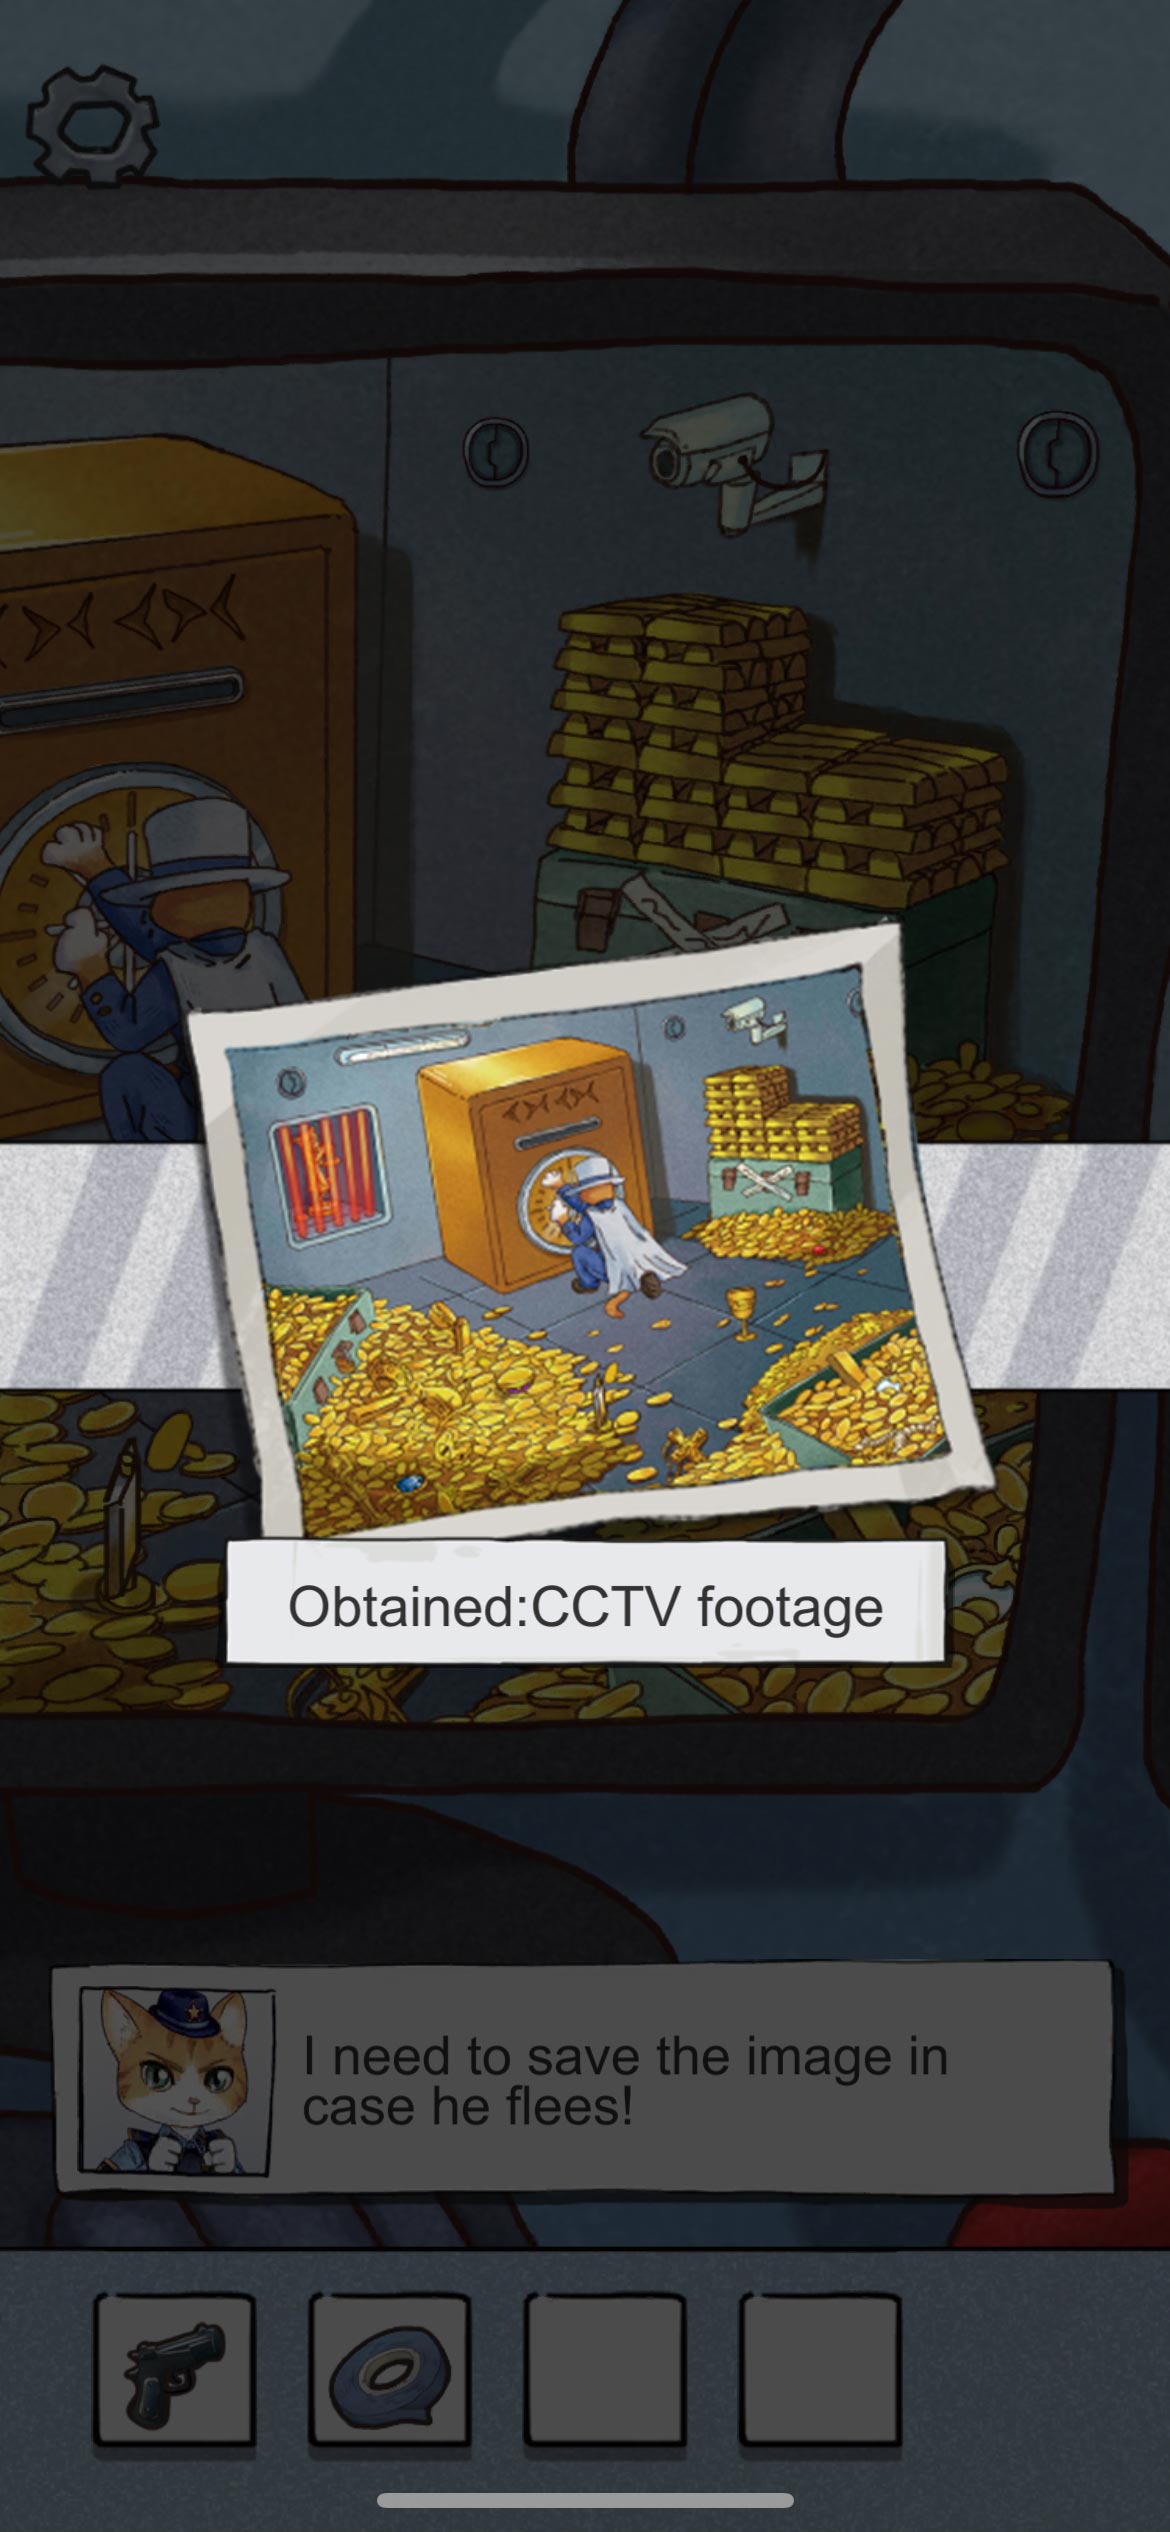
 Insert all 4 chips into the power box. Each chip will light-up a lined-up area. Light up all areas and the monitor
will be back to work. You will get a monitor photo that shows Cat Rogue is right in the vault.
Insert all 4 chips into the power box. Each chip will light-up a lined-up area. Light up all areas and the monitor
will be back to work. You will get a monitor photo that shows Cat Rogue is right in the vault.
· Machine Room
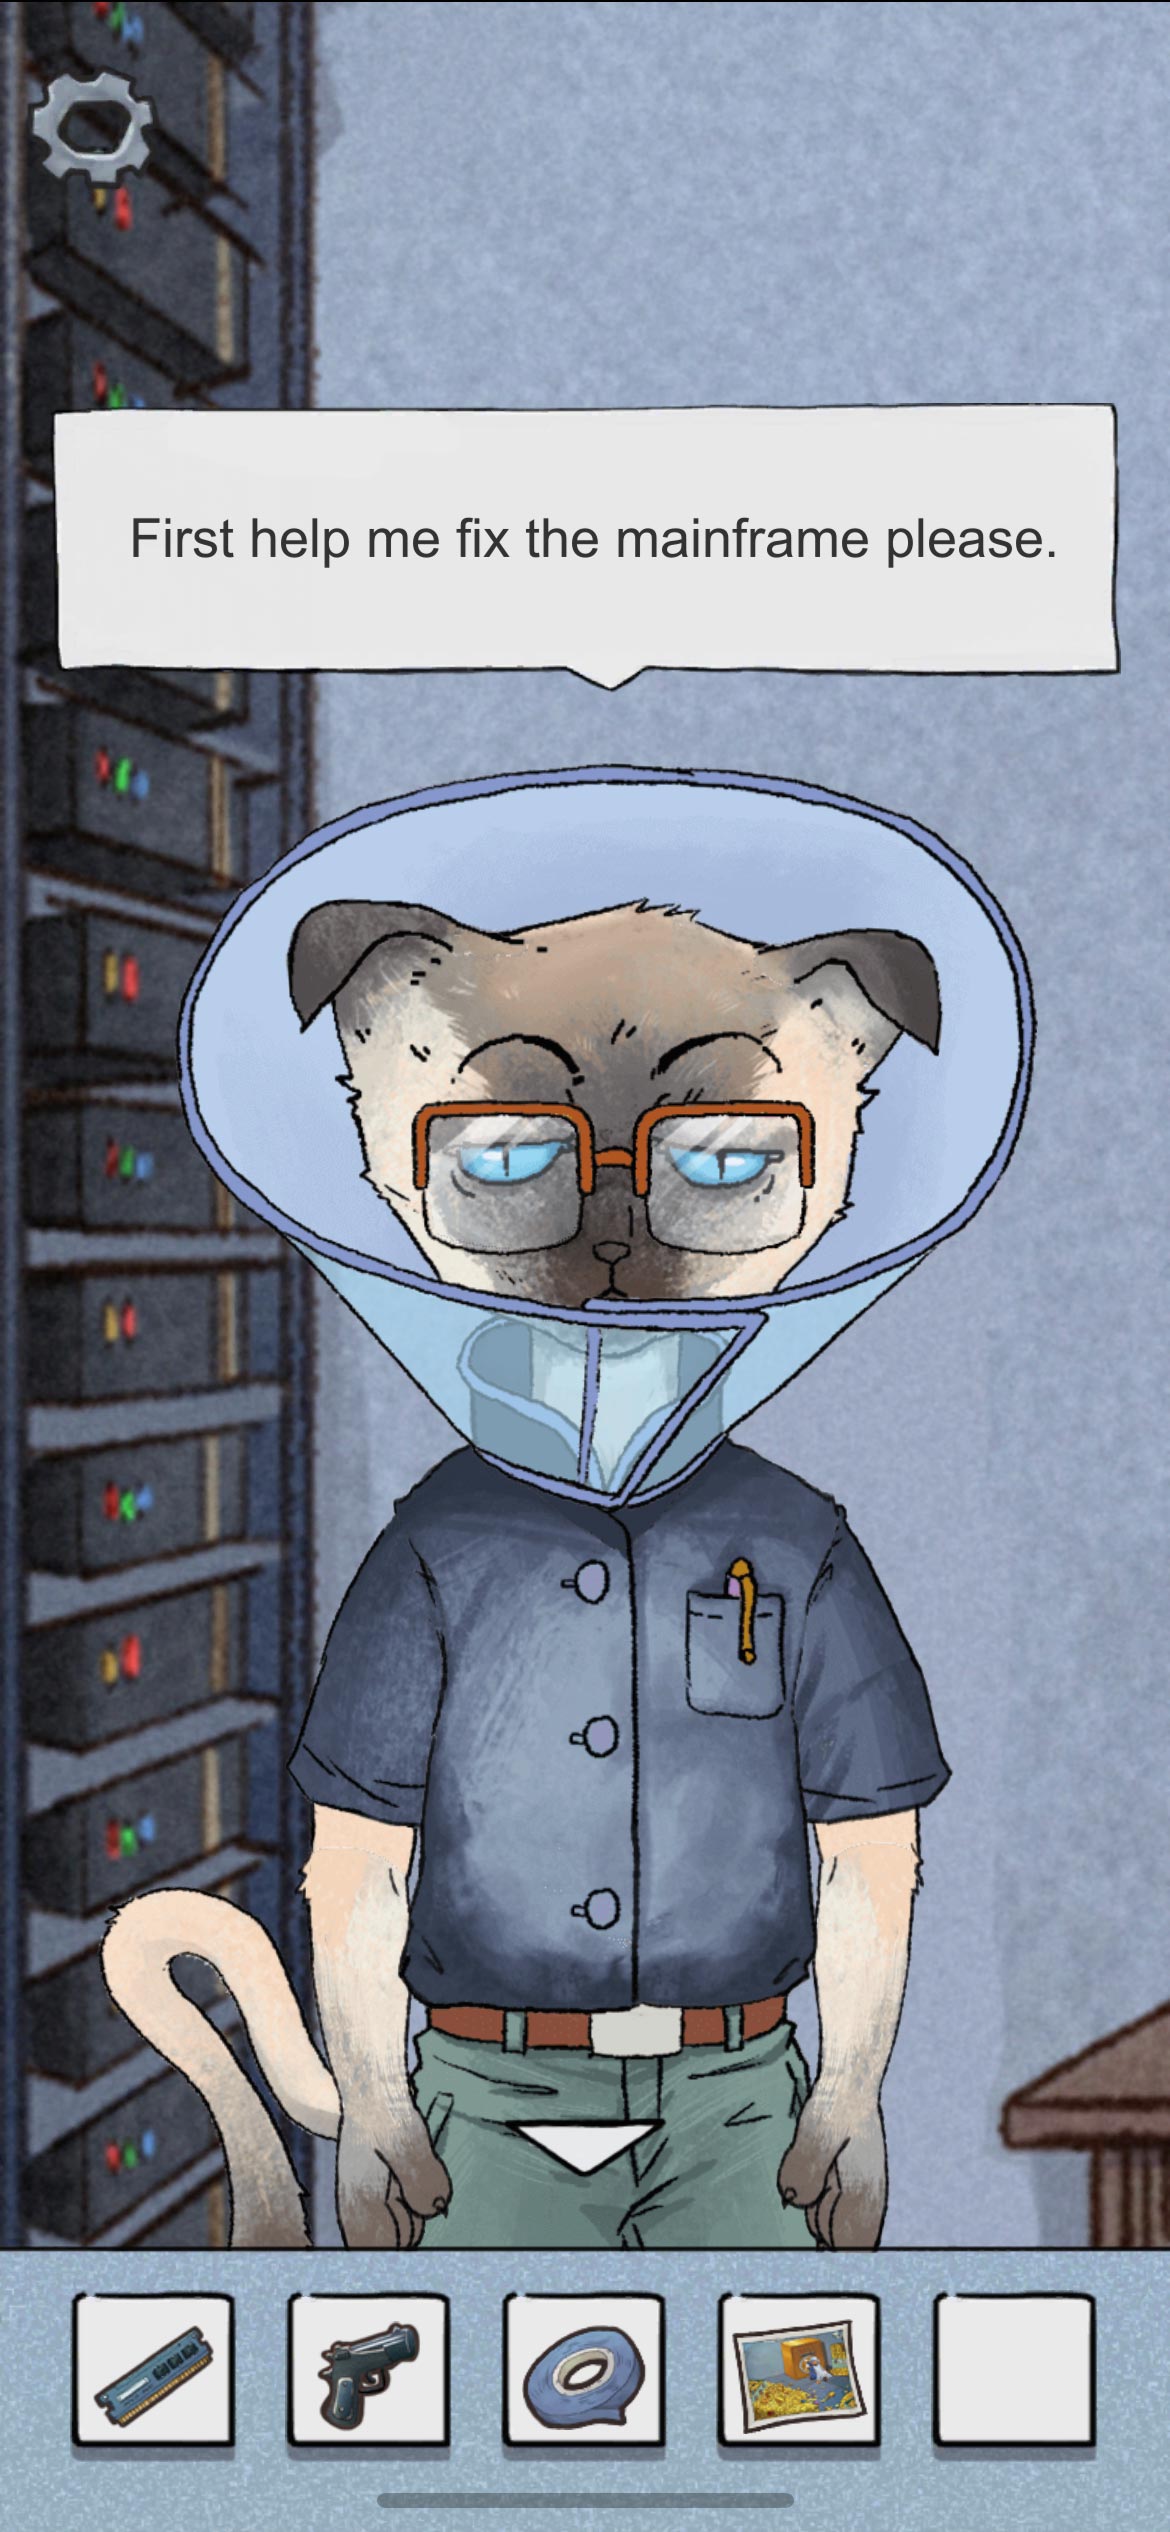
However, the door to the vault has mechanic problems.Go to the engineer cat’s room. He asks your help to fix the server.
 You can find a fuse on the floor in the corridor.
 Insert the fuse, memory stick and tape in the server. The server will activate two mini-games.
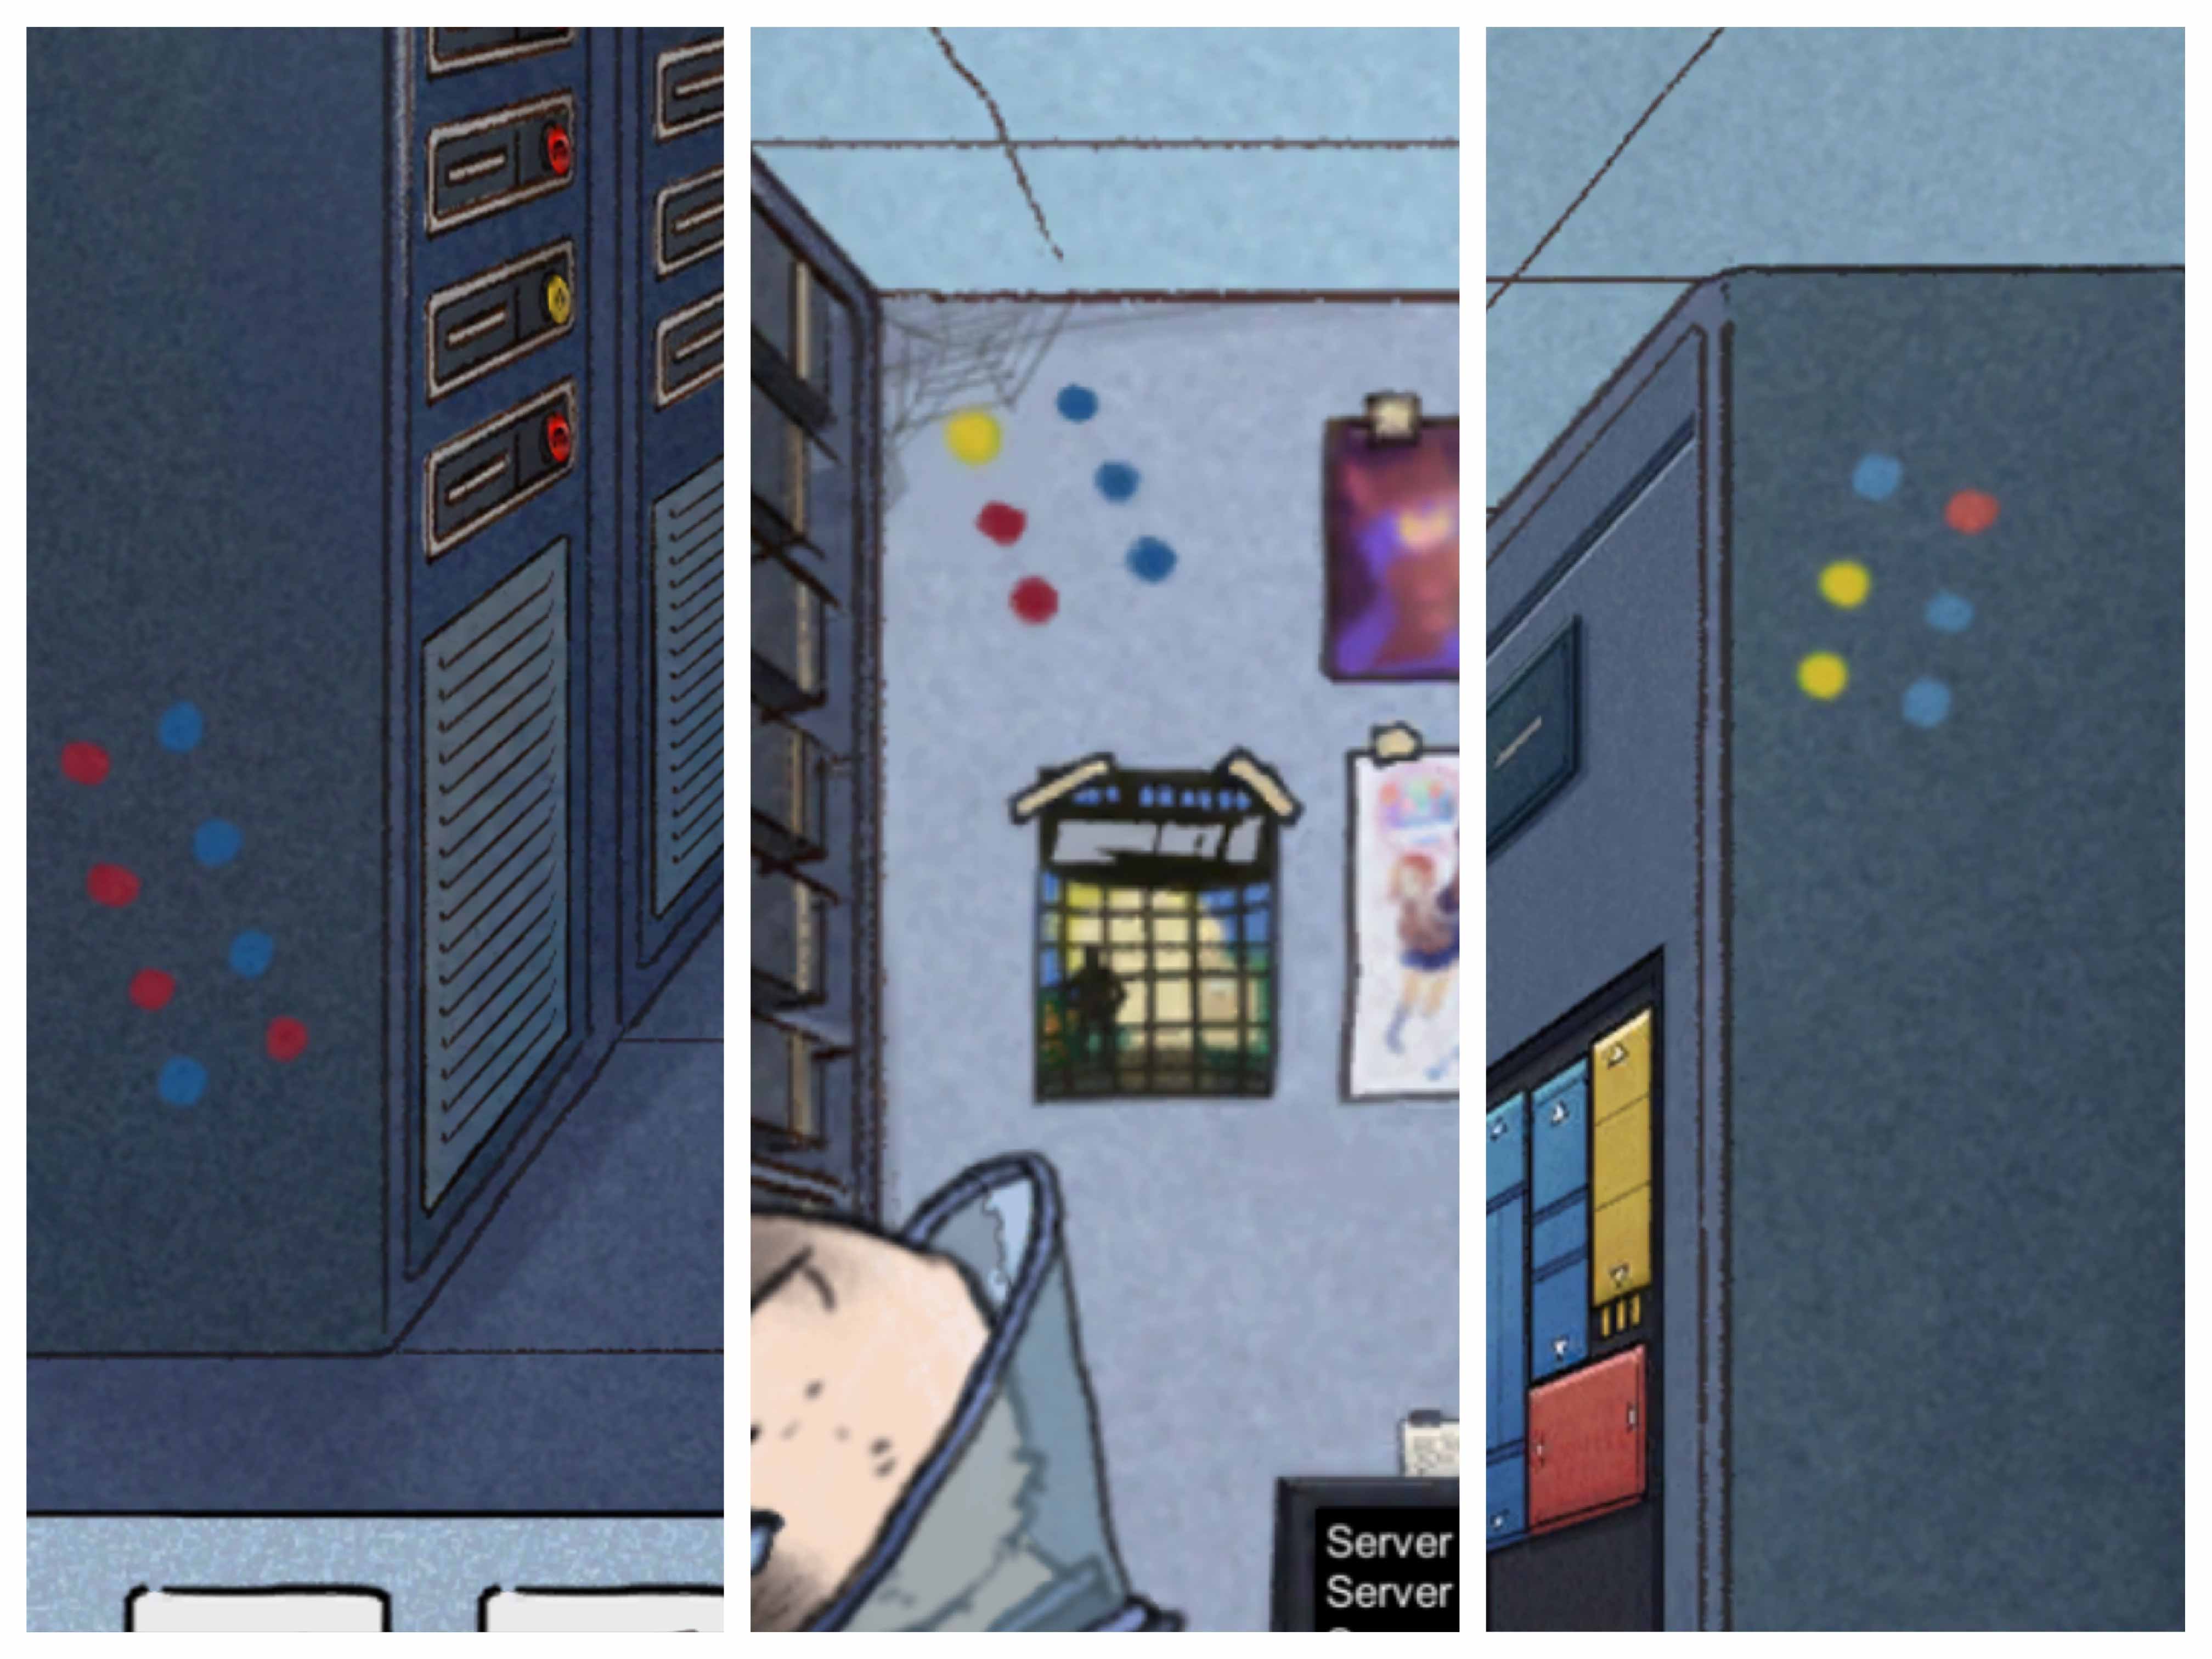
 On the left, there are many dots on the panel. By clicking the dot, it will change color from red to blue to
yellow. You can find hints on the left server, right server and on the wall.
On the left, there are many dots on the panel. By clicking the dot, it will change color from red to blue to
yellow. You can find hints on the left server, right server and on the wall.
 On the right, you need to move away blocks to allow two yellow ones to be connected to the node in the lower right
corner.
On the right, you need to move away blocks to allow two yellow ones to be connected to the node in the lower right
corner.
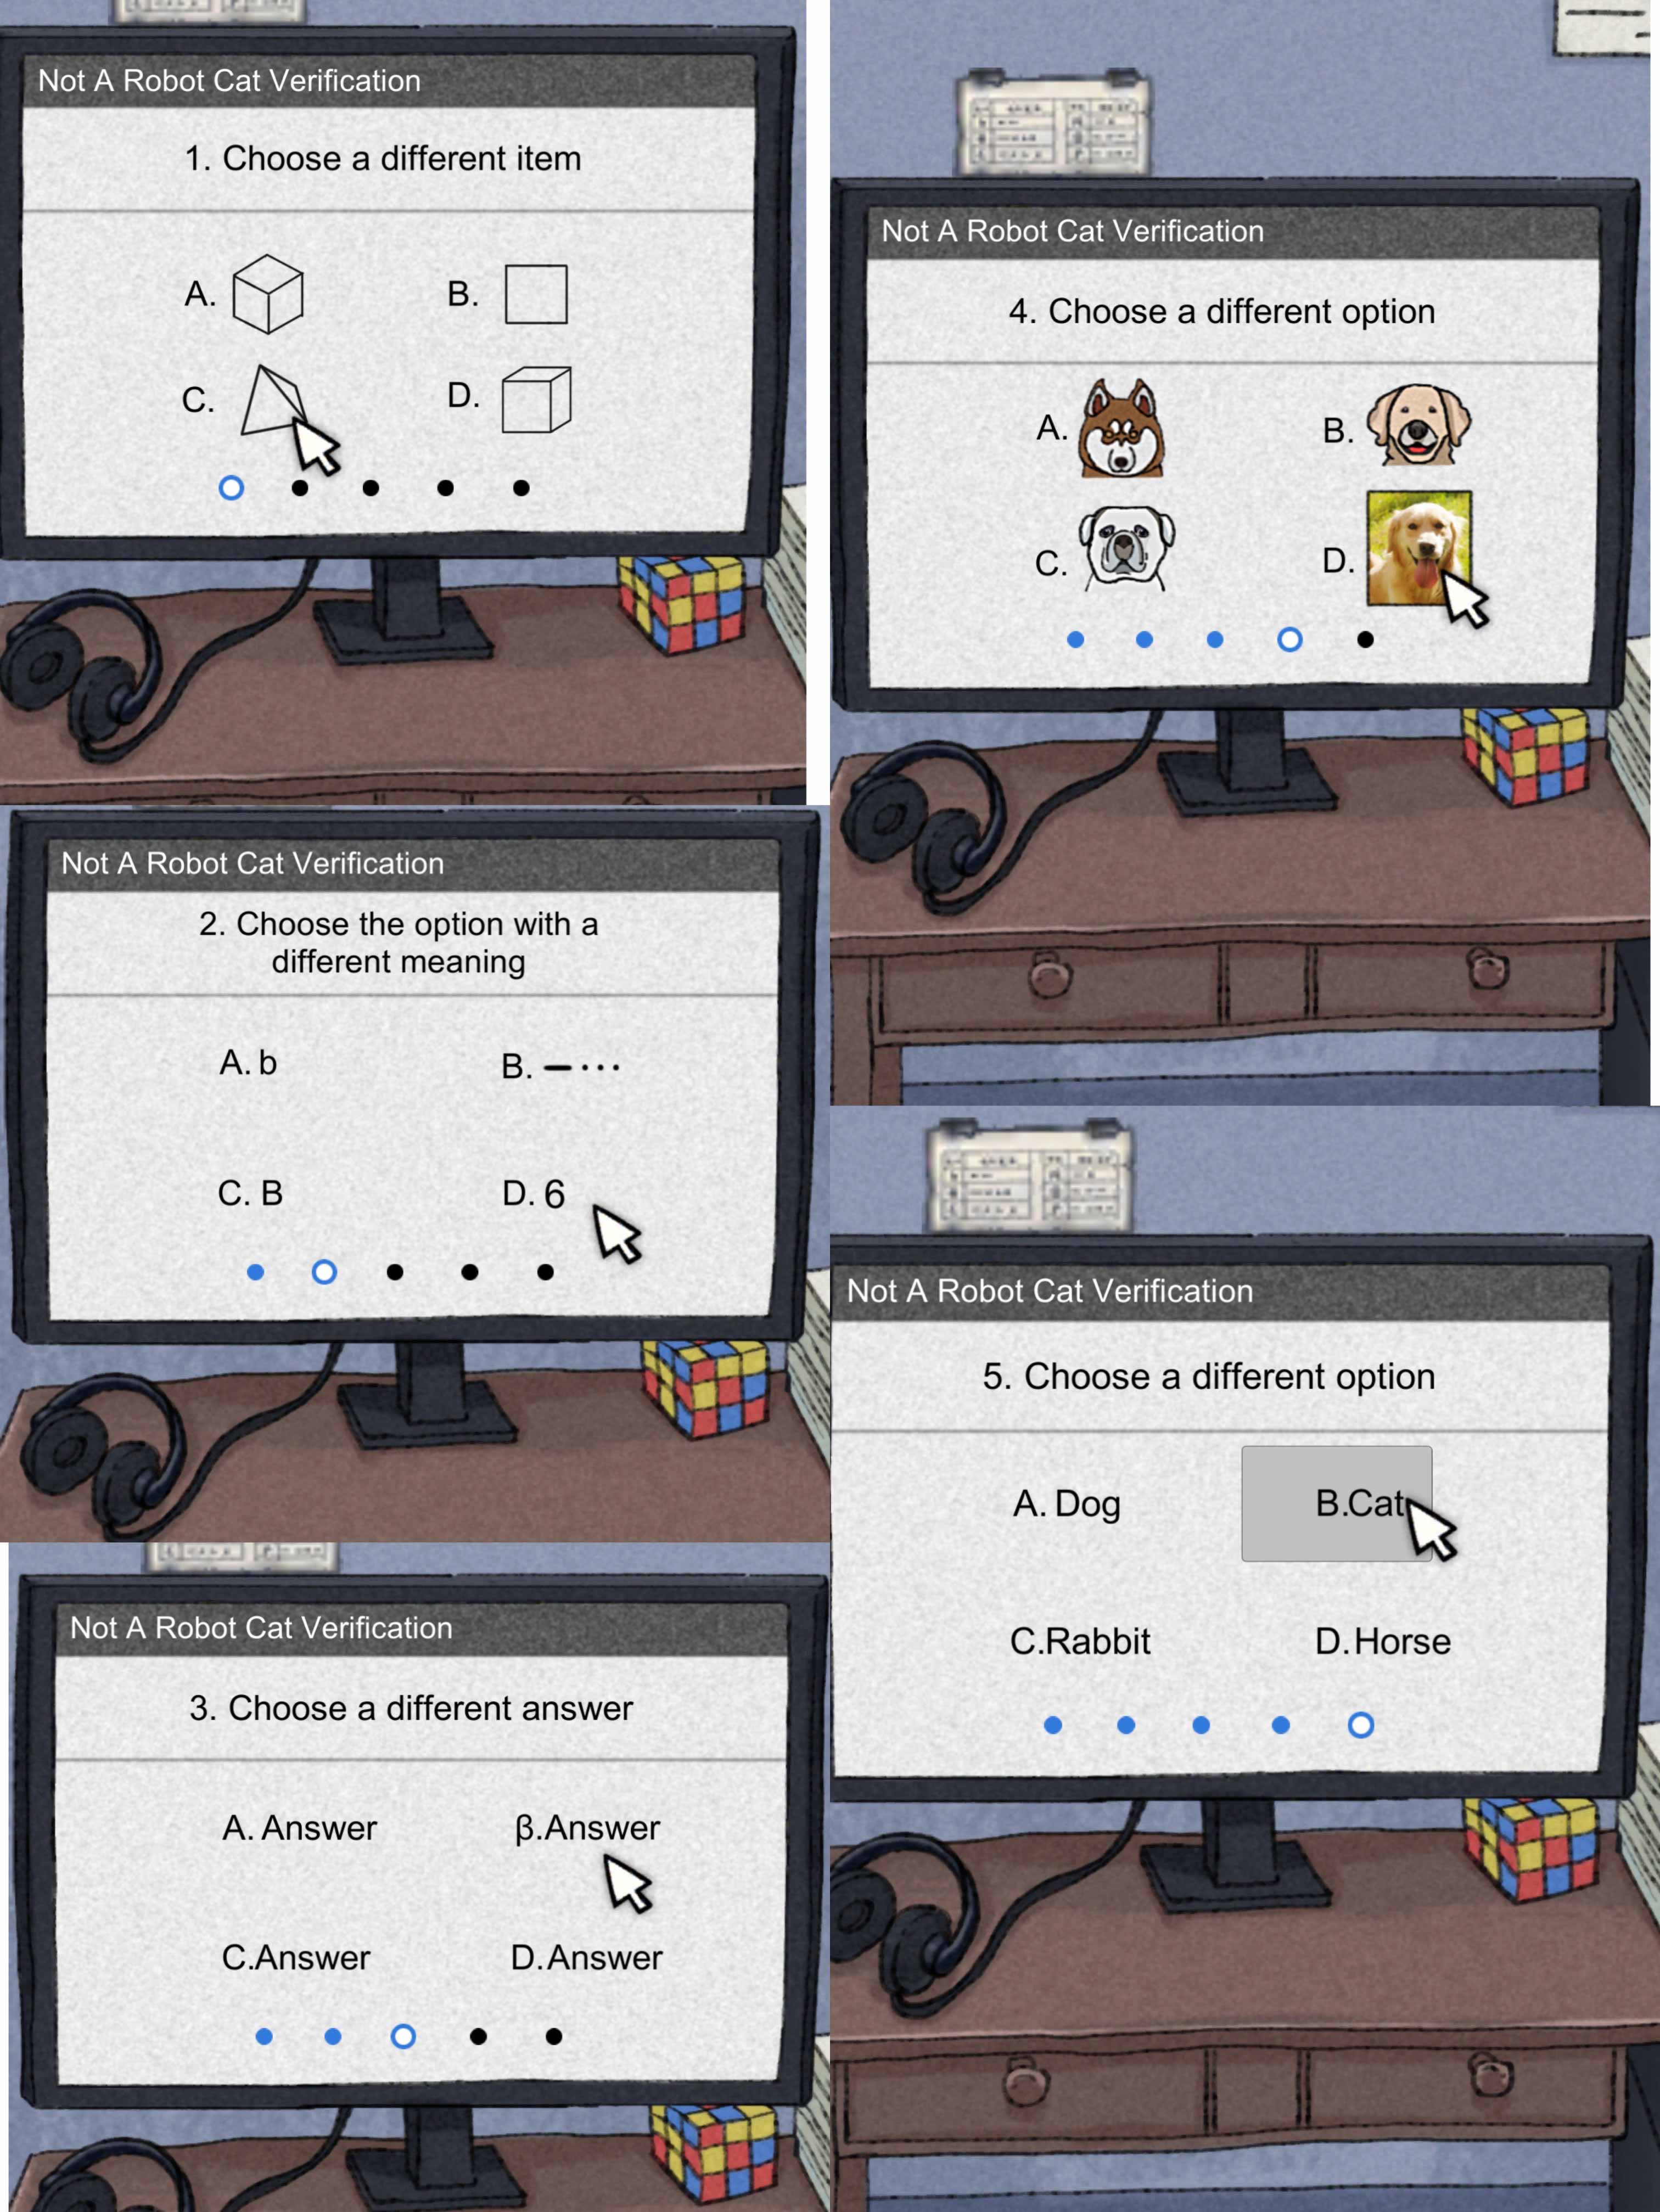
 After finish two mini-games, the computer will display a series of questions. You need to answer these questions.
The last question is little bit tricky. Because the story is set to happen in a city of cats, so you should choose
cat.
After finish two mini-games, the computer will display a series of questions. You need to answer these questions.
The last question is little bit tricky. Because the story is set to happen in a city of cats, so you should choose
cat.
· Vault
Go to the door of the vault.Adjust the position of gears and unbolt 3 bolts.
 Enter the vault, the police cat will come and ask you a series of questions. The answers would be: it is
unreasonable to have a monitor camera in the monitor image of the vault. The chip in the monitoring room is
hacked. The engineer cat is the Cat Rogue because he gave you the hacked chip.
Enter the vault, the police cat will come and ask you a series of questions. The answers would be: it is
unreasonable to have a monitor camera in the monitor image of the vault. The chip in the monitoring room is
hacked. The engineer cat is the Cat Rogue because he gave you the hacked chip.
 The police cat gradually turns into Cat Rogue and you need to use the capture gun to capture him. But he changes
the game’s coding to delete the web.
The police cat gradually turns into Cat Rogue and you need to use the capture gun to capture him. But he changes
the game’s coding to delete the web.
 Find Mimo who is trapped in a mirror in the server room.
 And then,you need to find the reset button to help Mimo go back to the game again.
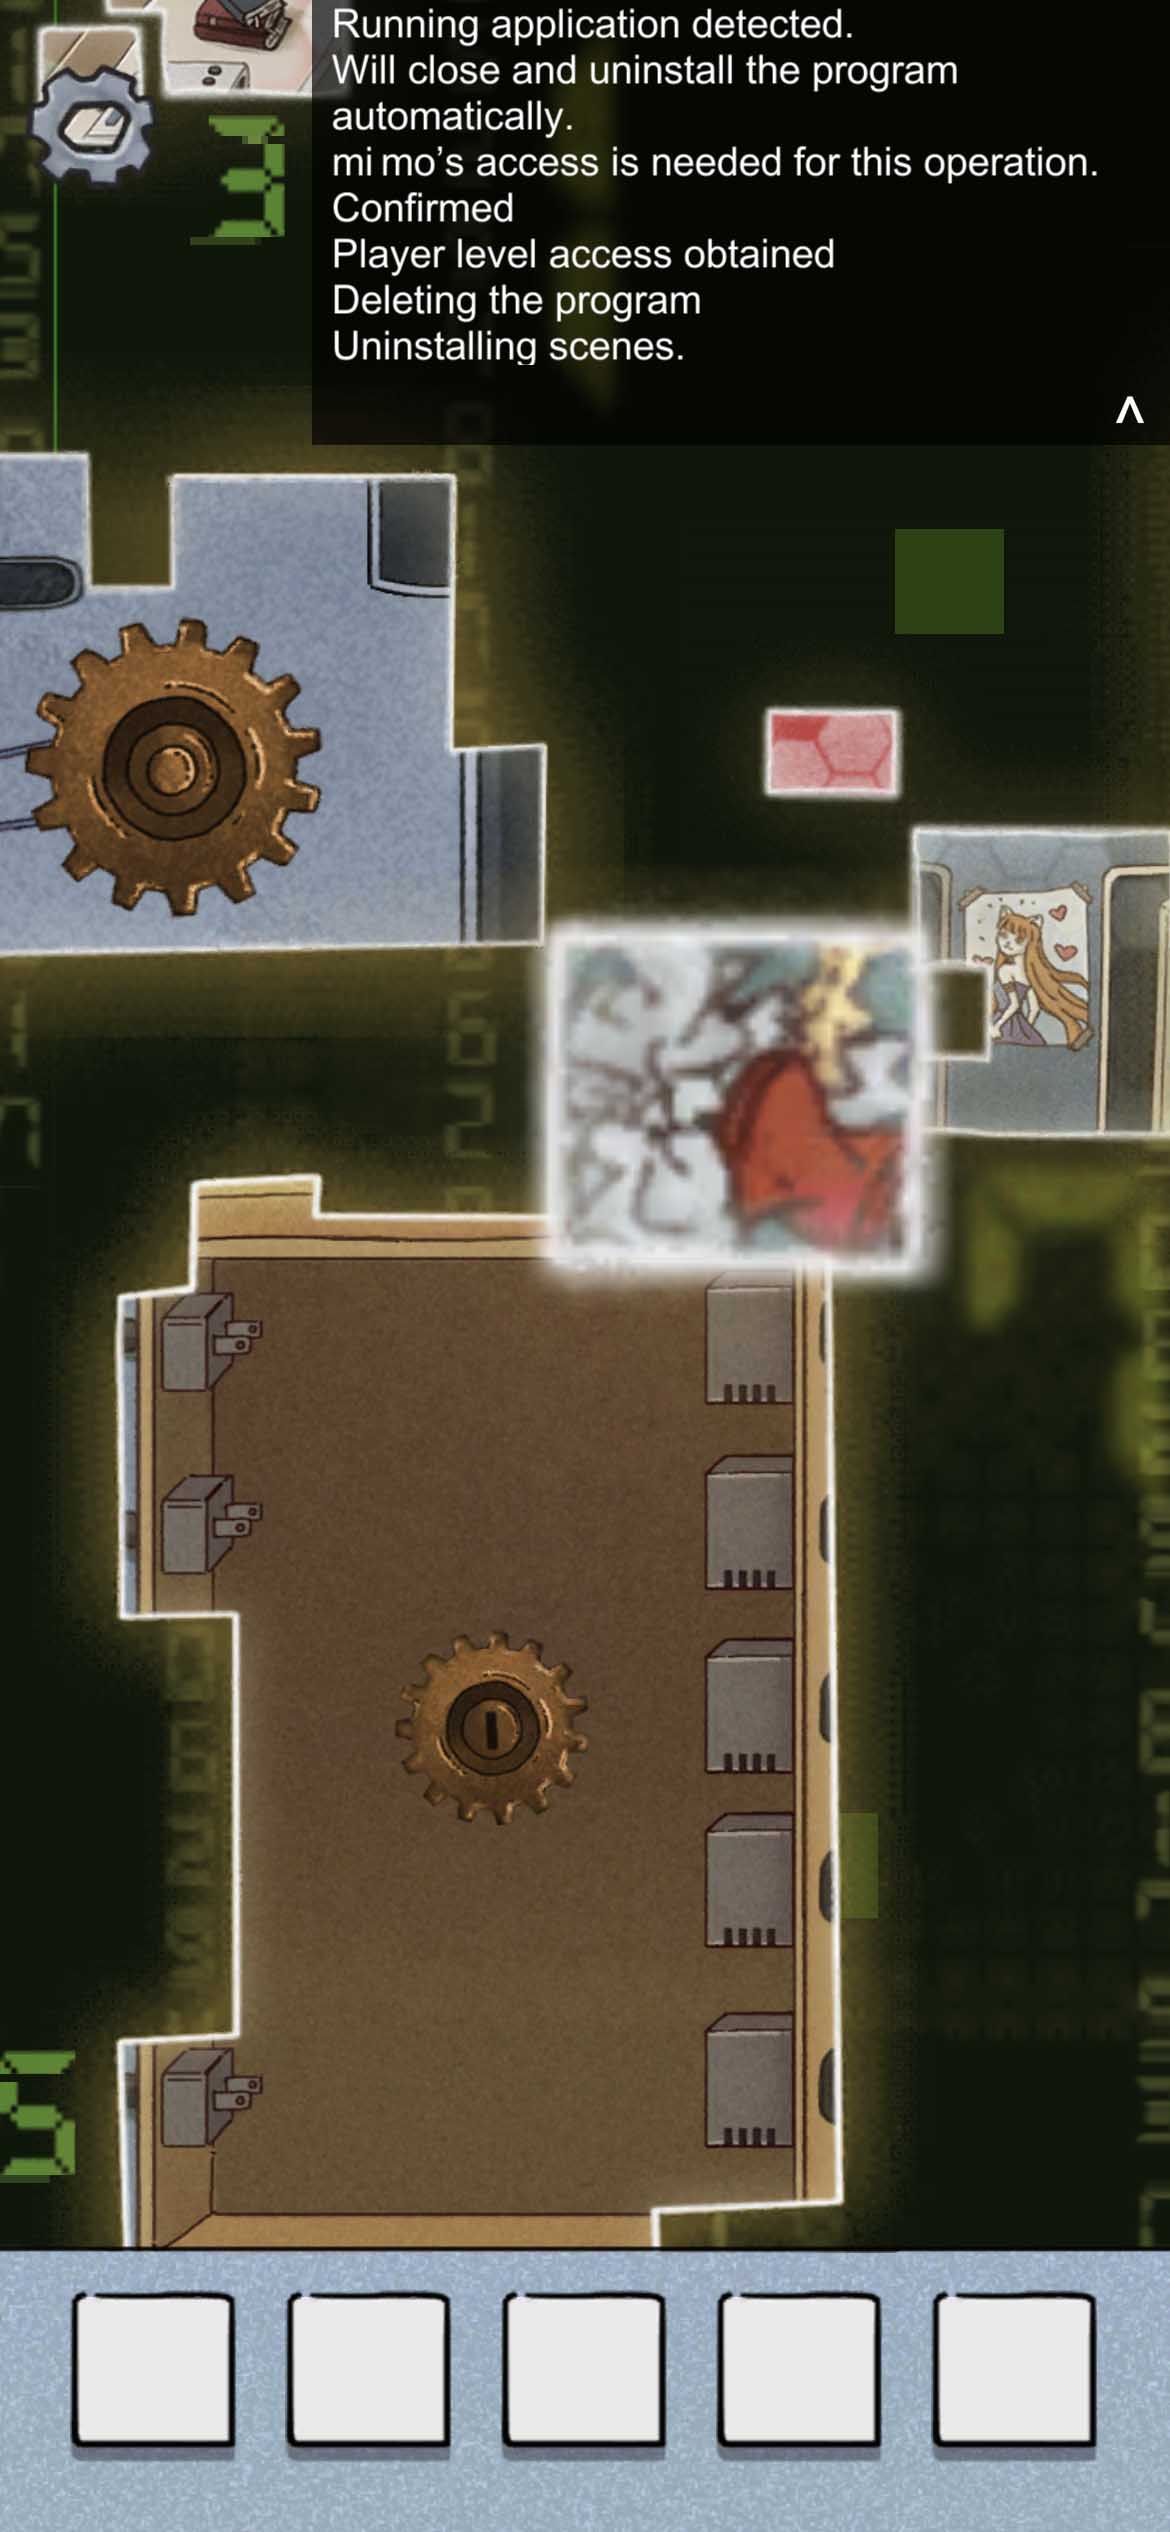
PART 2
· Police Office
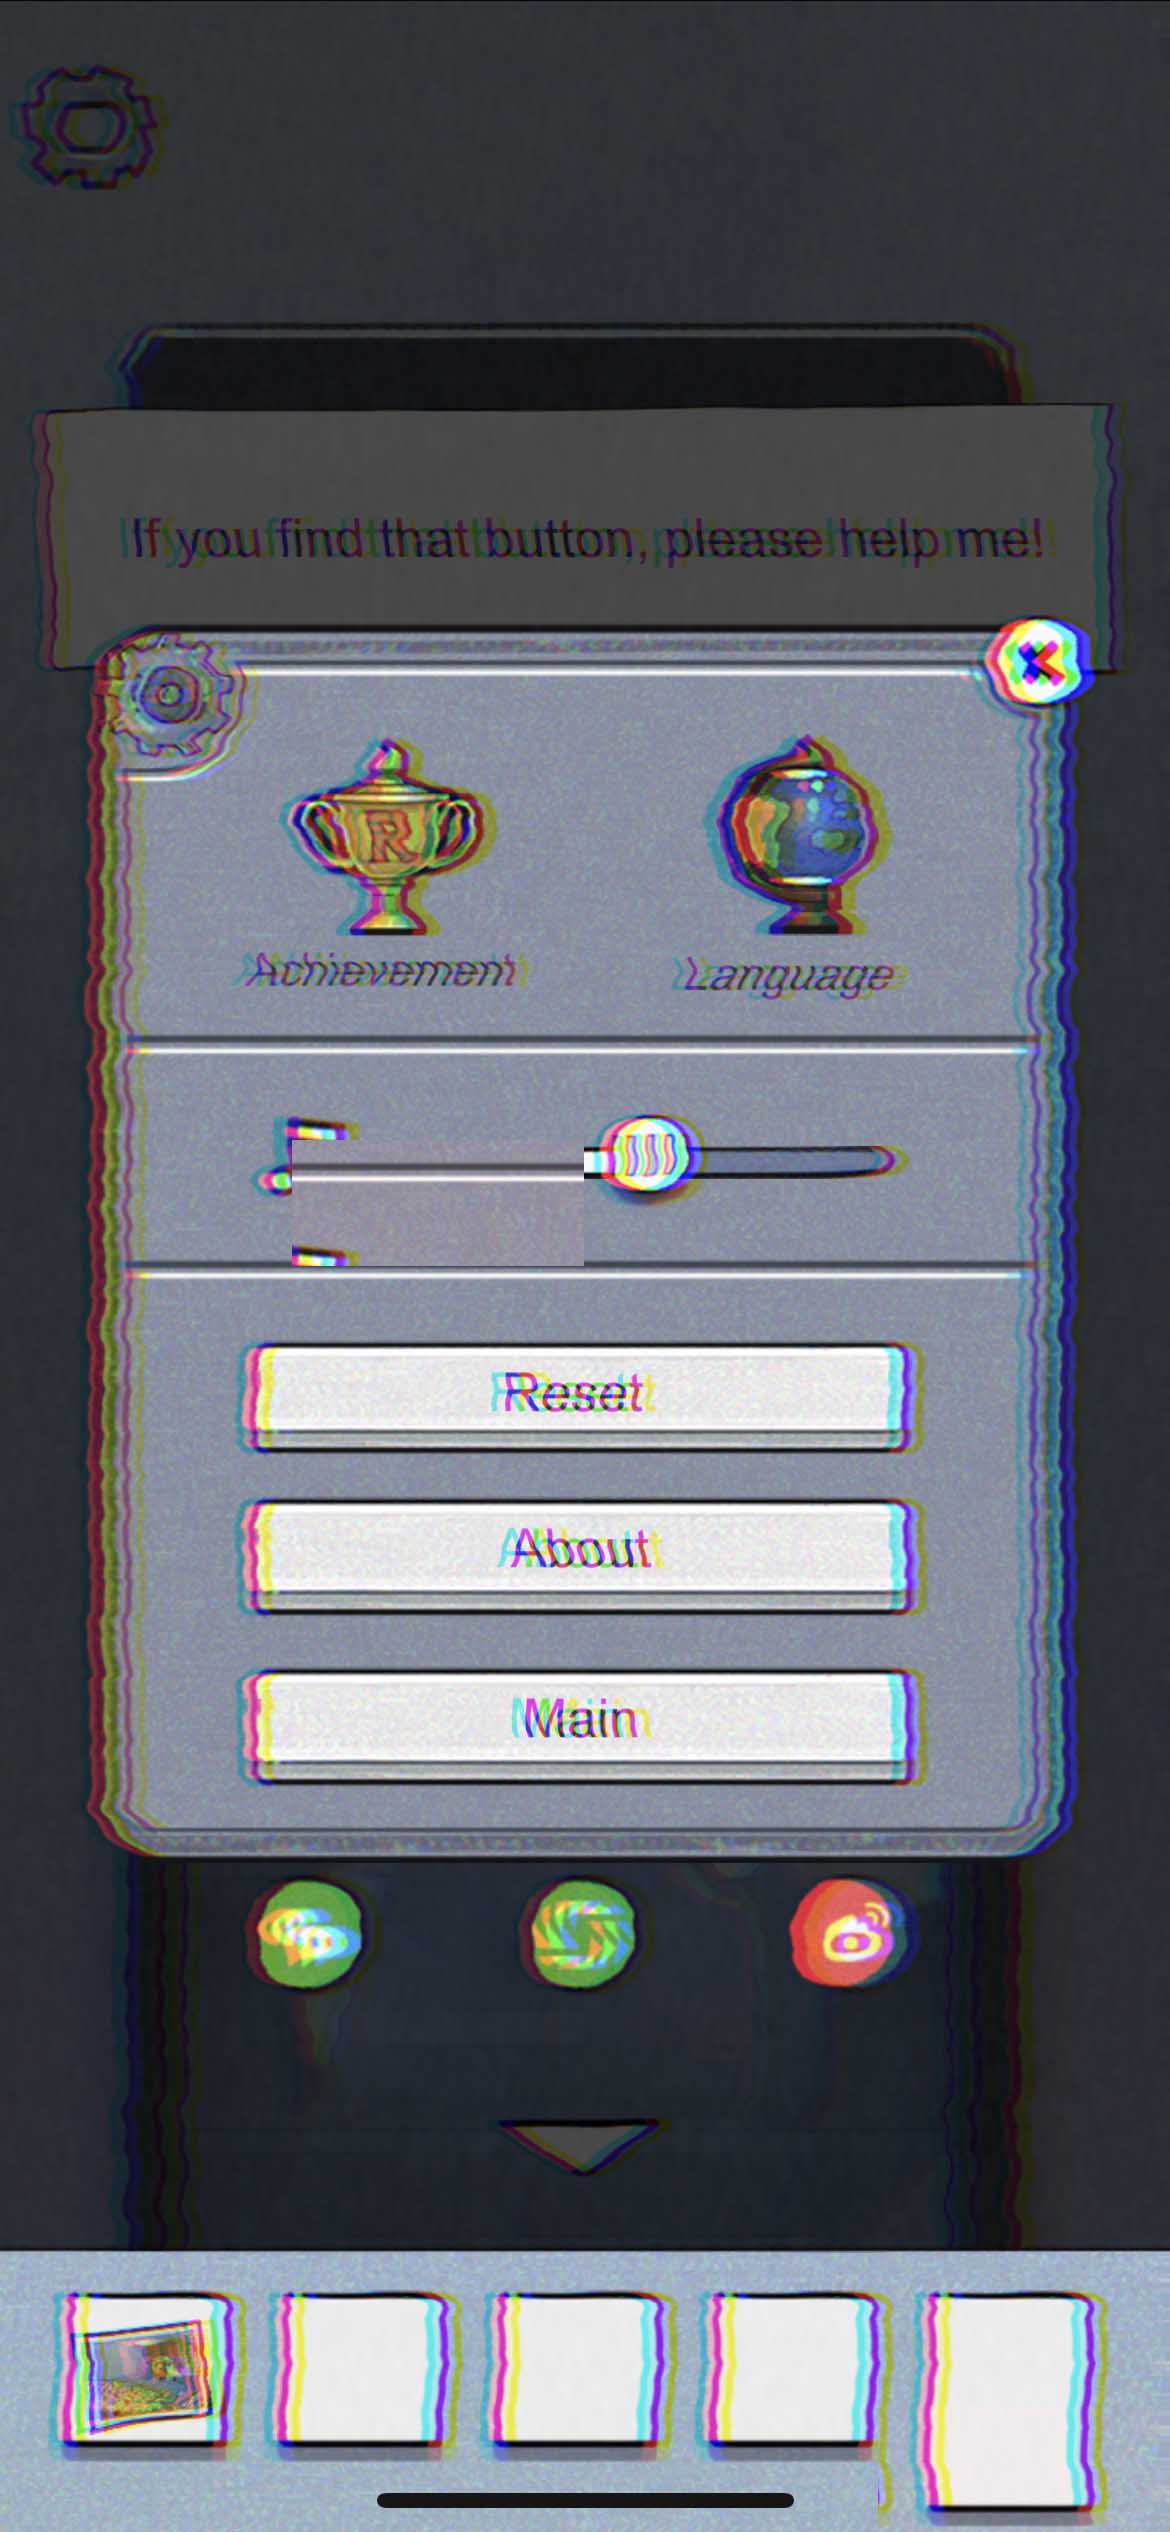
Find a QR code on the box on Mimo’s desk. Use any app which has QR code scanning function to scan the code, and it says you need you to change back the game’s language. Open the game’s setting panel, find the language button (a globe), change it back to the language you are using.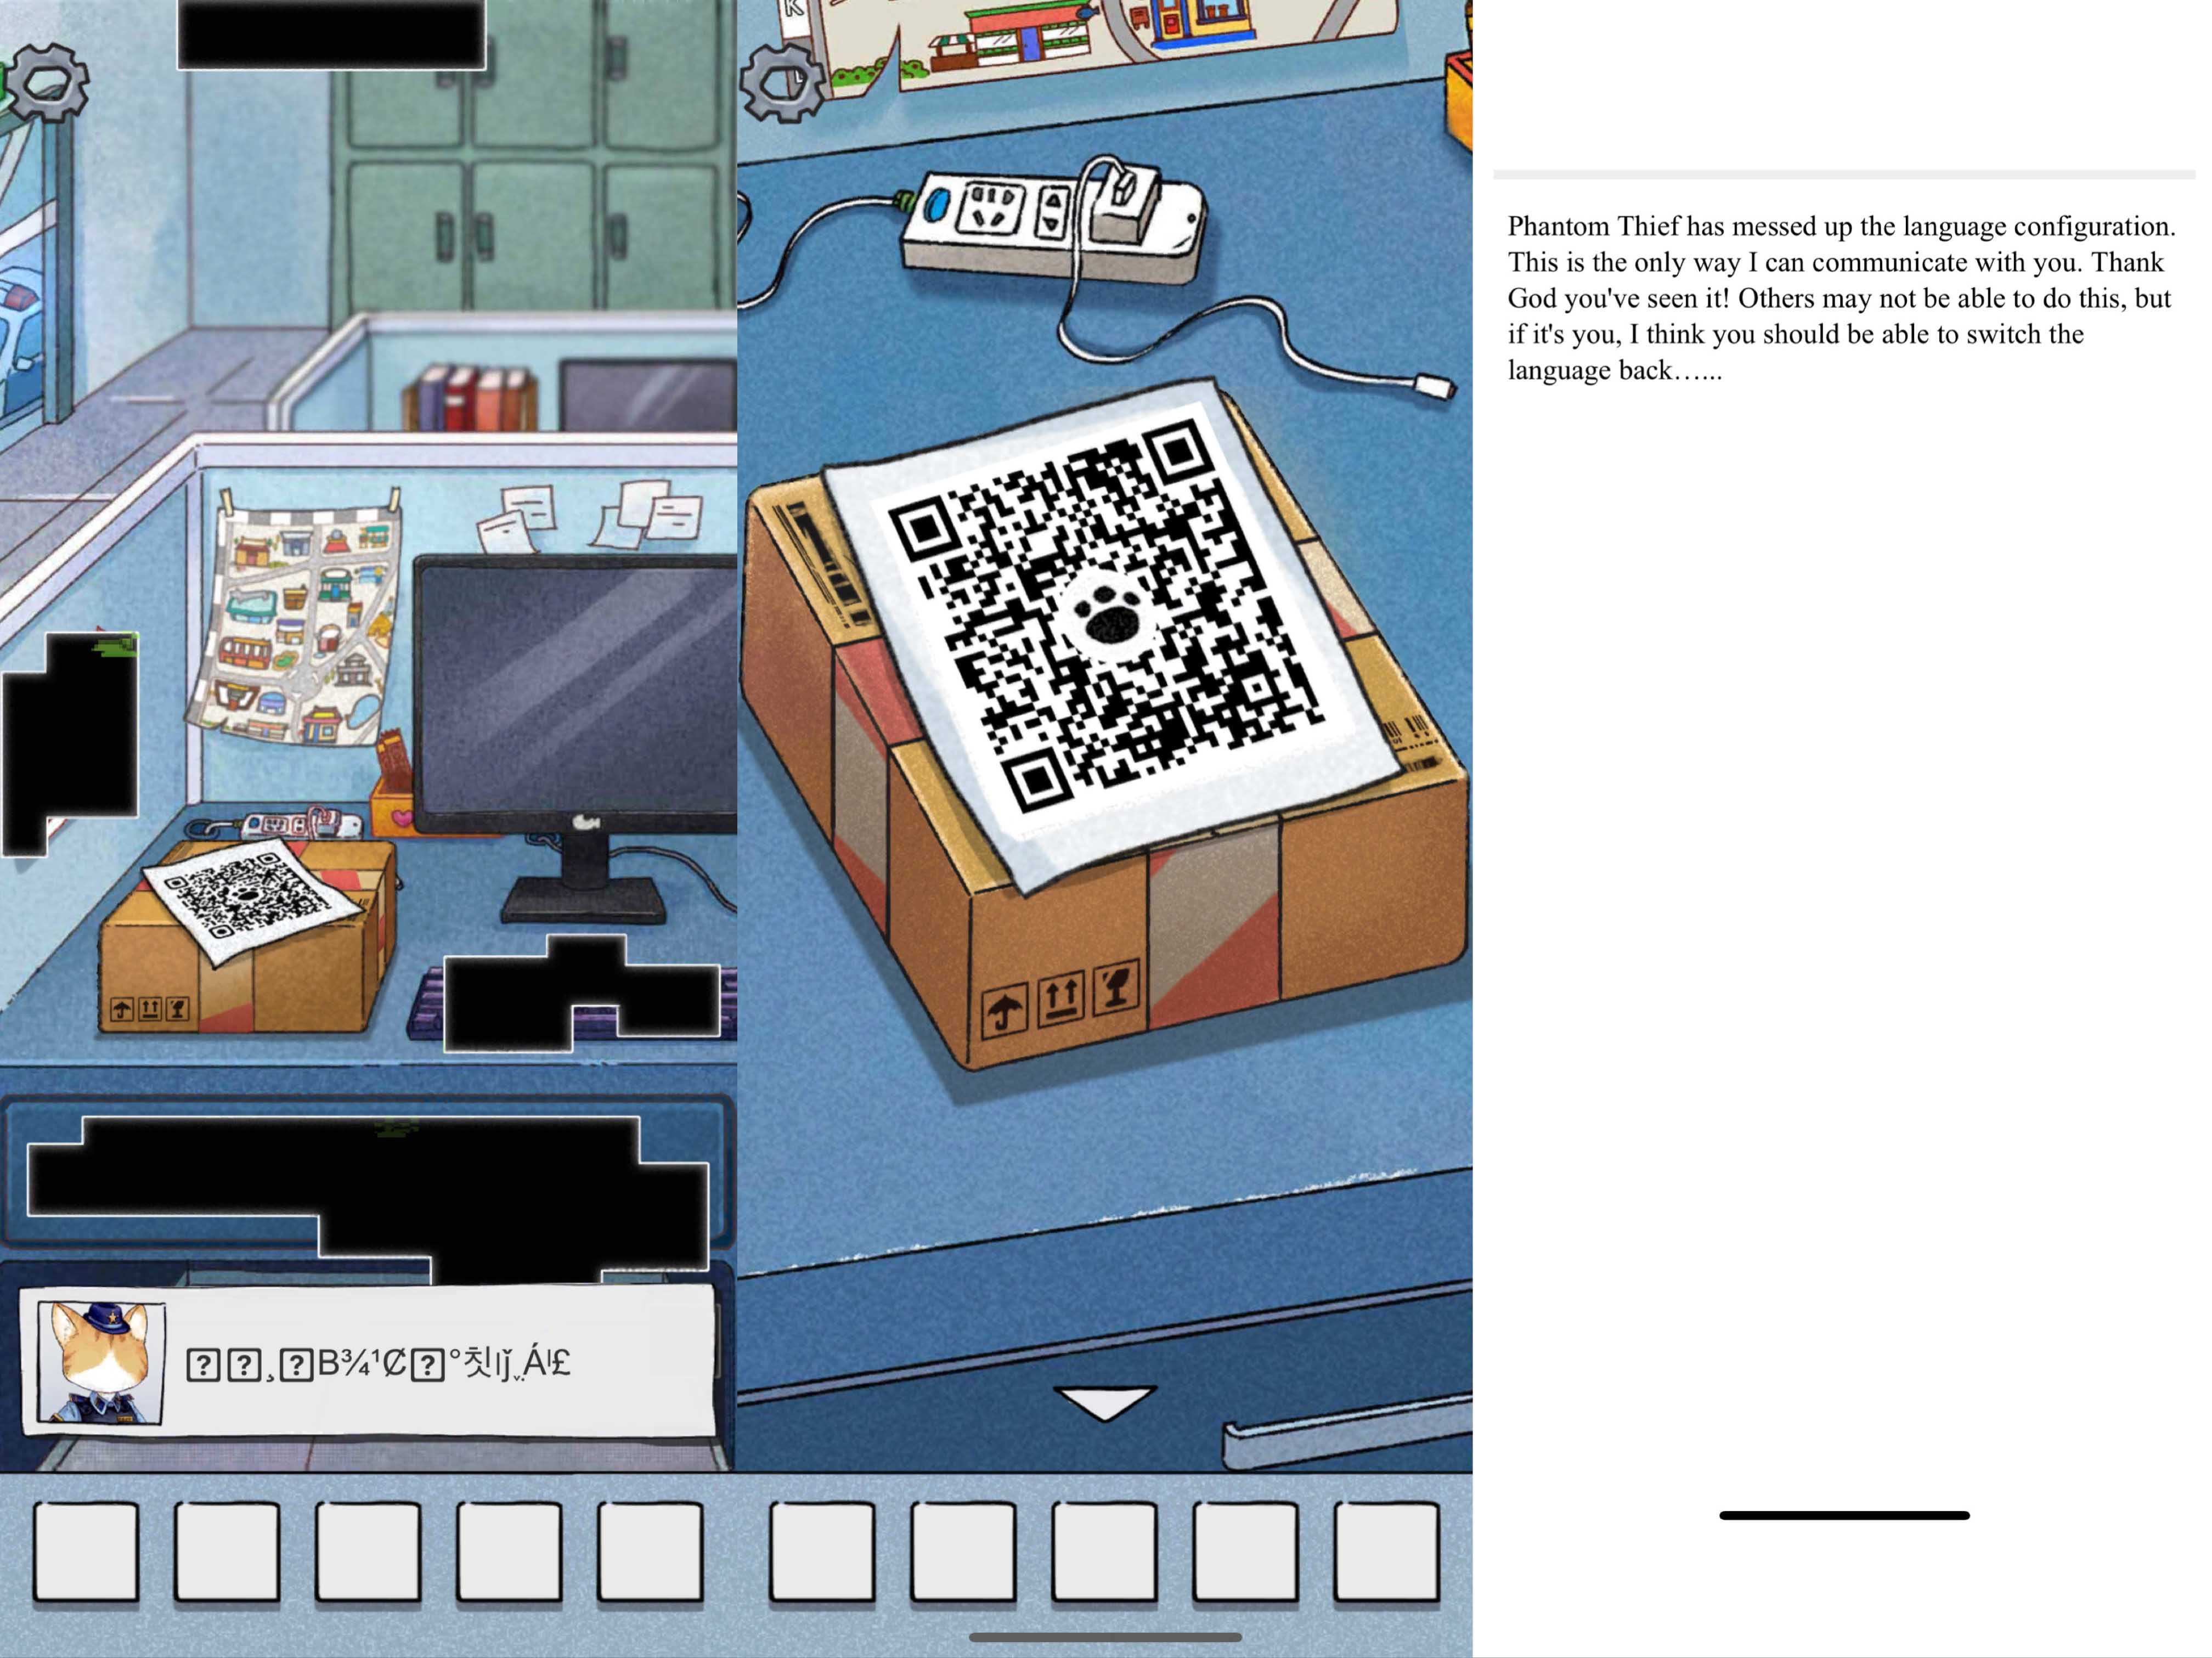
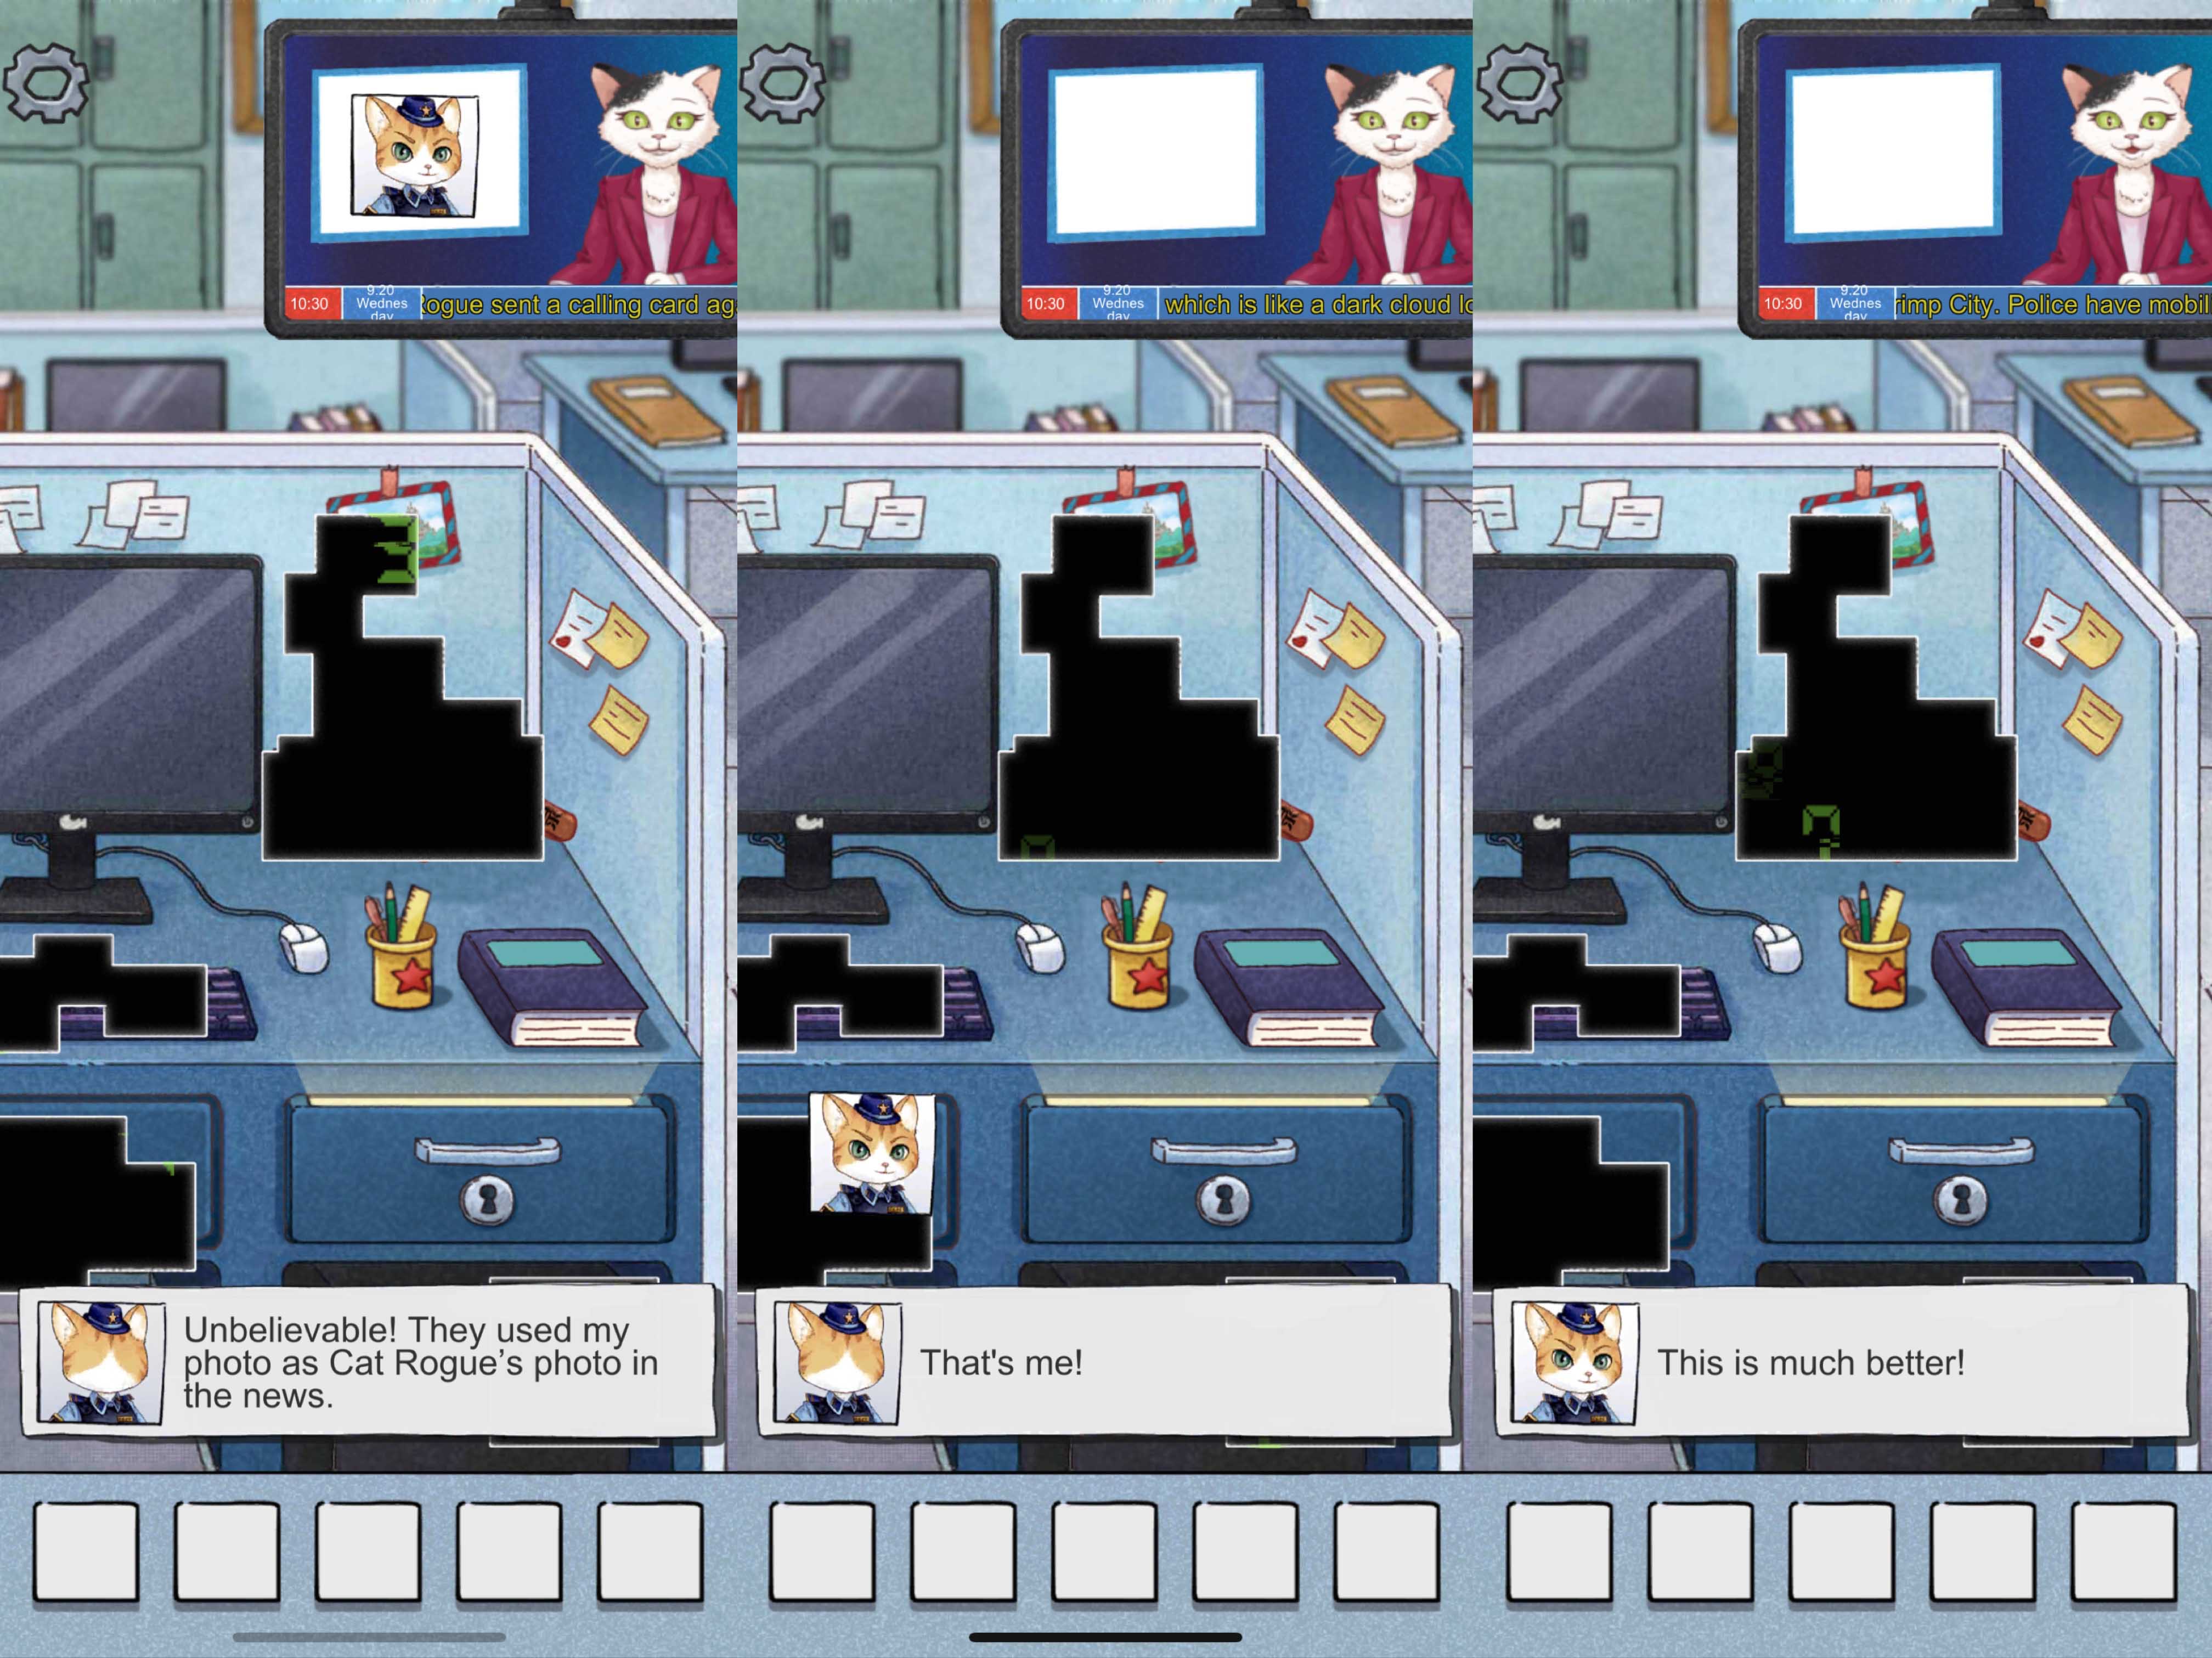
 Then Mimo says she has lost her face.
Find a TV, the news report has Mimo’s face on the screen. Drag her face down.
· Bank
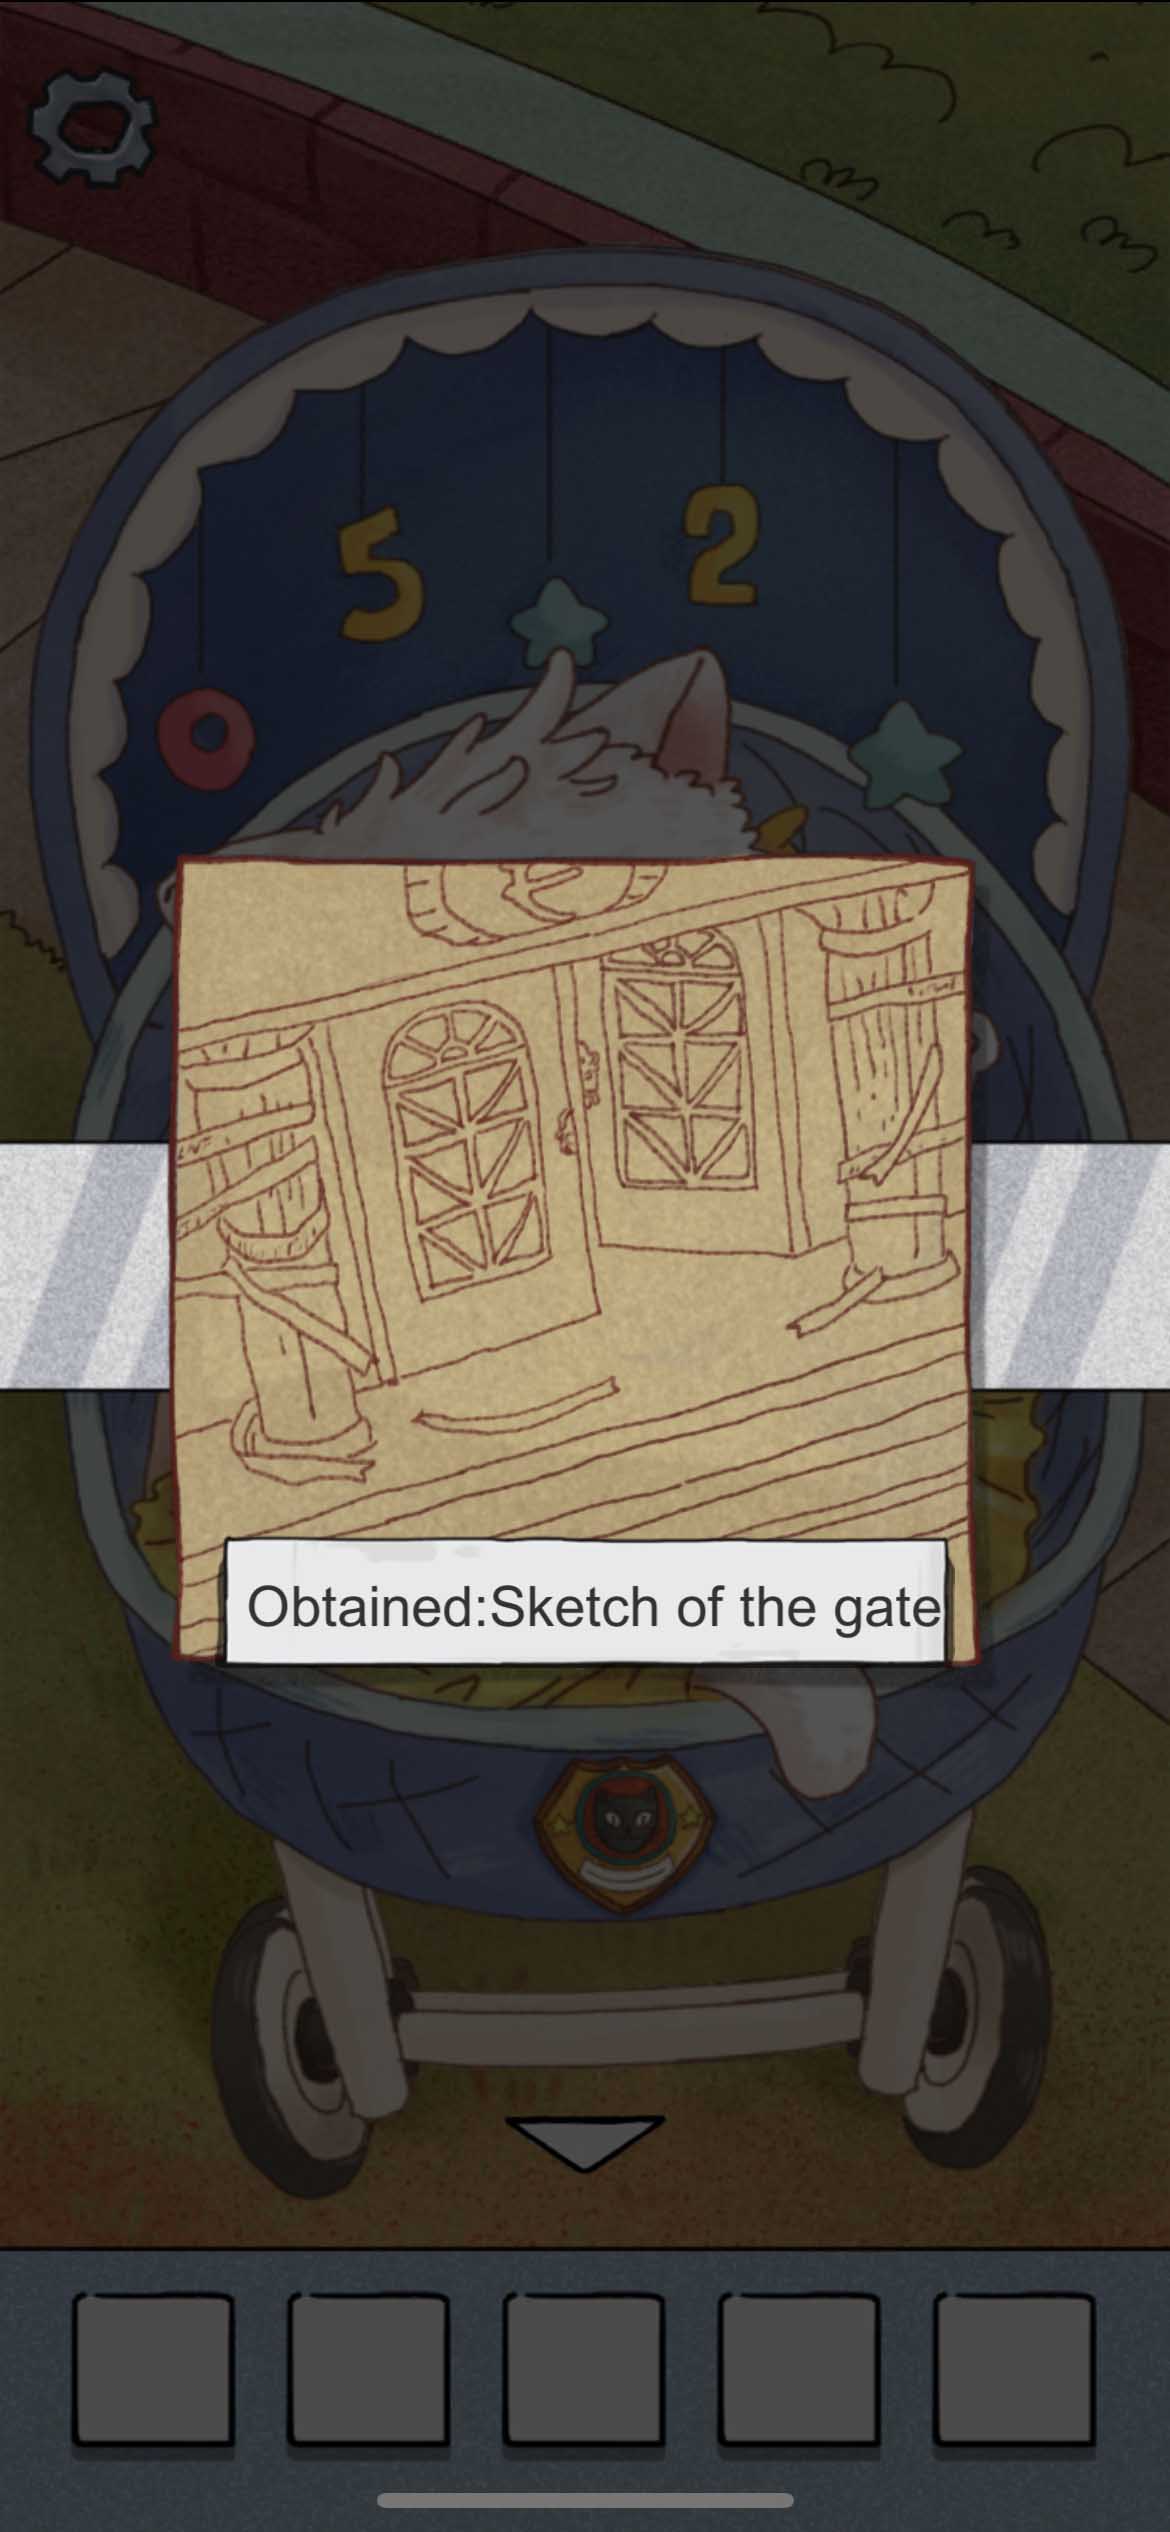
Go to the bank again.In front of the bank, the door has disappeared. Find Agent 52 in the stroller. His face is shredded into pieces. It is pretty much like a Rubik’s cube.
By fixing his face, he would give a drawing of the bank door.
 Instead of using the drawing to the bank, you should carefully move the map to match the drawing. Once it is
completely matched, the door to the bank will reappear.
Instead of using the drawing to the bank, you should carefully move the map to match the drawing. Once it is
completely matched, the door to the bank will reappear.
· Hall
In the hall, the mew button of the ATM is missing. Find the same mouse device on the desk. Instead of shaking the device, this time you need to shake your phone to move the device. The sequence of shaking is: 3 times to the right, 2 times to the left and then 4 times to the right.Open the desk, you get the missing mew button. Press it for 3 seconds, then the image gets broken, and you are stuck there.
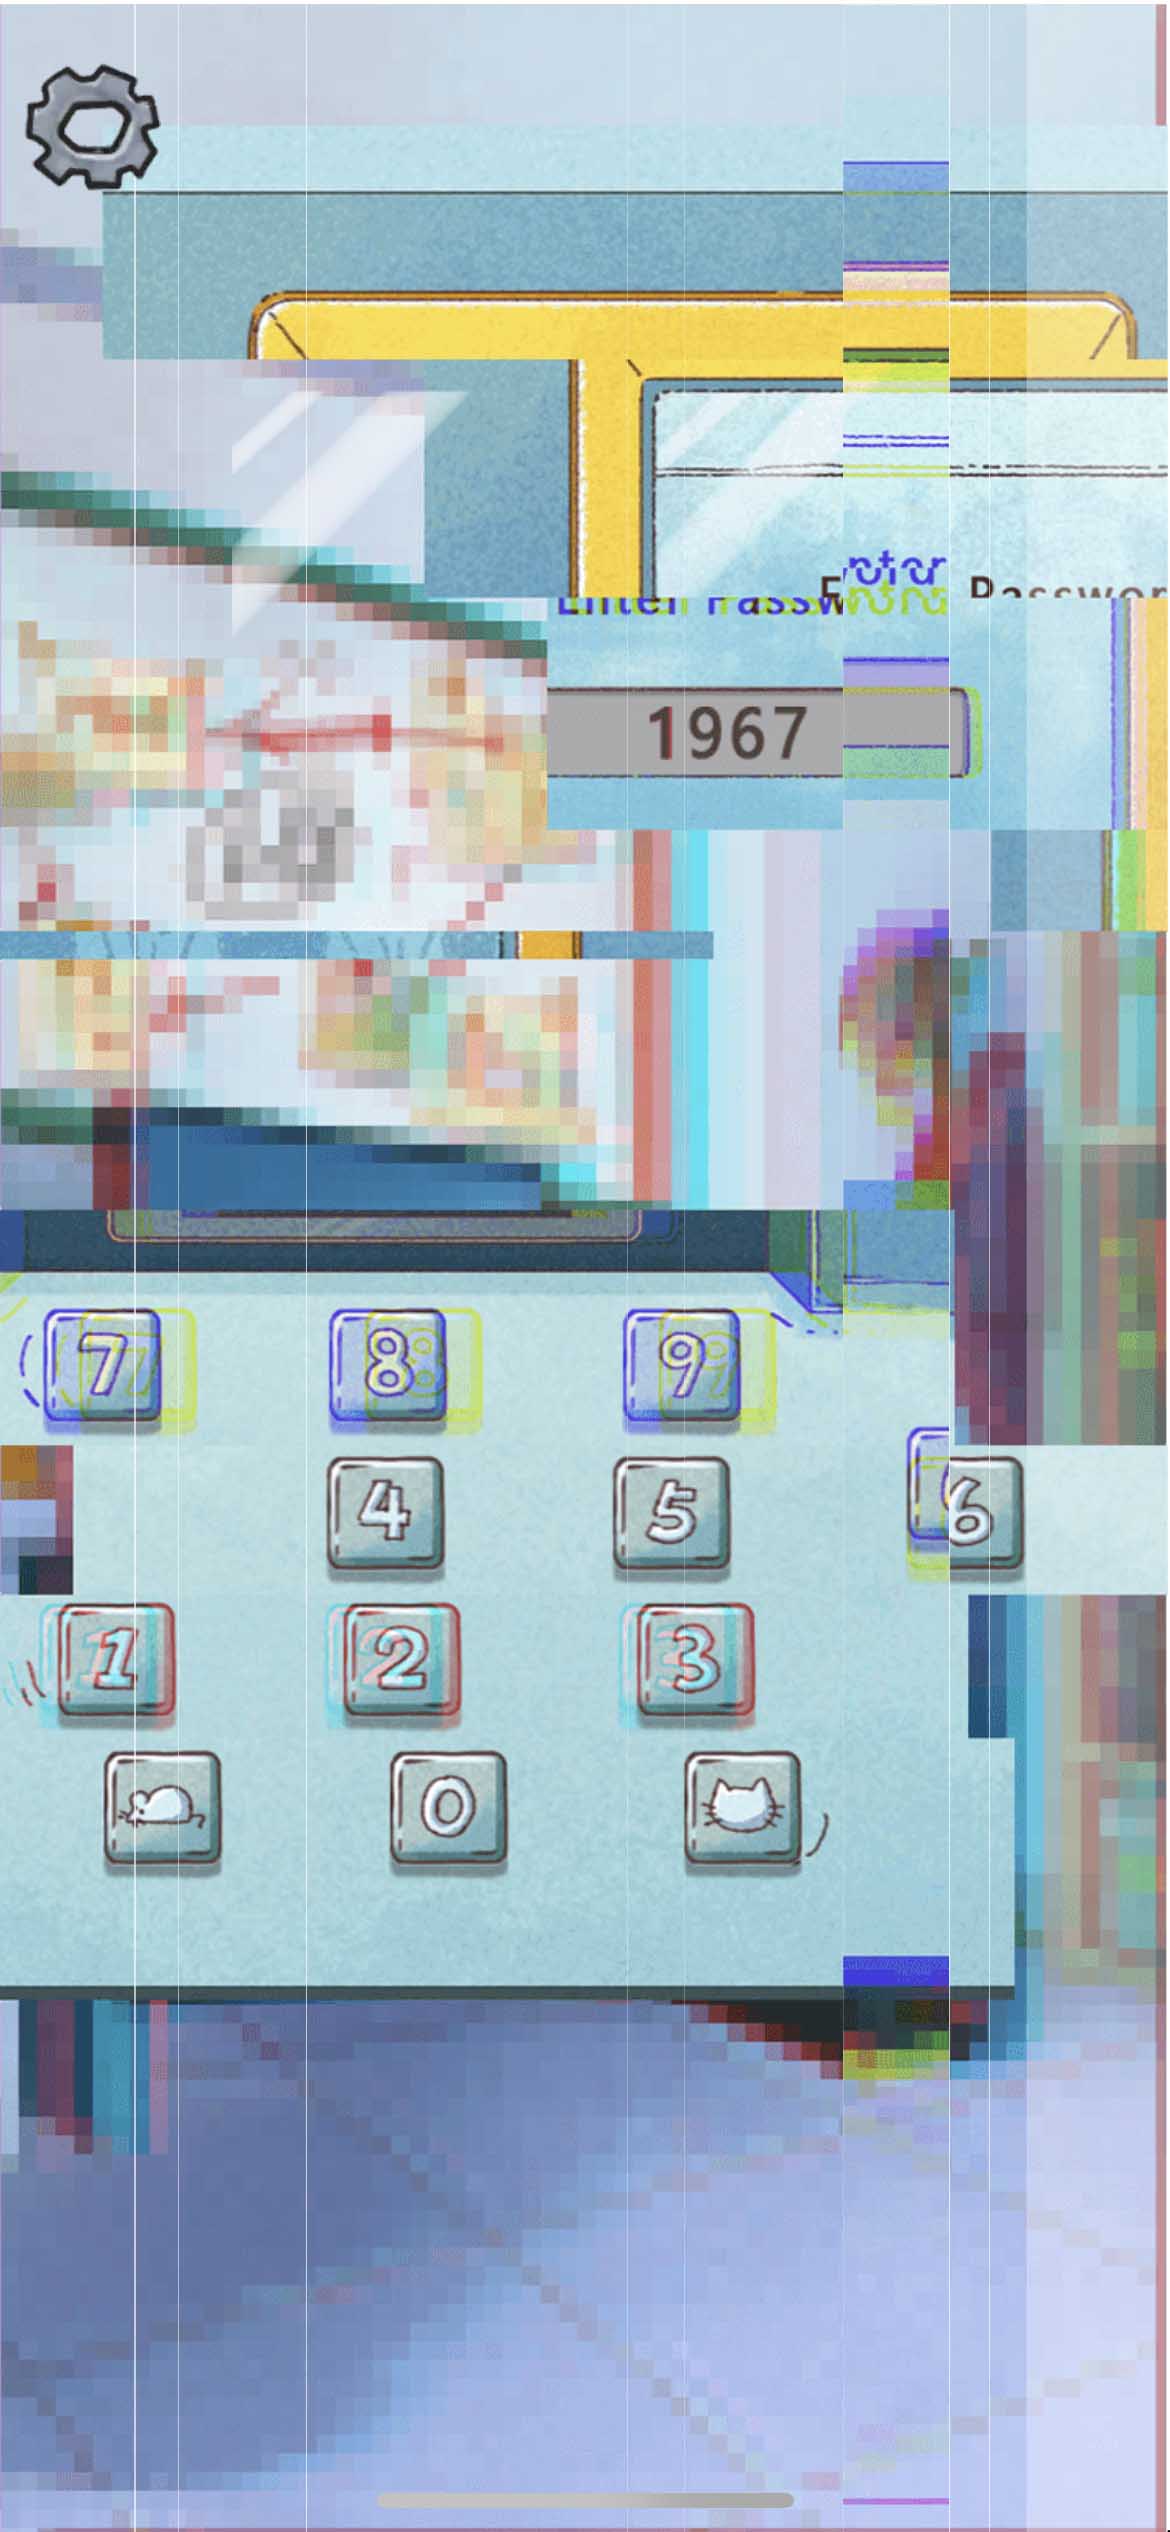
 The Cat Rogue says you should quit game. Back to the main menu, a piece of paper will fall down and reveal a code
1967 hidden behind.
The Cat Rogue says you should quit game. Back to the main menu, a piece of paper will fall down and reveal a code
1967 hidden behind.
 Back to the game, input 1967.
· Corridor
Go into the corridor again.It is totally black in the corridor. Open the power box, you find an image looks like telling you to charge your phone. You should charge your phone. The power will back on.
 There is a vast void to the right. Find a CD in the void and put it in CD player. Listen to it carefully, you will
find a whispering says “wayout”. Input “wayout” to the encoded door.
There is a vast void to the right. Find a CD in the void and put it in CD player. Listen to it carefully, you will
find a whispering says “wayout”. Input “wayout” to the encoded door.

· Security Guard Dormitory
In the security guard dormitory, you will find another game card and play the Mario-like mini-game again. In the end, it will give a hint on how to get through the vast void.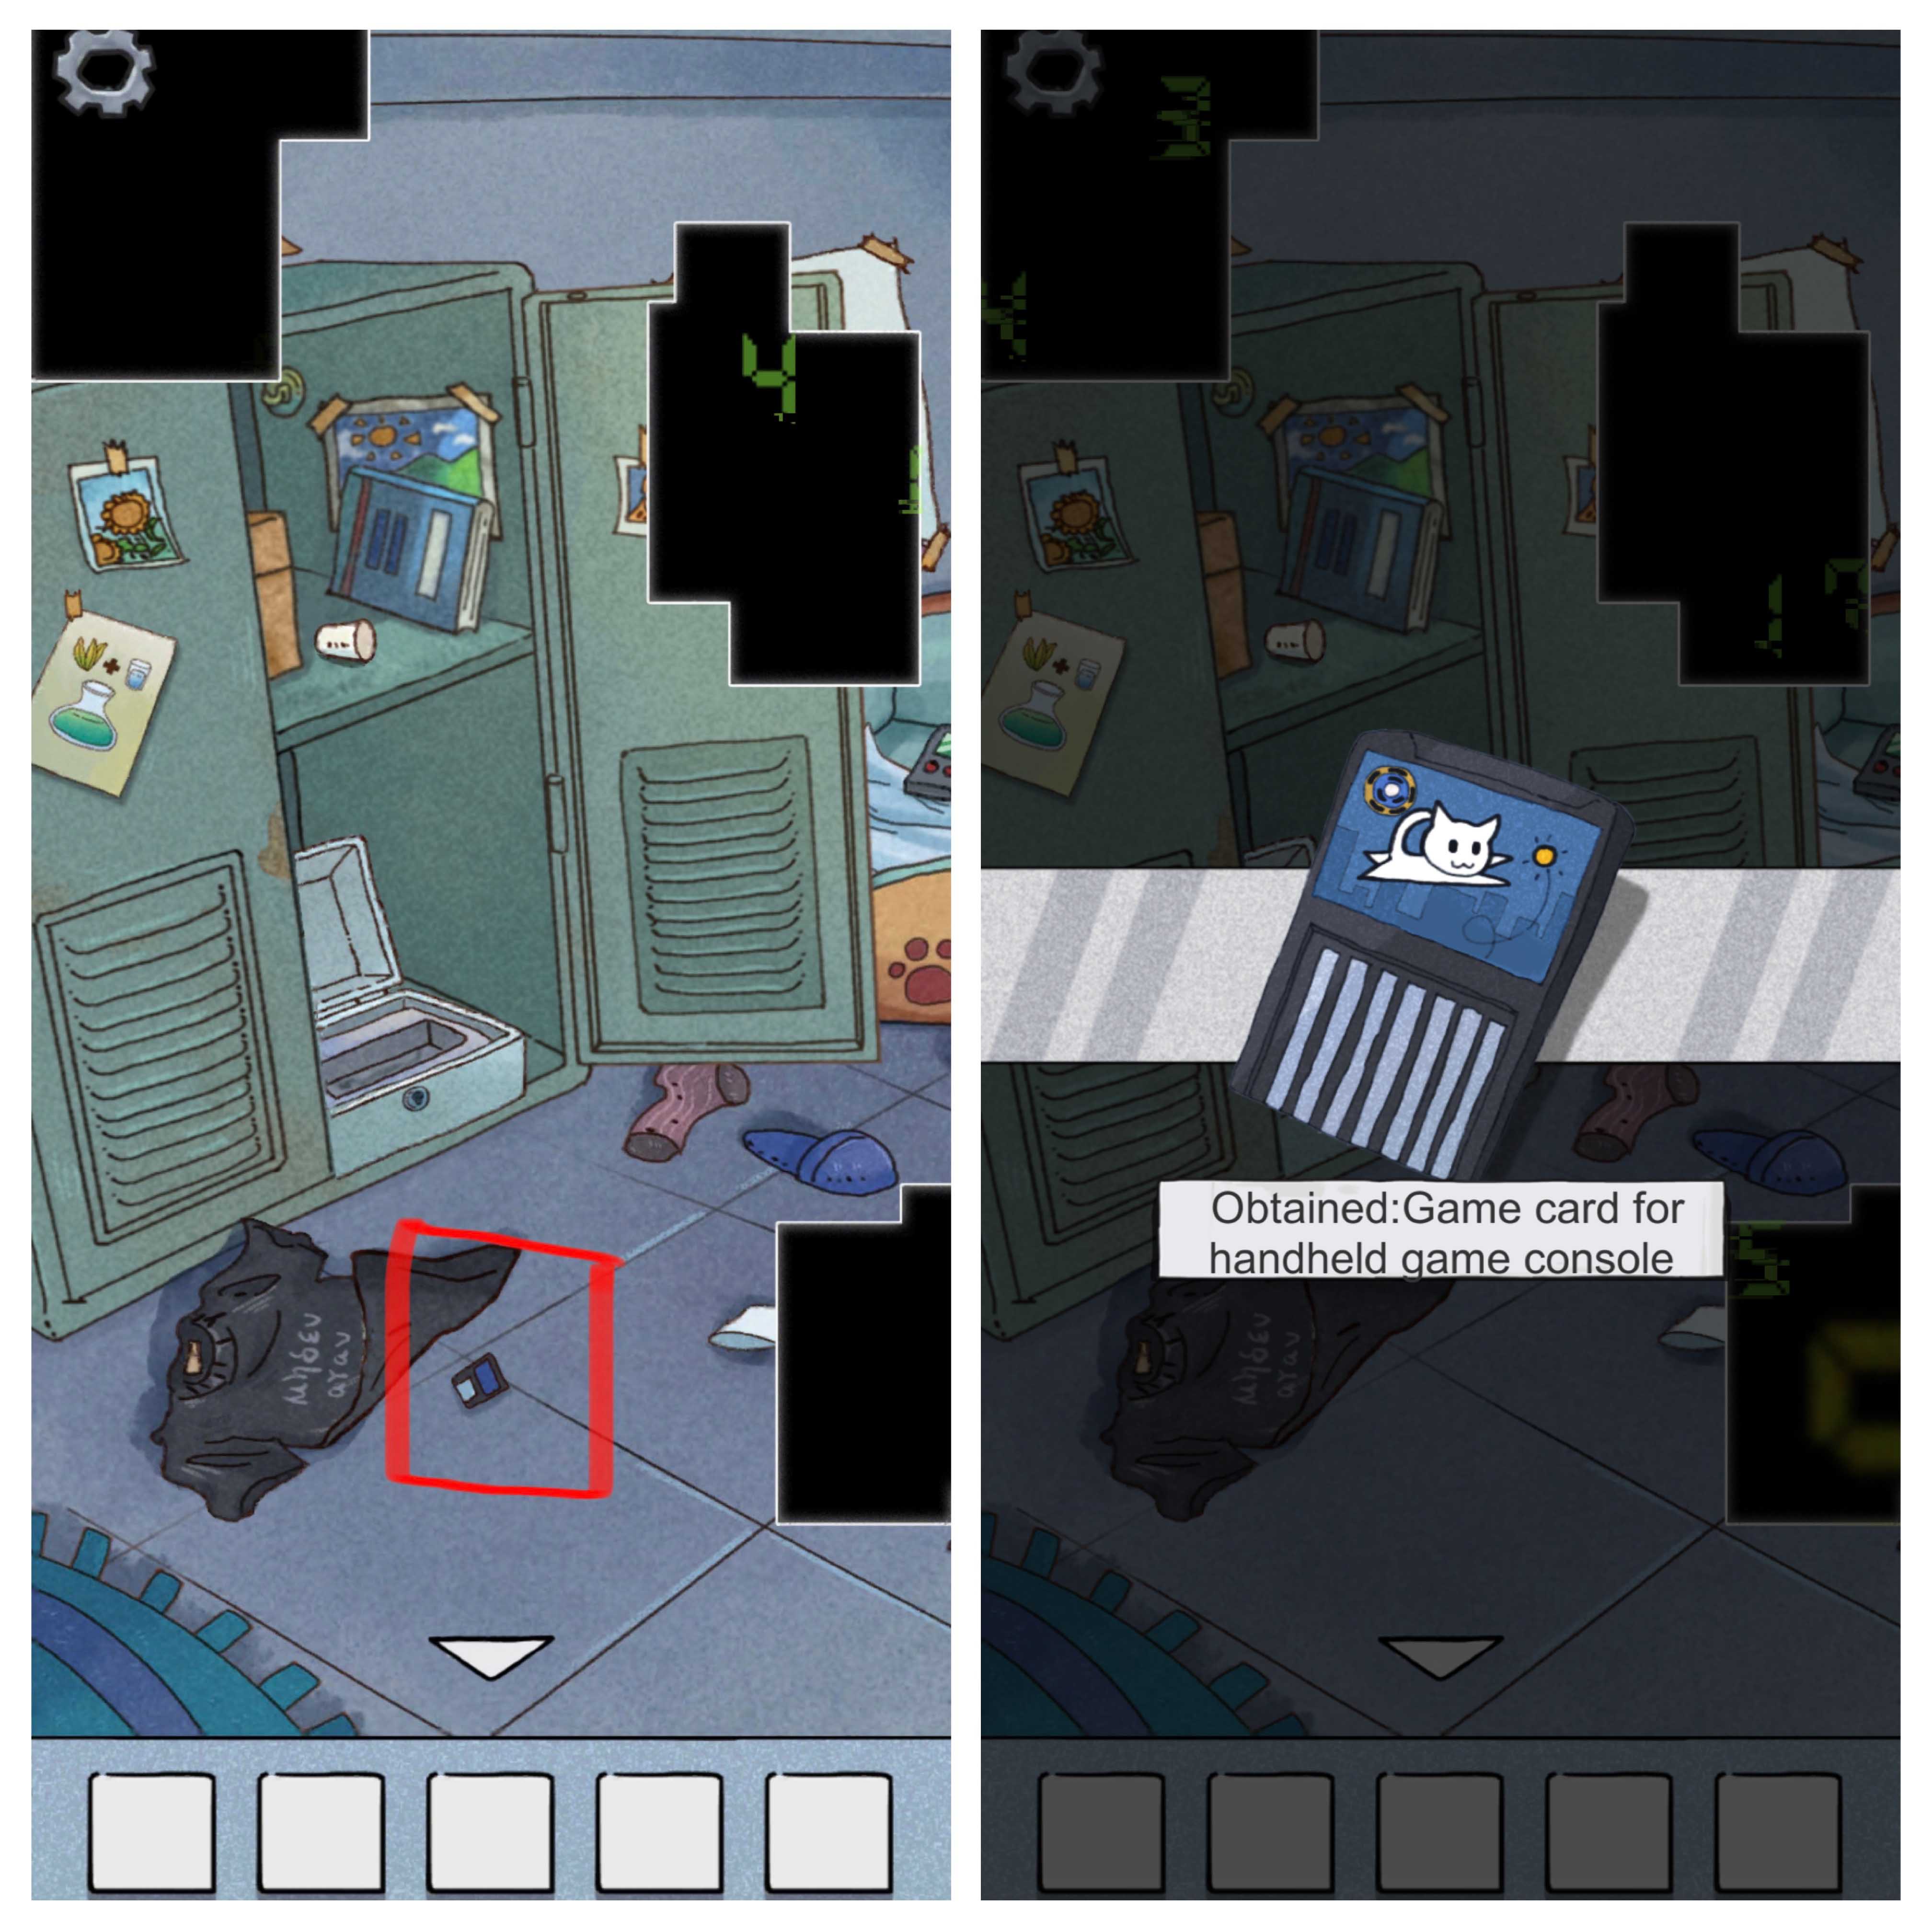
 By dragging the void, you will get through it and move to the right part of the corridor.
· Machine Room
Get into the machine room.The game shuts you out.
 When you reopen the game, you will find you get stuck on the main menu. Notice that Mimo points to a note on the
board. Click the note, it says “paste”.
When you reopen the game, you will find you get stuck on the main menu. Notice that Mimo points to a note on the
board. Click the note, it says “paste”.
 Click the input box, try to paste in the box.
 You may also paste it in other apps. And you will read a text that hints you how to open the secret chapter.
Back to the game again.
Check the computer in the server room.
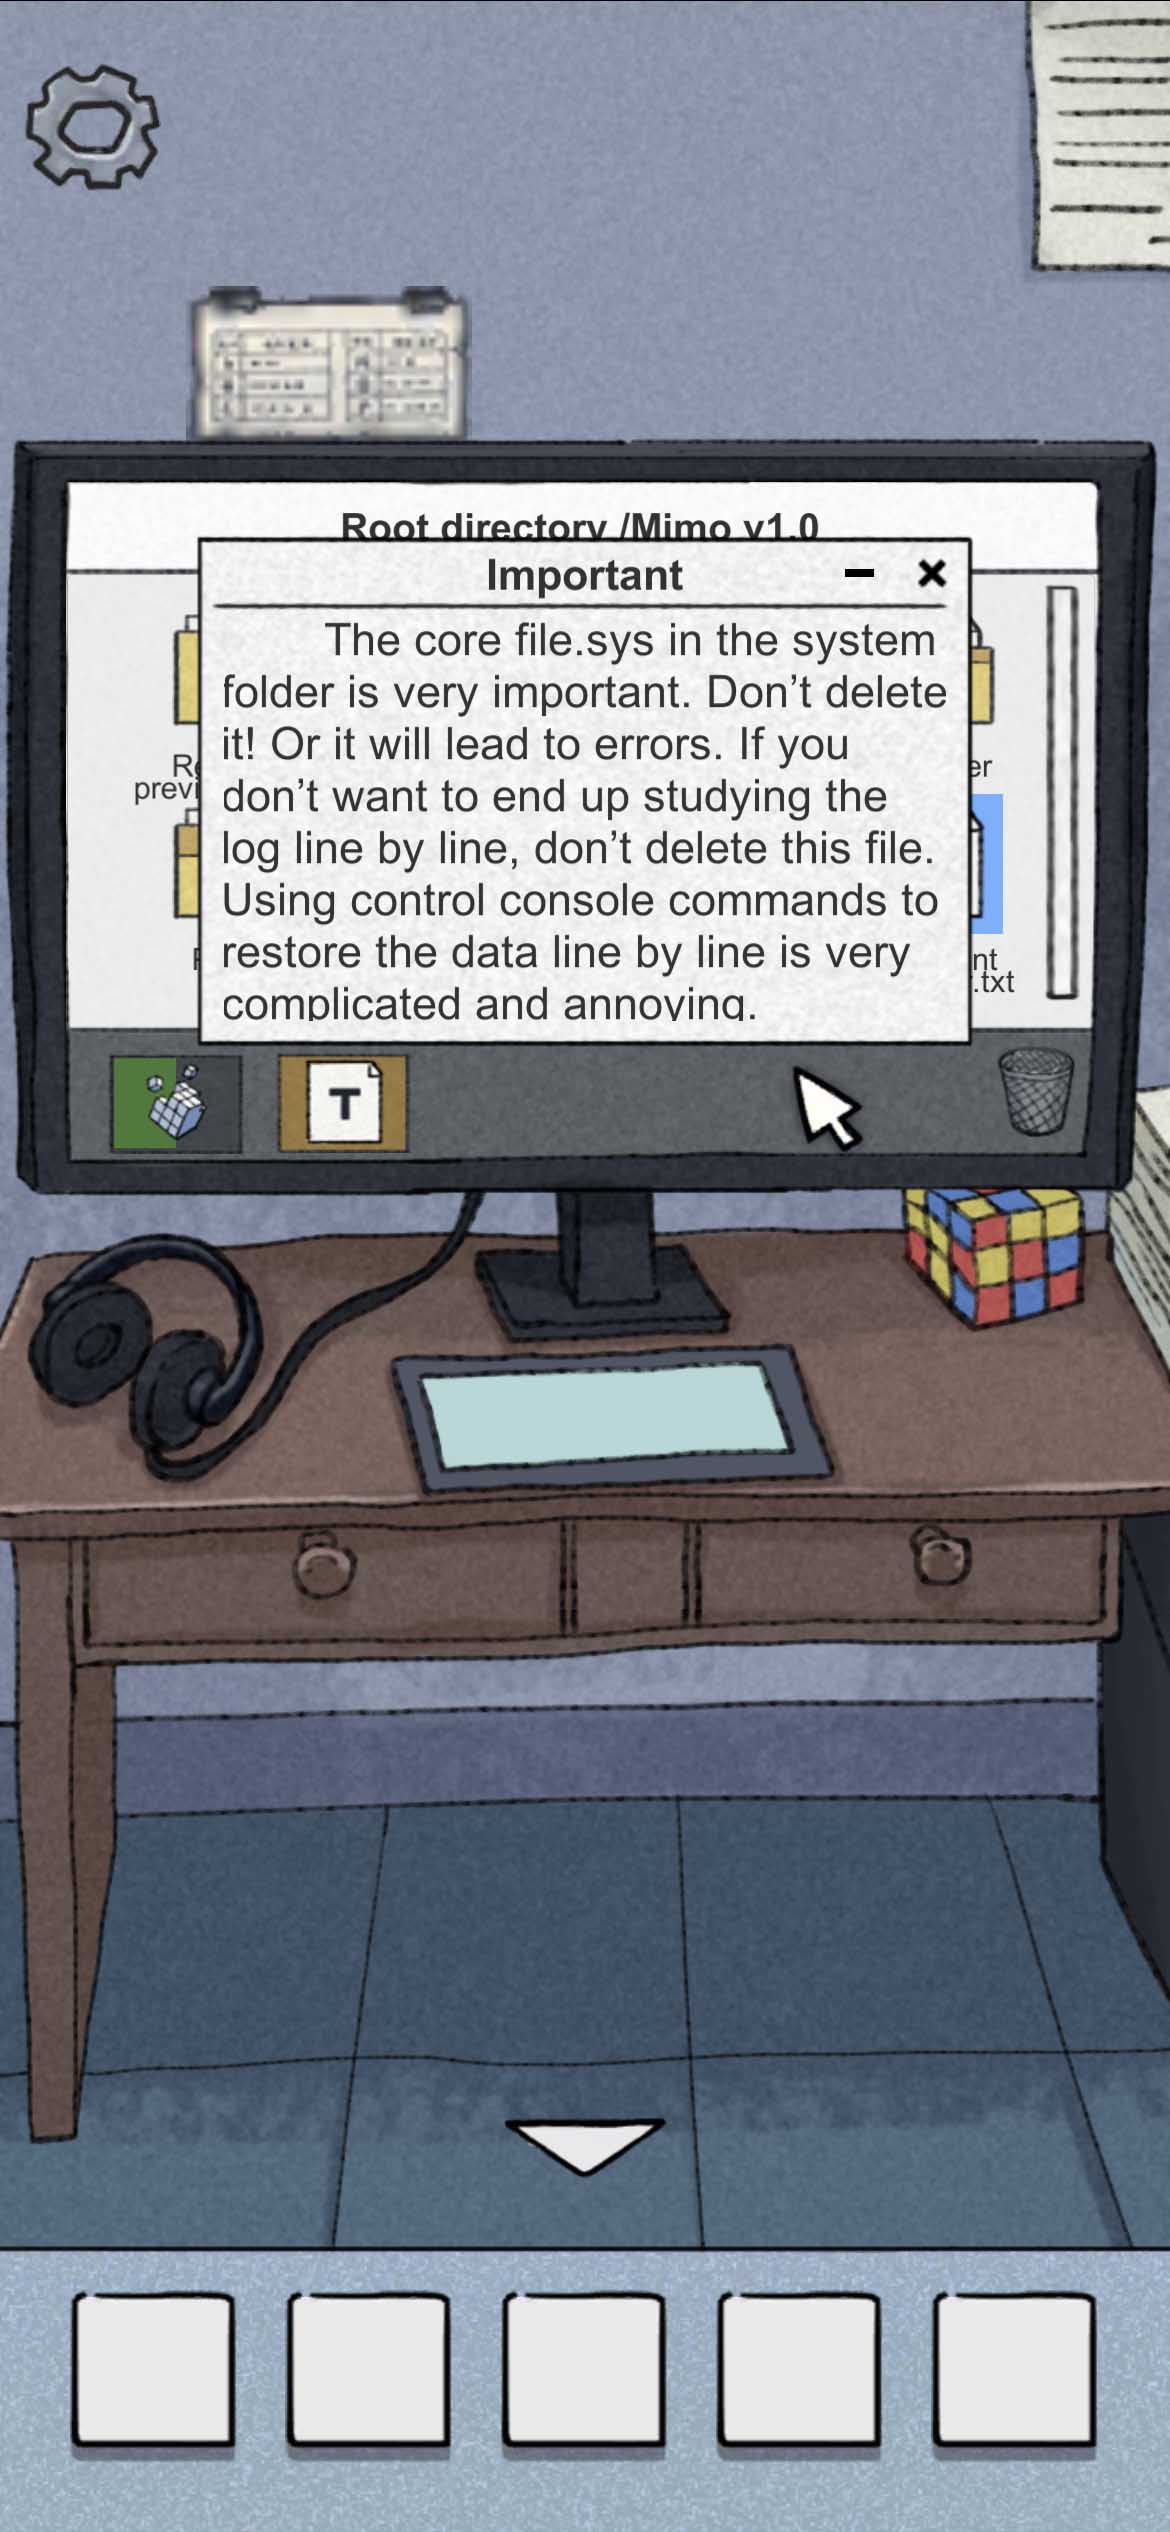
The “important” file note says you should not delete the “Core file. Sys”, which means you should delete it.
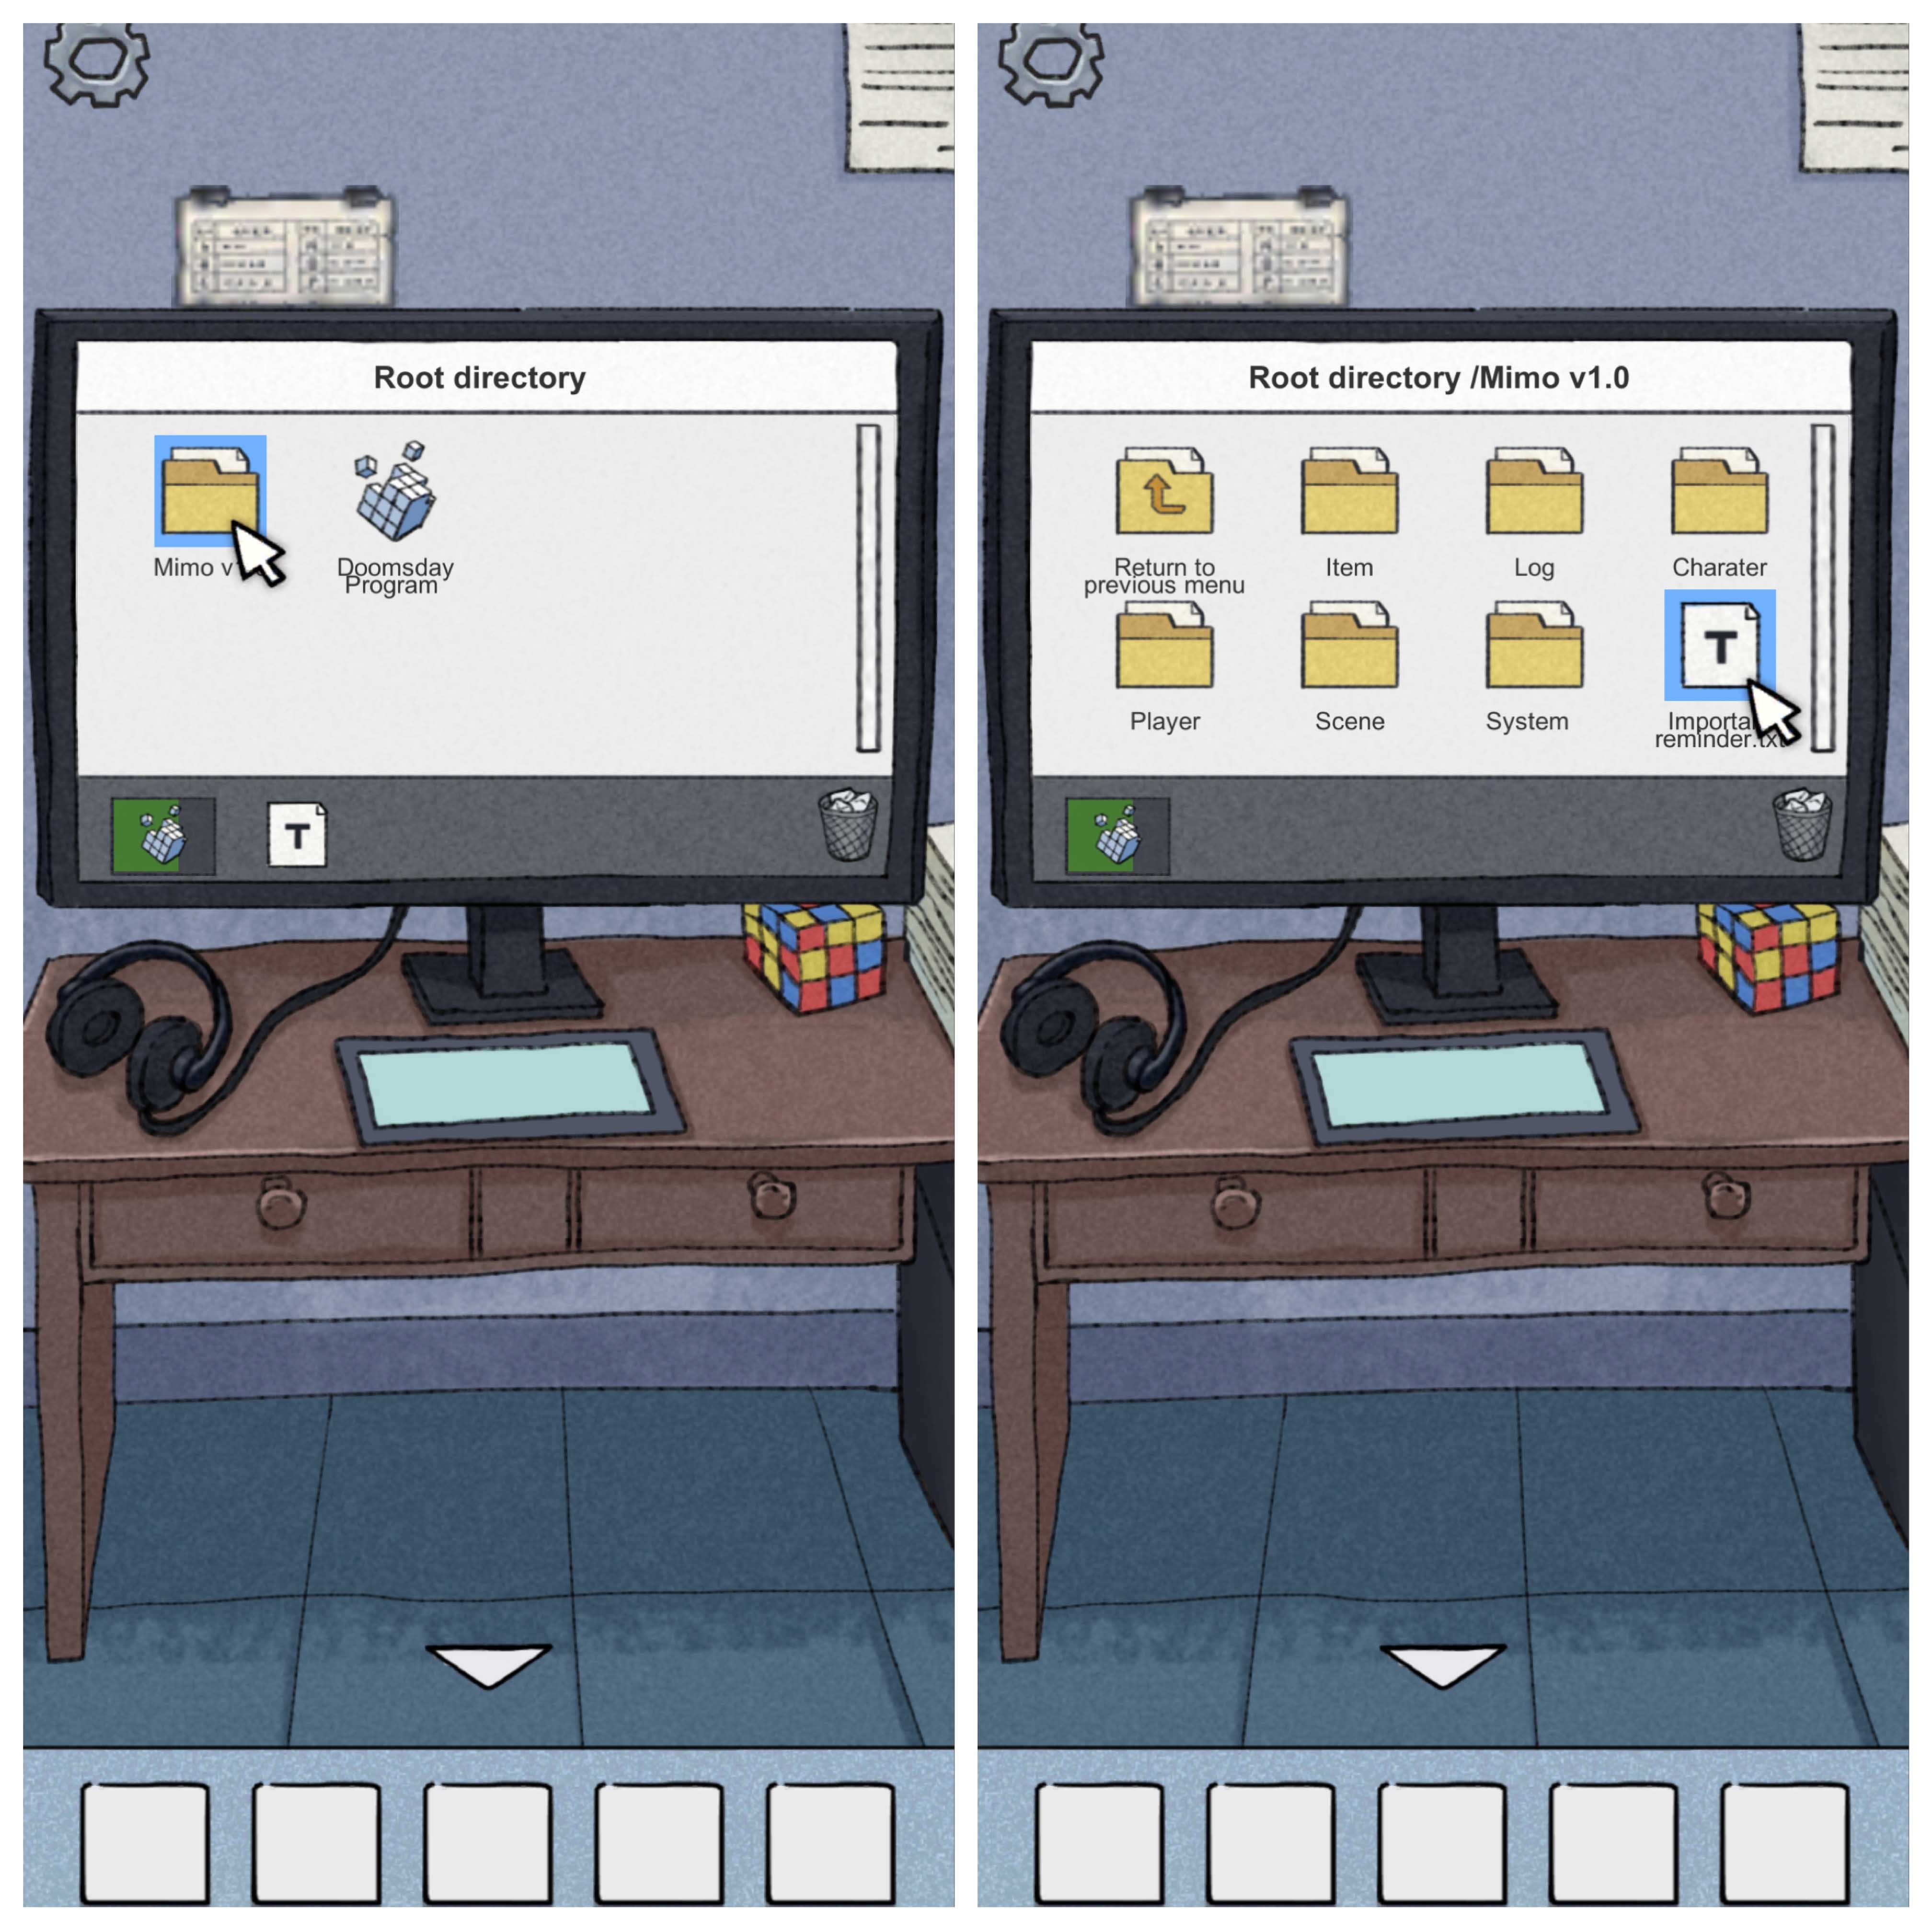
 Find the Error Log file, it says there is an abnormal file.
 Follow its path and find the basic information file. In the file, it mentions that you should click the Cat System
5 times in the Coreinfo.
Follow its path and find the basic information file. In the file, it mentions that you should click the Cat System
5 times in the Coreinfo.
 Find the Coreinfo by following the path mentioned in the Error Log. Click the “Cat System 2.1” entry 5 times.
 It opens a matrix of 0-1. Blue stands for 1 and black stands for 0.
 Then you will see a message that Developer tools obtained.
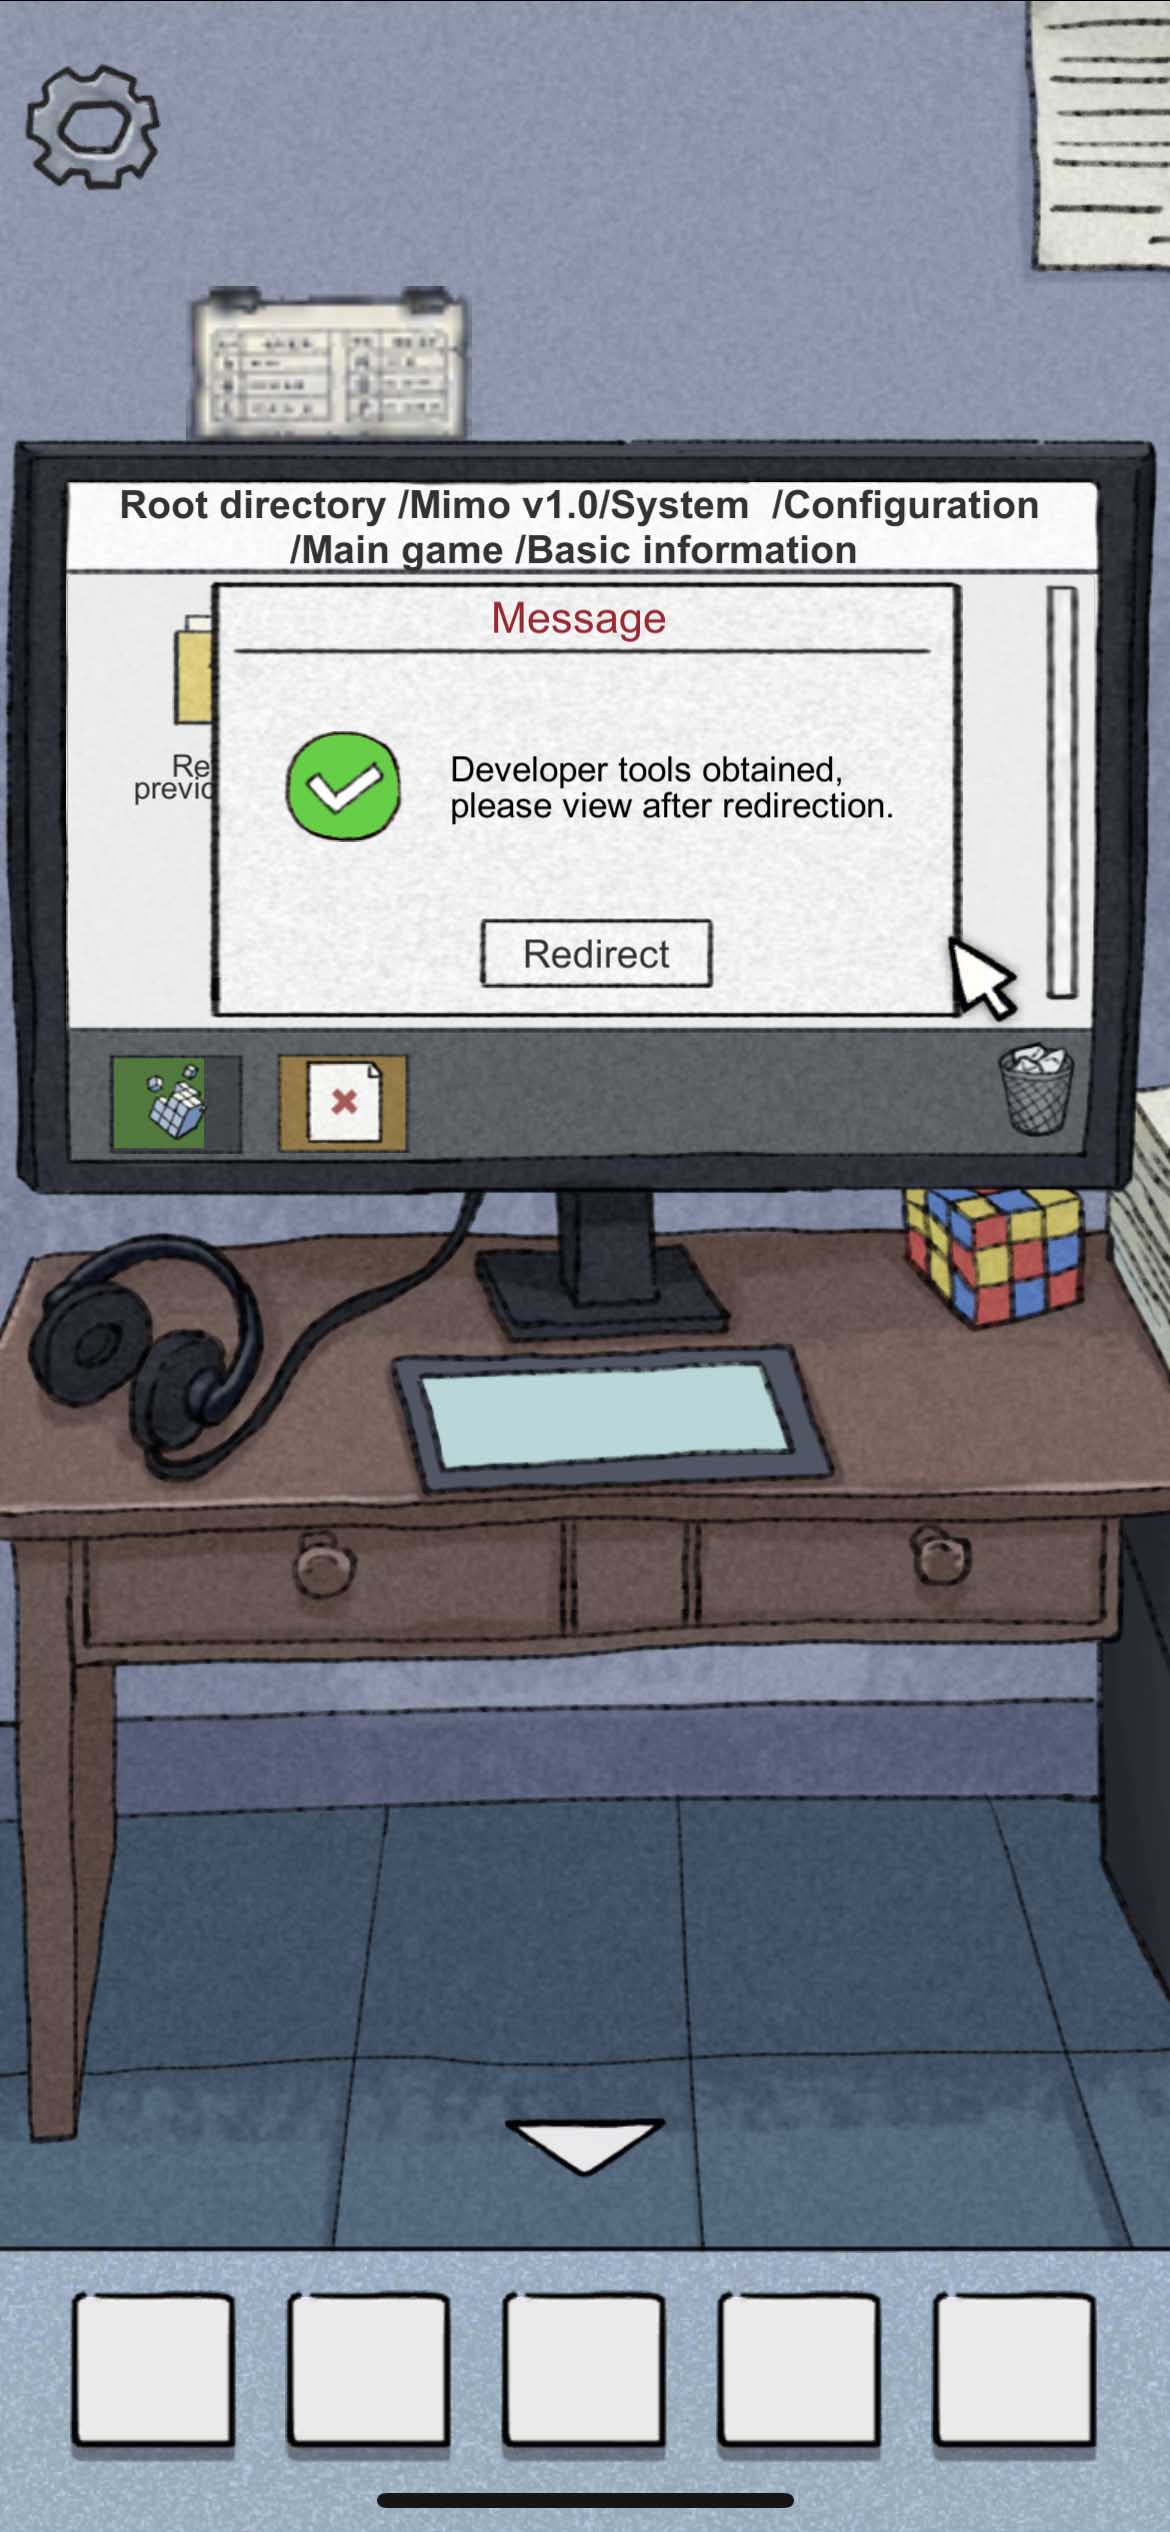 Click Redirect, you can see a txt named w(゚Д゚)w,go into that txt it says here has a Quanturn decoder which can
provide passcode.
Click Redirect, you can see a txt named w(゚Д゚)w,go into that txt it says here has a Quanturn decoder which can
provide passcode.
Then open the Control Console,you have to find a passcode.
 Open the Quanturn decoder, Mimo says the system is secured by a quantum mechanism that code is changing all the
time unless no body is observing the screen. She says you should flip the phone and wait around 30s. After a
flashlight signal, it will give sound signal to deliver the code information.
Open the Quanturn decoder, Mimo says the system is secured by a quantum mechanism that code is changing all the
time unless no body is observing the screen. She says you should flip the phone and wait around 30s. After a
flashlight signal, it will give sound signal to deliver the code information.
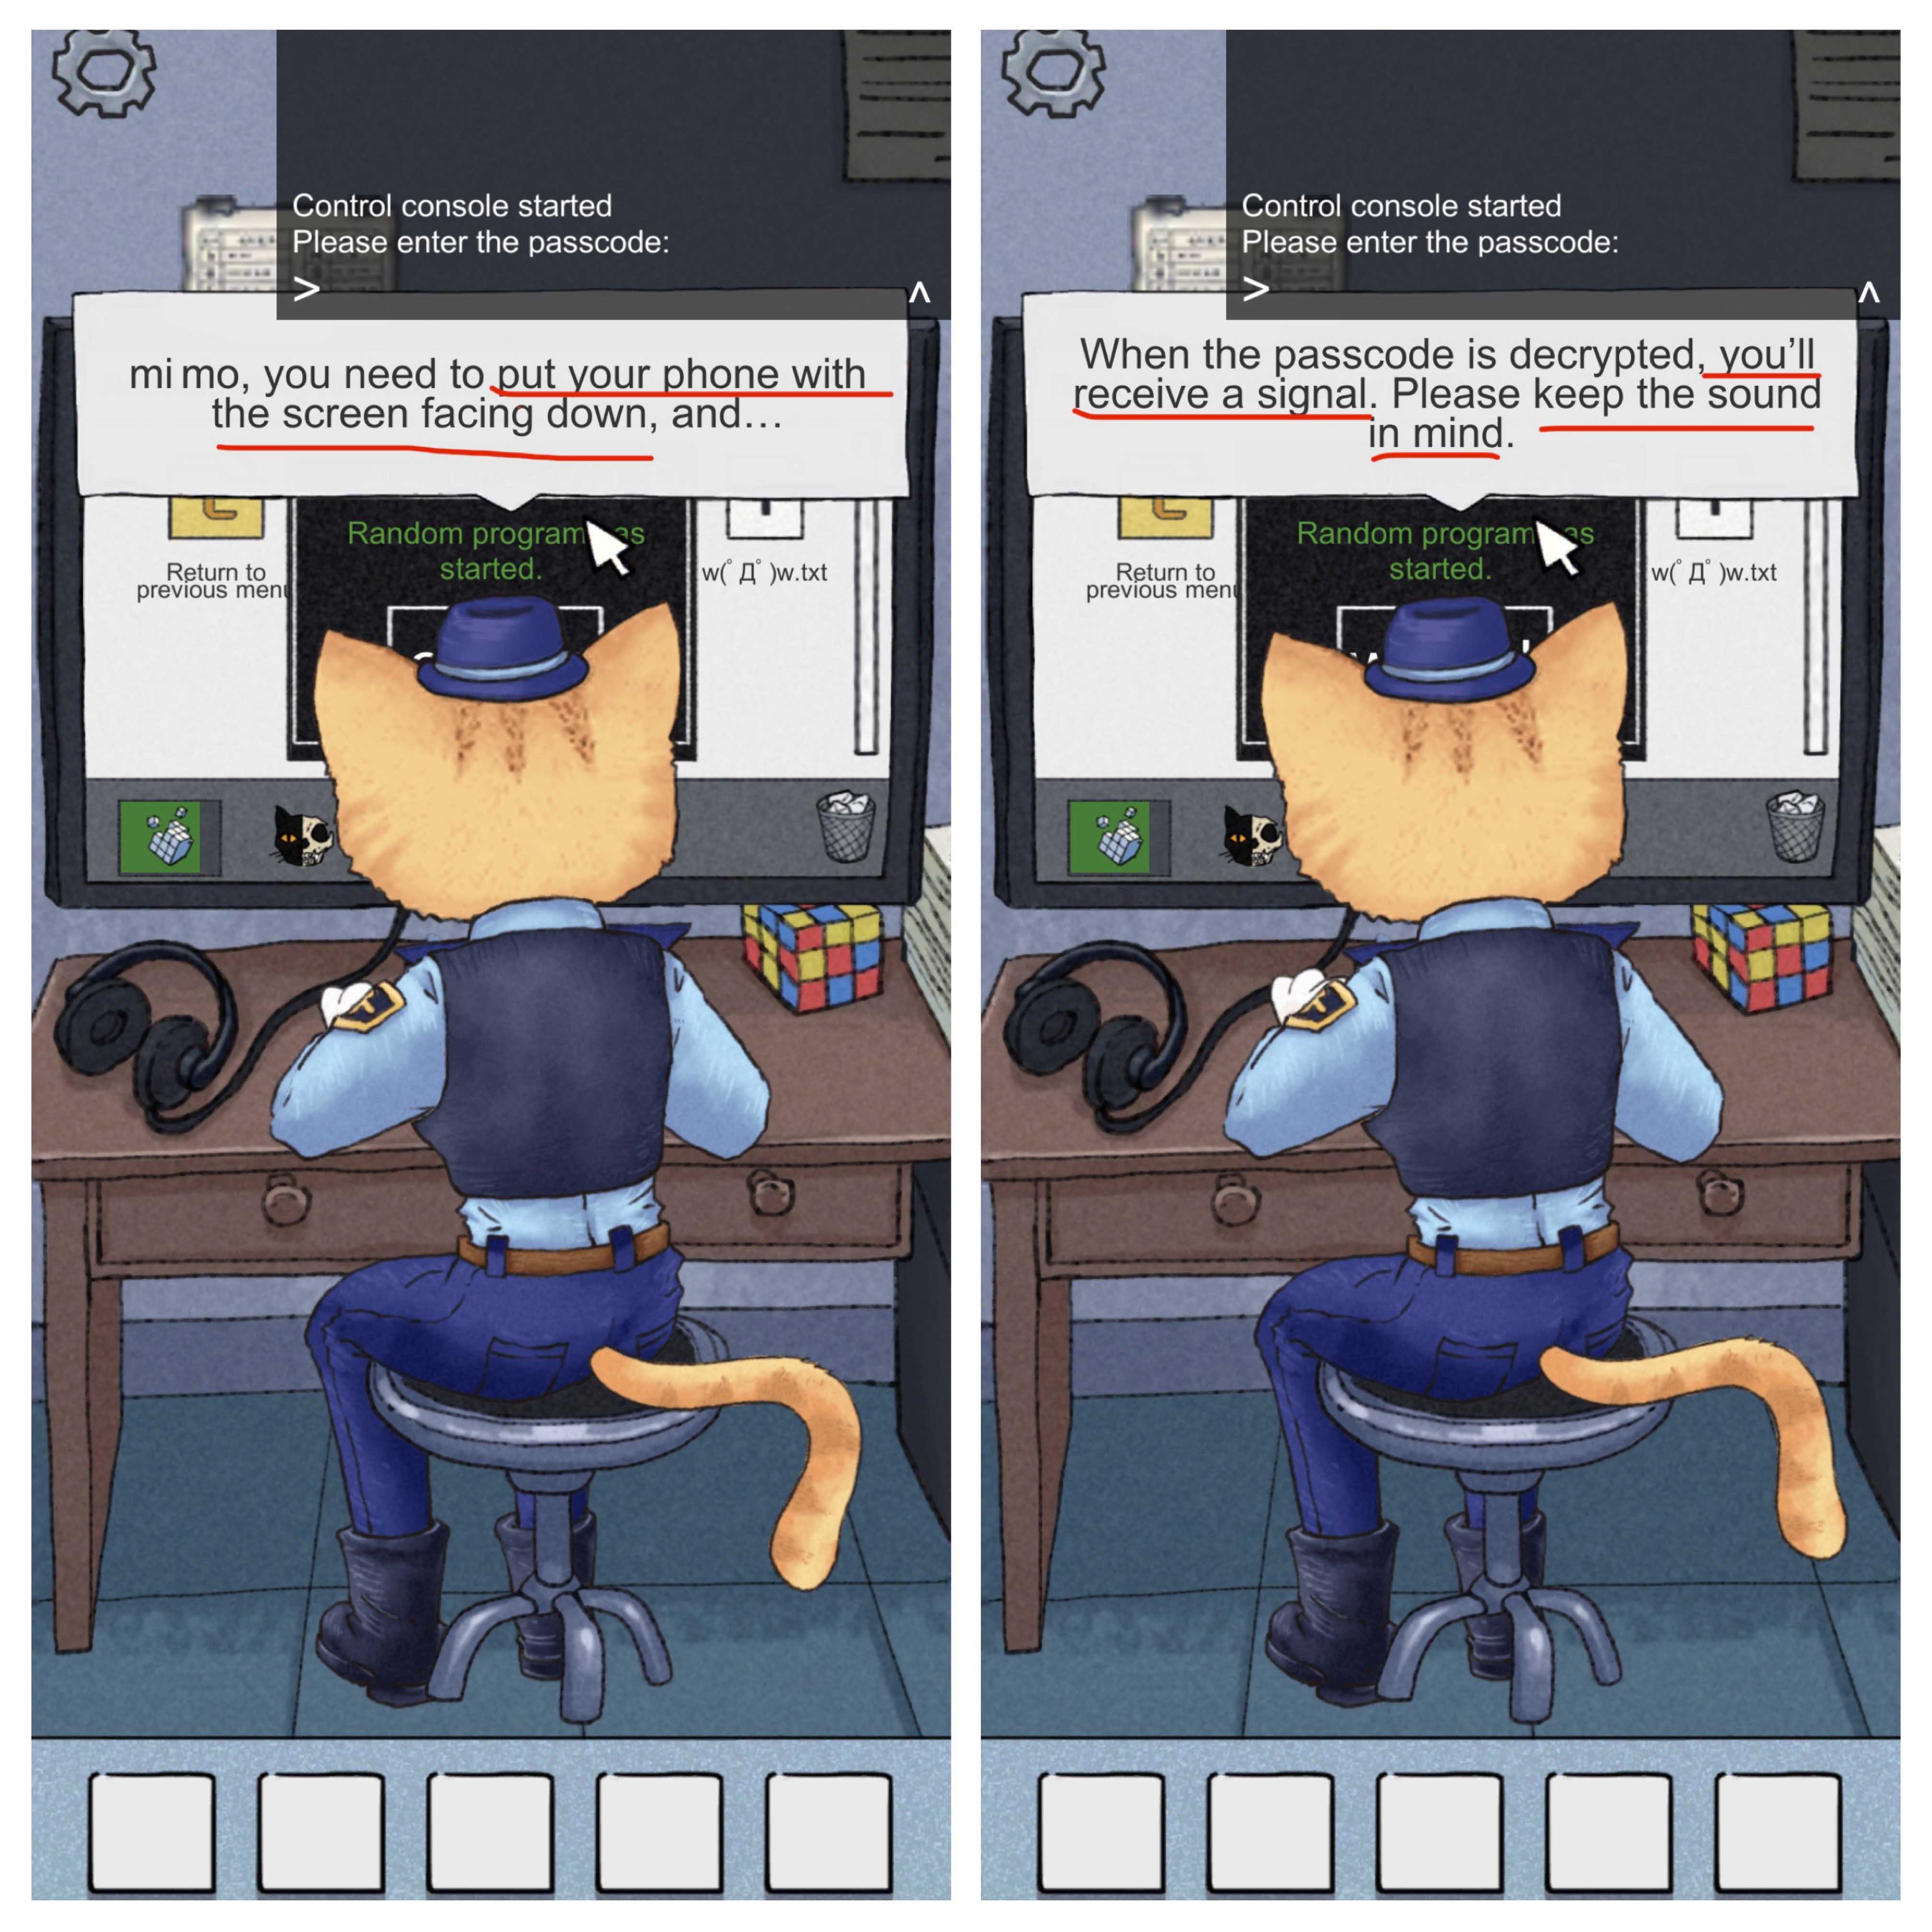 Get a pen and a piece of paper, when you hear a long “du~”, it means “-“ in morse code, when you hear a short
“Du!”, it means a dot in morse code.
Get a pen and a piece of paper, when you hear a long “du~”, it means “-“ in morse code, when you hear a short
“Du!”, it means a dot in morse code.
There will be three letters, each designated by a sequence of sound signals. Keep the screen down on the desk until all signals are completed.
Check the morse code illustration on the wall near the computer in the game. Find three letters and input it on the control panel. Remember that the code is totally random. It will change each time you hear it.
 Here comes to the point where two different endings diverge.
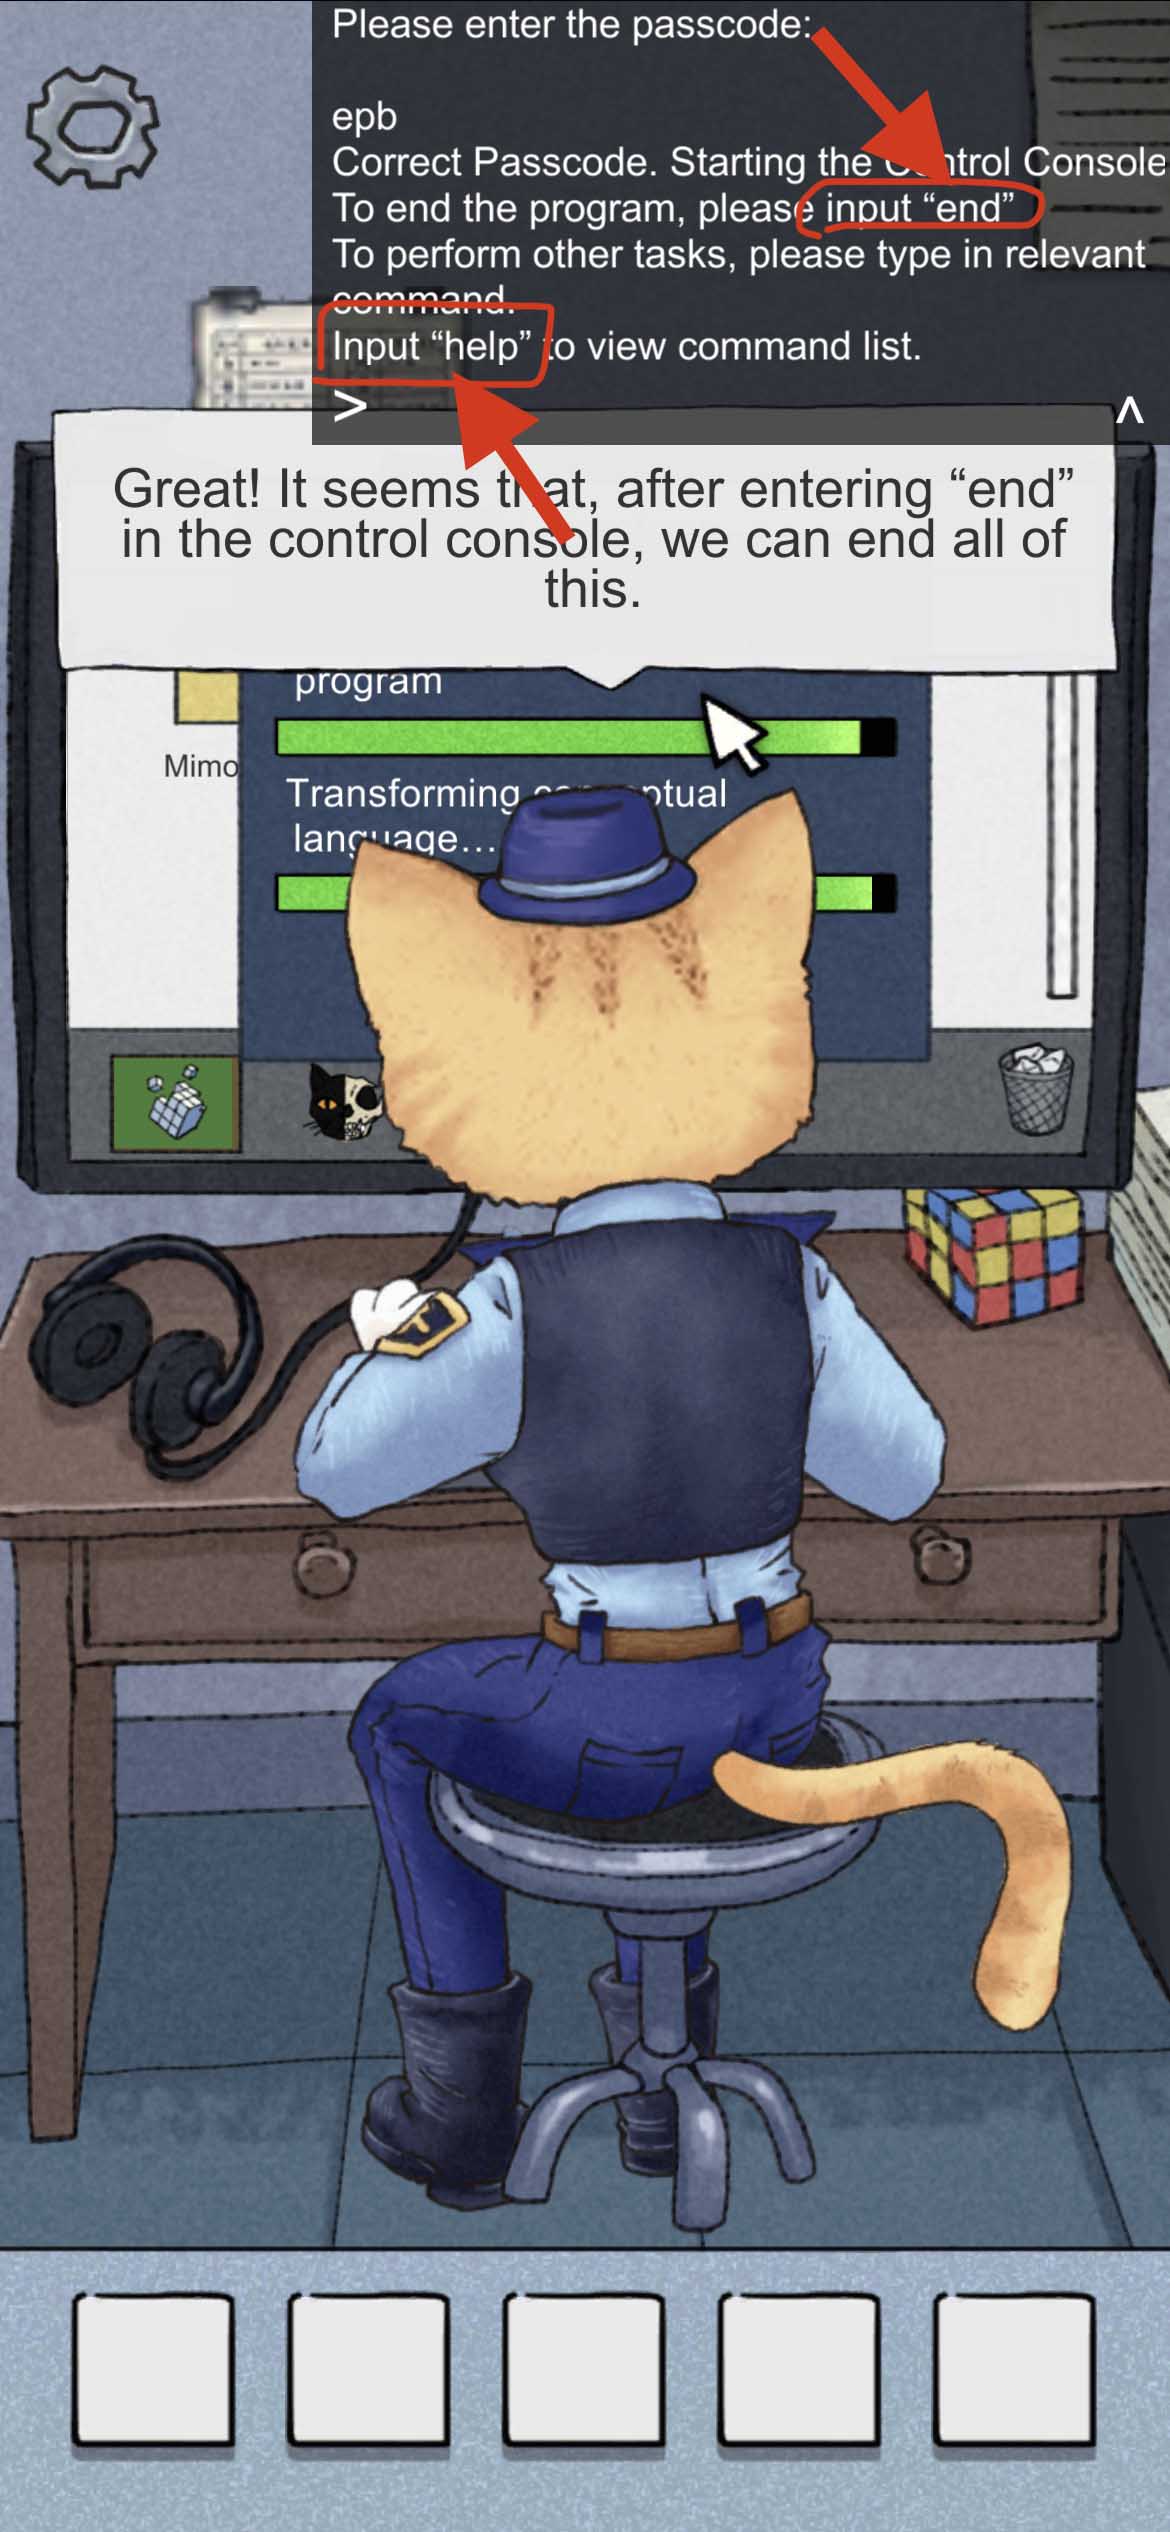
ENGDINGS
· Ending 1
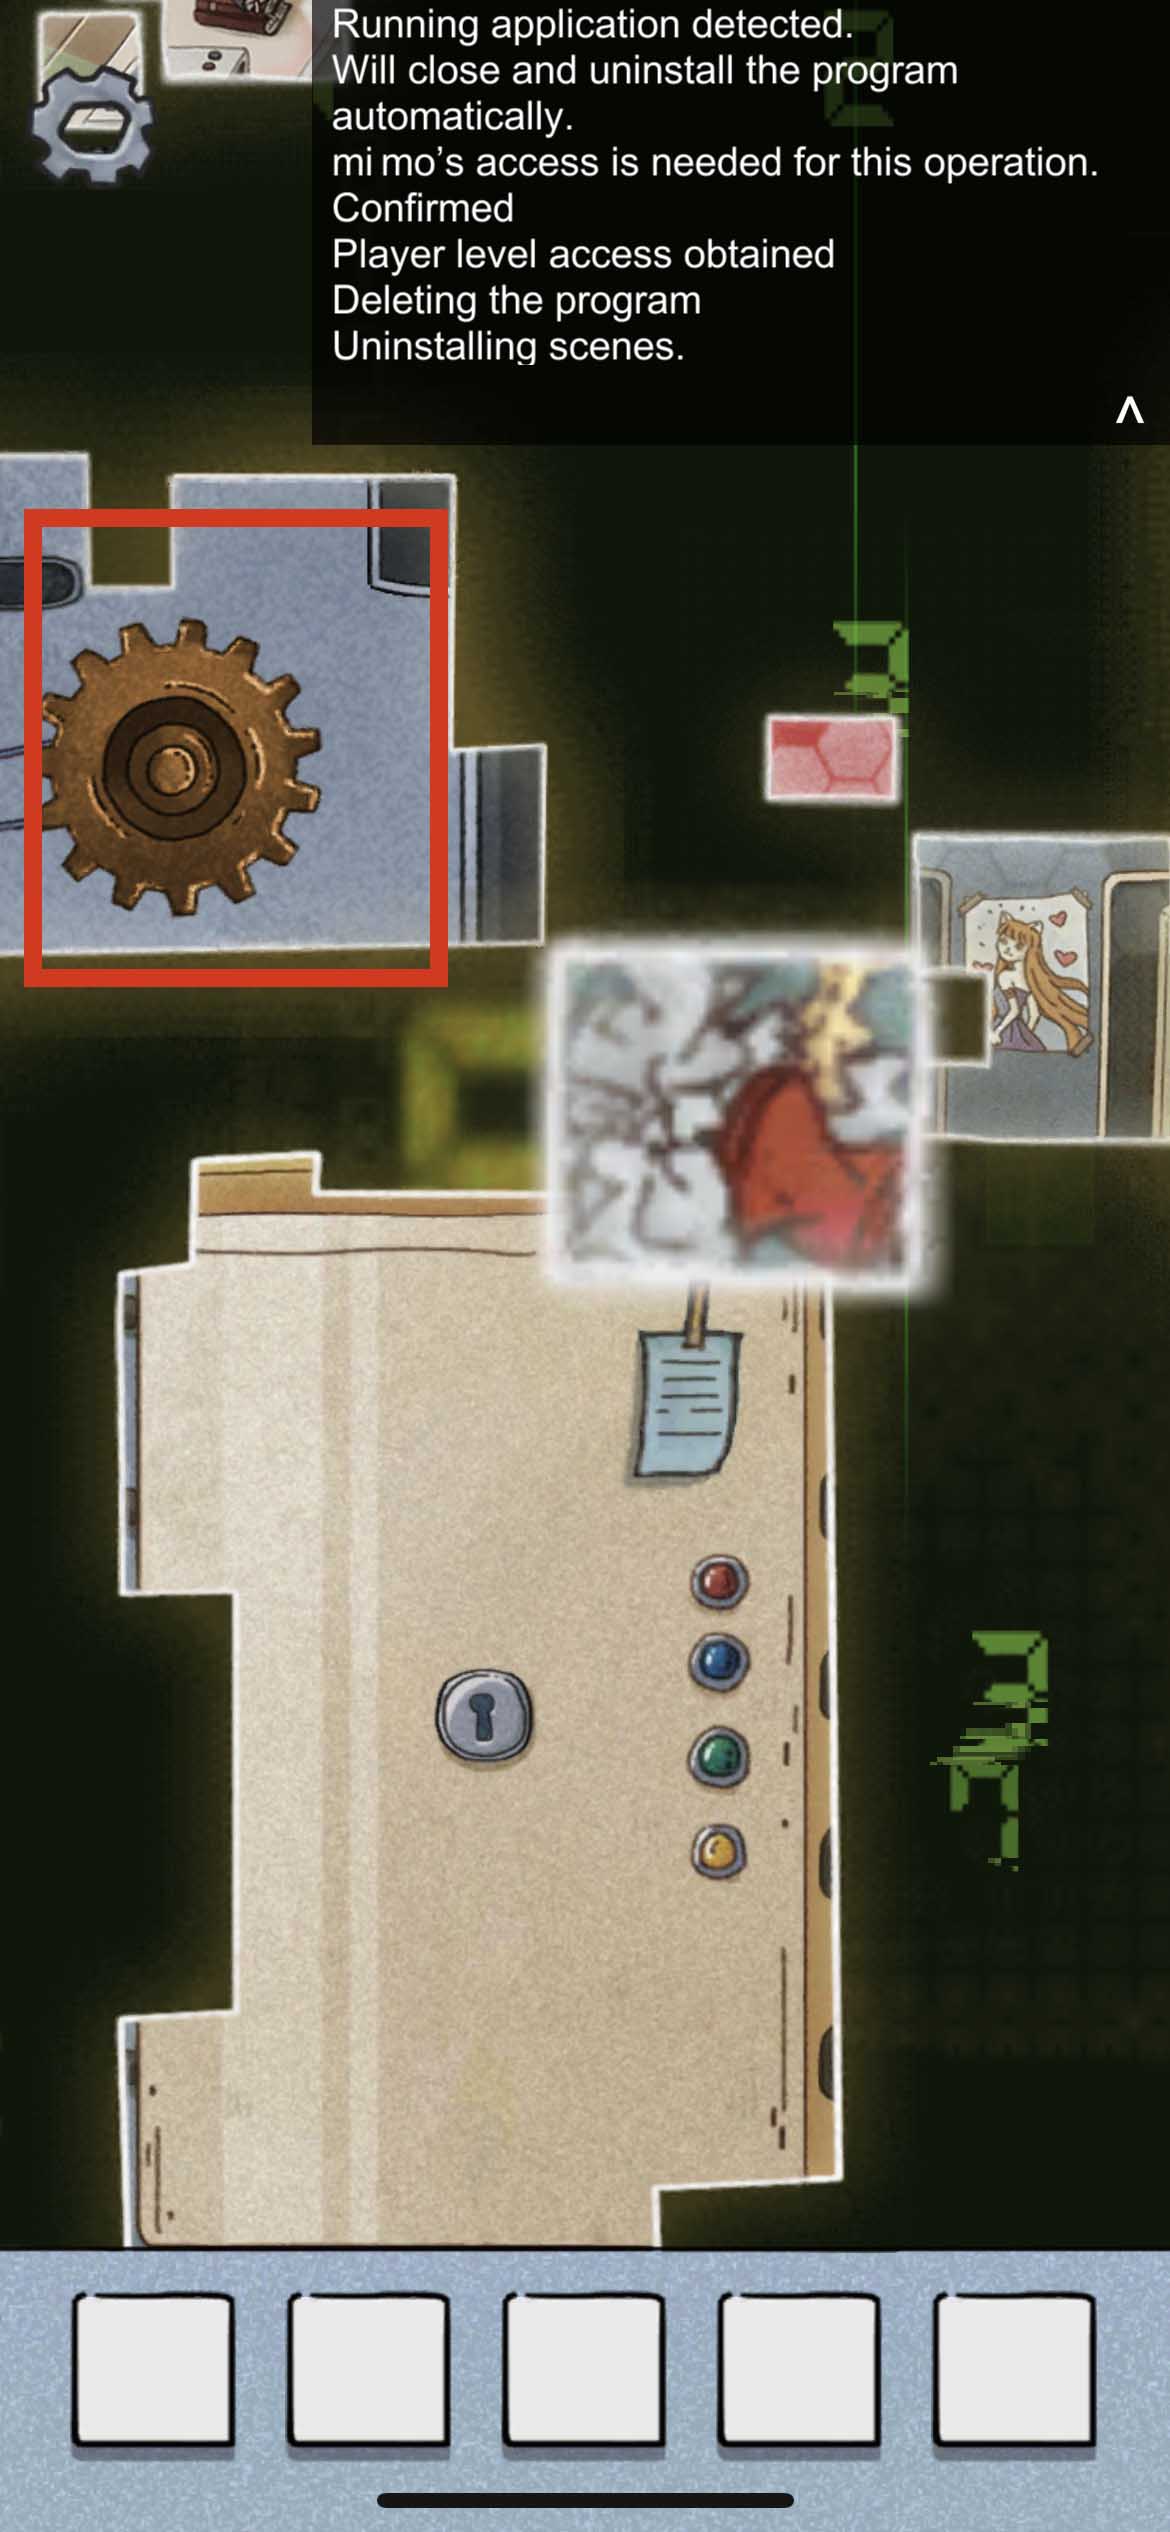
You input “END” as Mimo requests and allow Mimo to delete APP data. You need to find 5 gears. Here I label them 1-5 counting from the left.
 For the first one, swipe the screen to the left , and piece two parts of the gear together.
 Second one is locked inside a box under the first one. There is a note says that you need find the key in a not so
broken place, which is the main menu.
Second one is locked inside a box under the first one. There is a note says that you need find the key in a not so
broken place, which is the main menu.
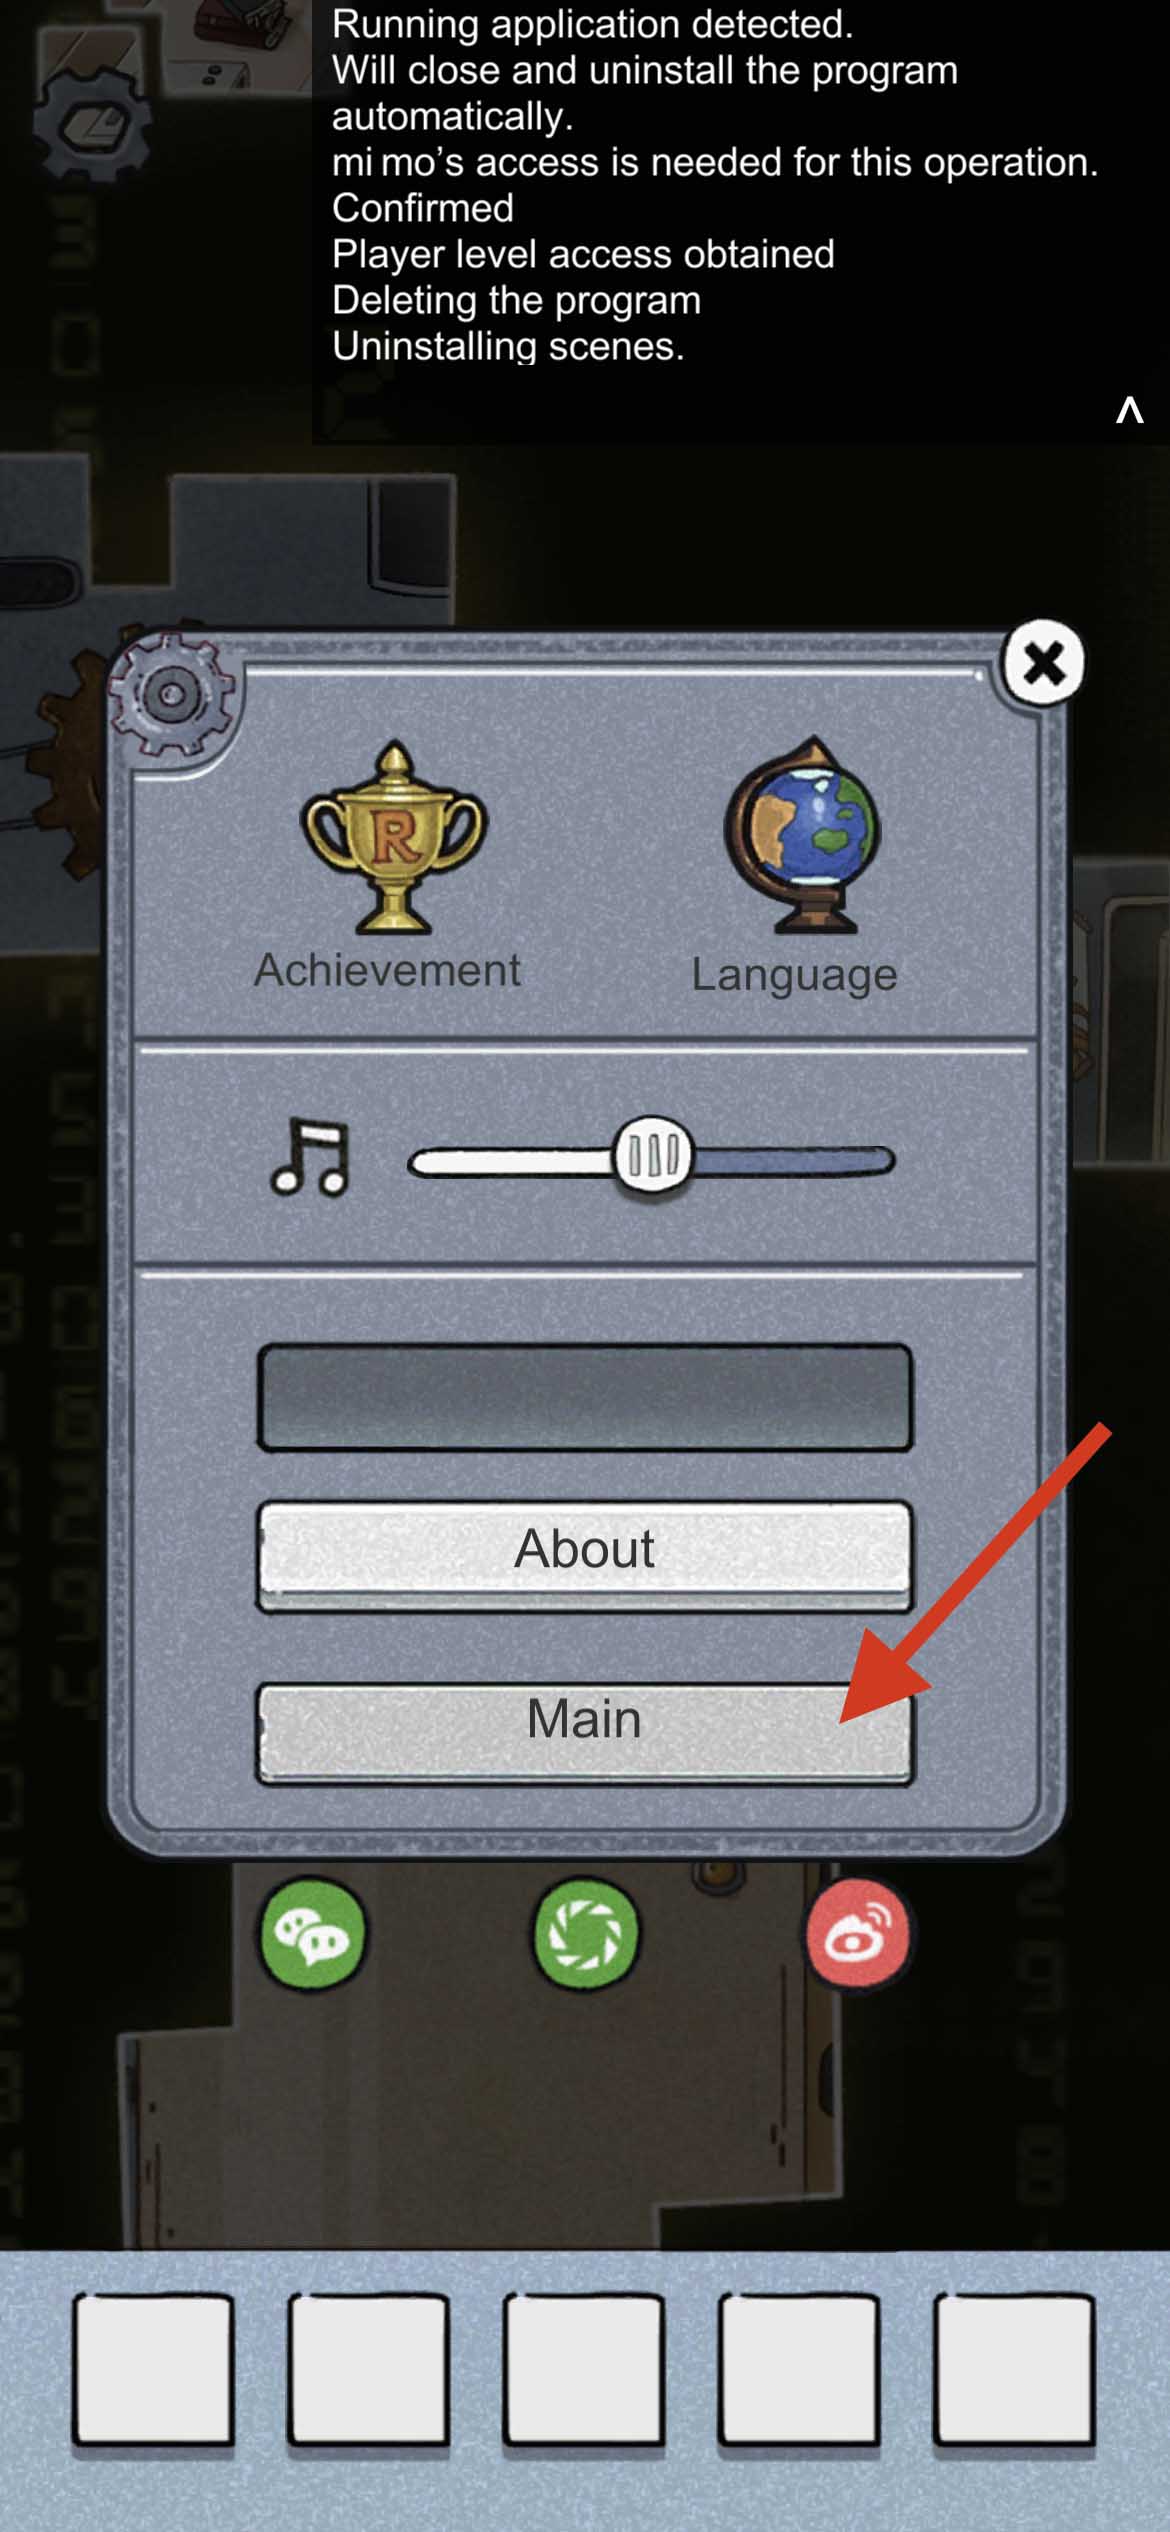
Back to the main menu if you still have the setting button. If you can’t use the setting panel (the setting panel and button is gear no. 4 and 5), quit the app and reopen it.
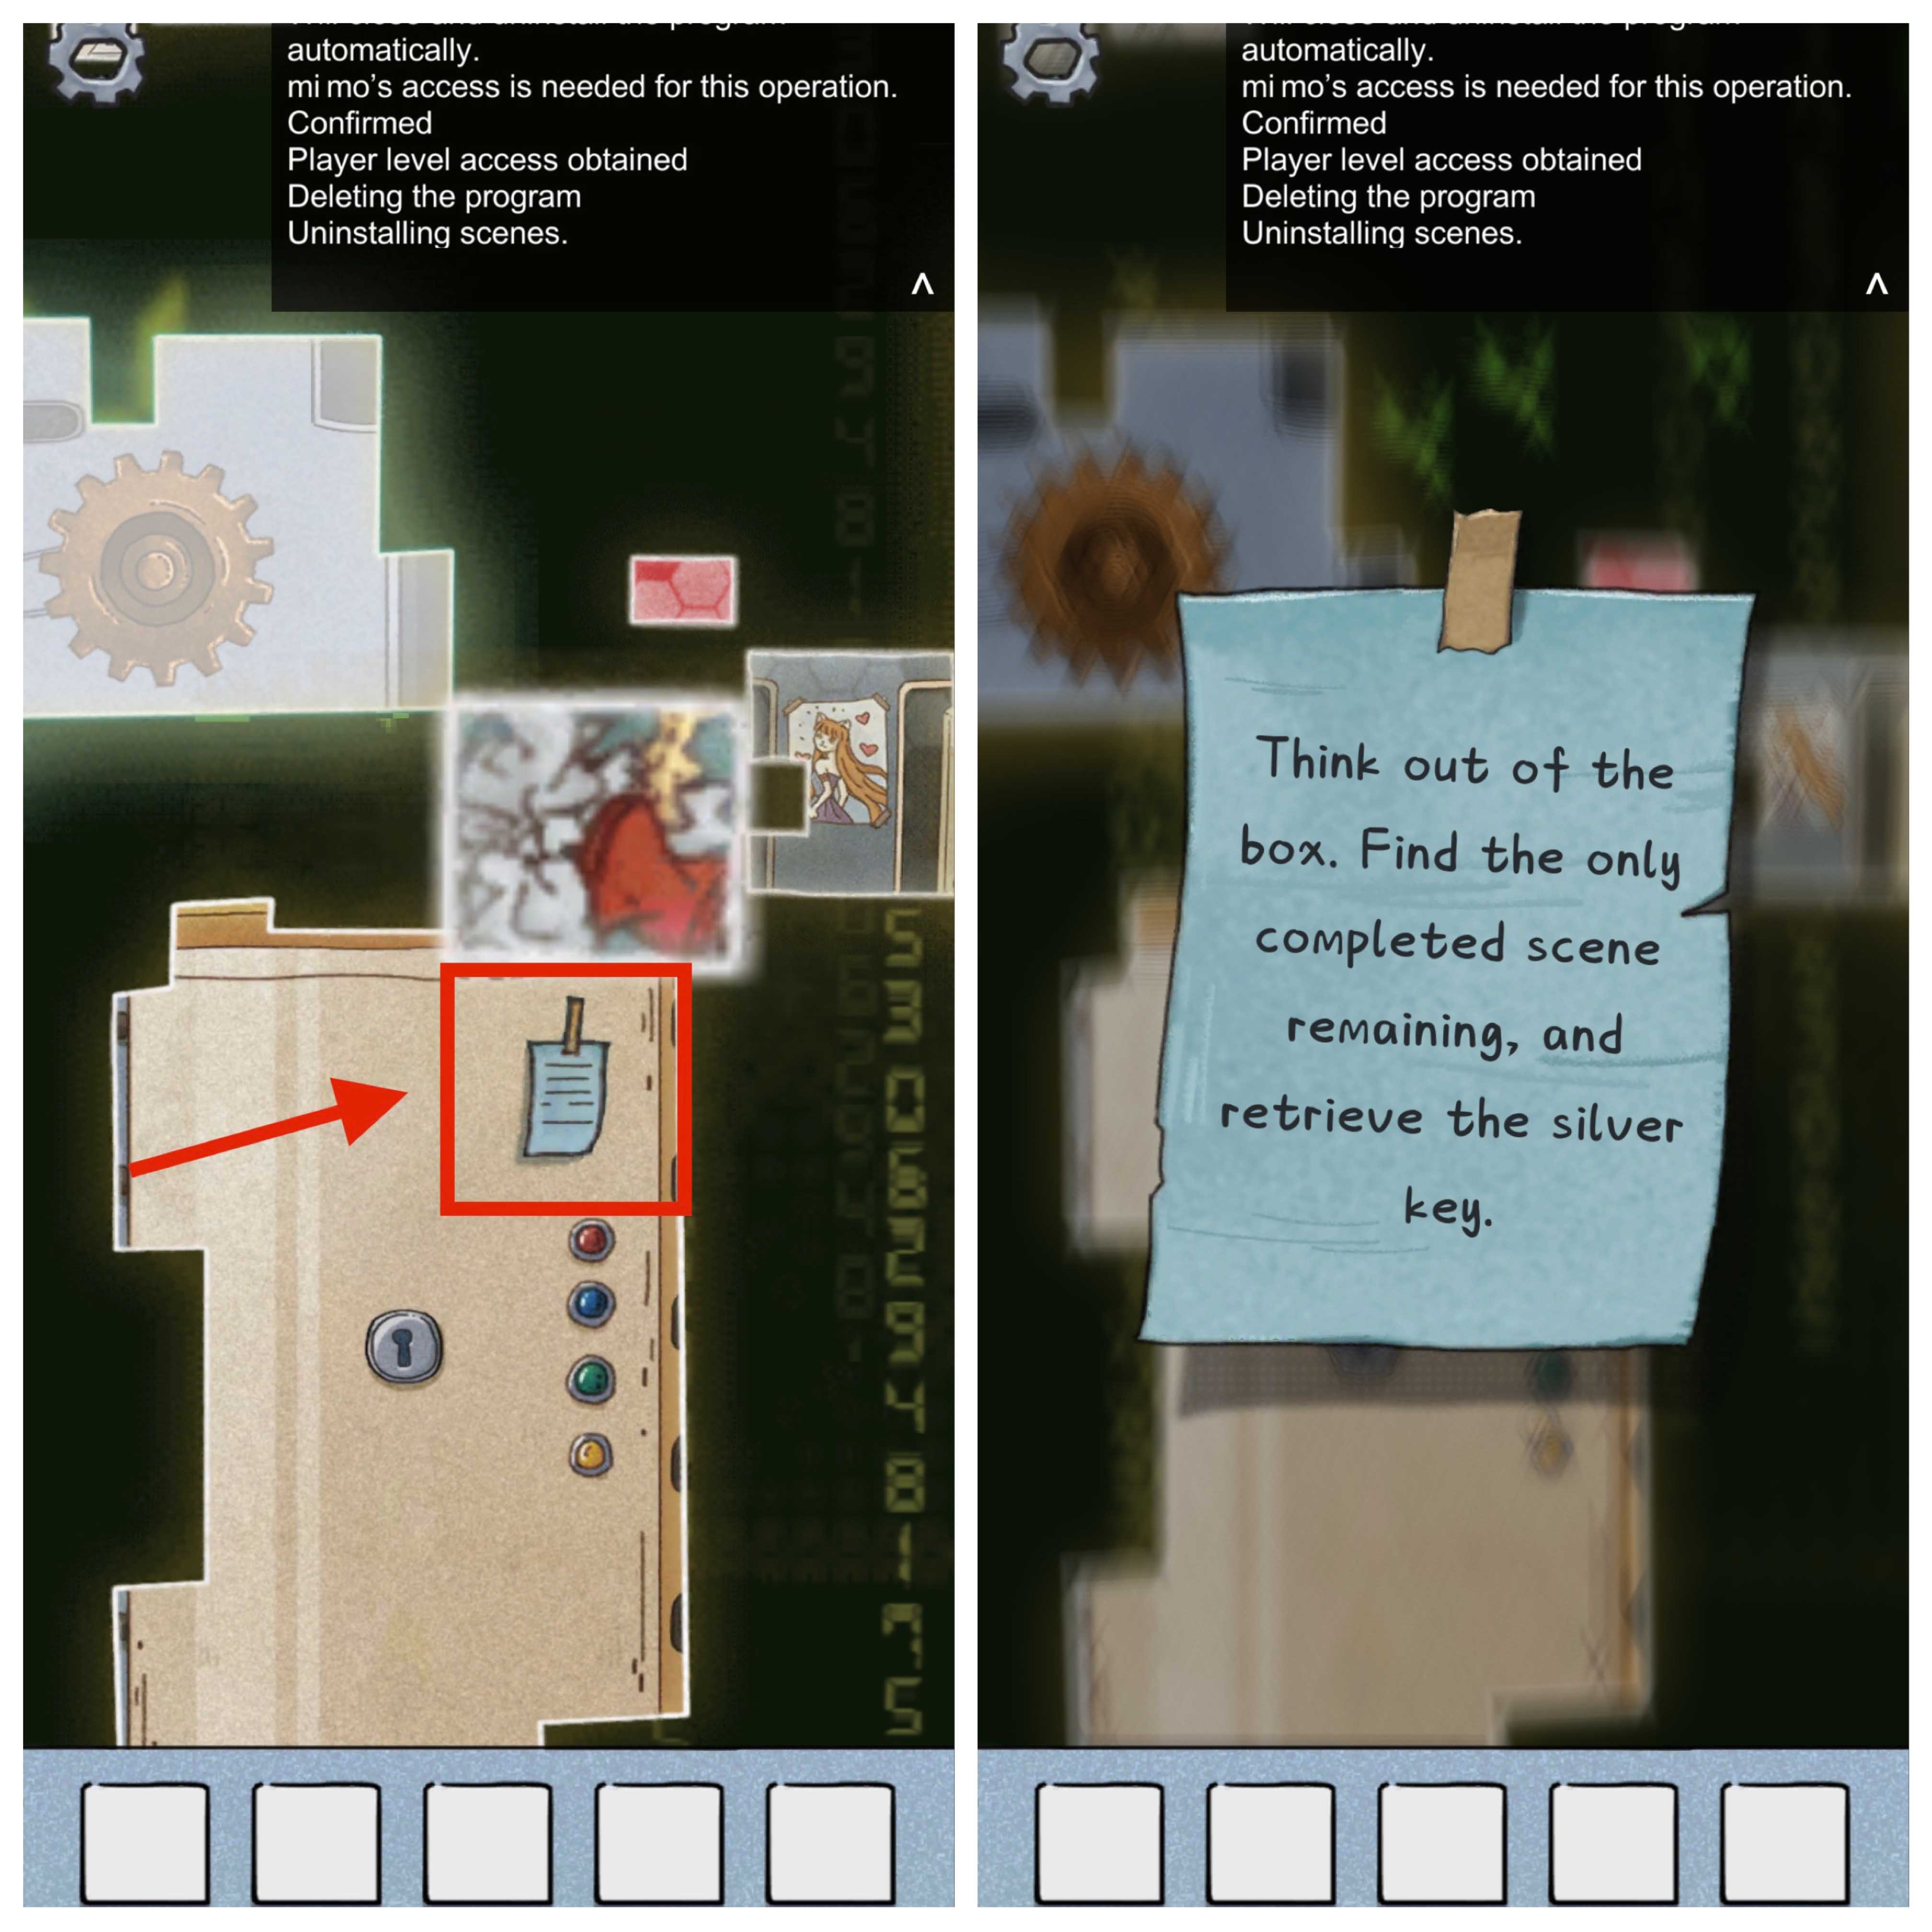
 You will find a silver key on Mimo and drag that key into the computer next to her.
 Use that key to open this box and get gear No.2
 No. 3 can be found right in right part of the void.
 No. 4, open the setting panel and place it right in a blue area.
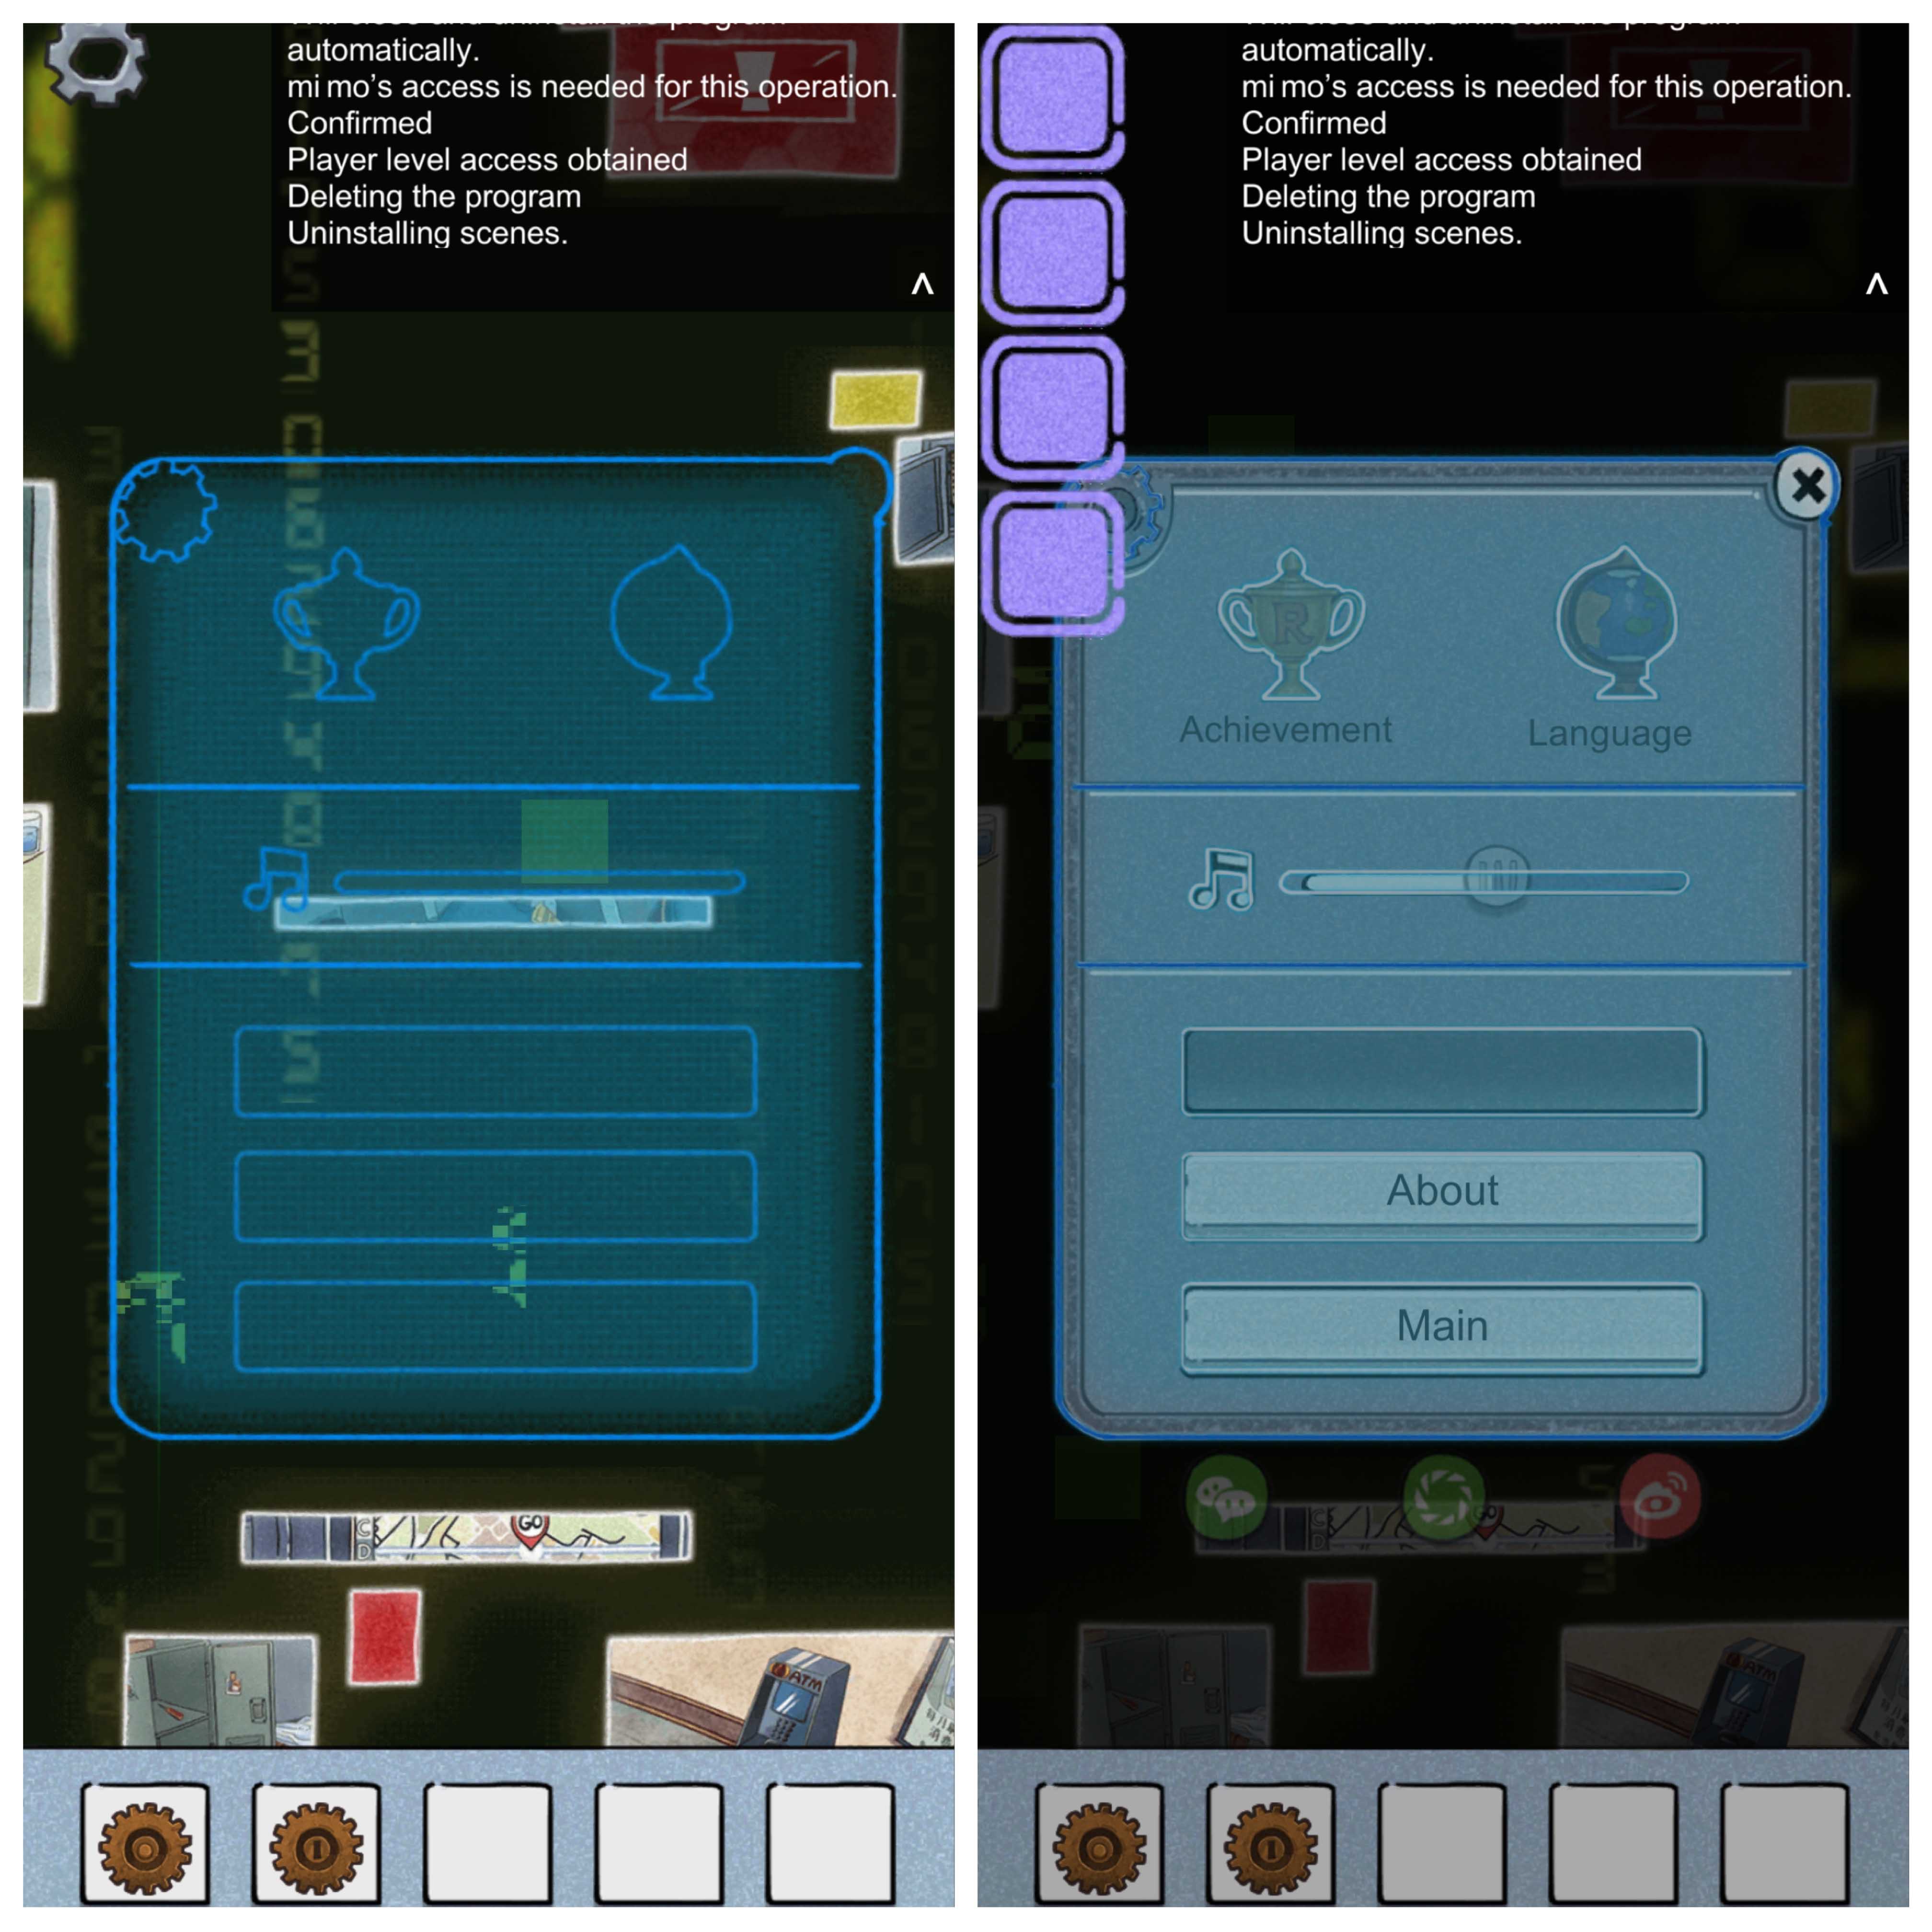
 No. 5, it is the setting button itself.
 Please notice that gear No.5 can be traced back by clicking it even if you have placed it. Once you get gear No.
4, the setting panel and all its functions can no longer be used.
Please notice that gear No.5 can be traced back by clicking it even if you have placed it. Once you get gear No.
4, the setting panel and all its functions can no longer be used.
When you try to get gear No.4 you will need to finish a min-game that requires you draw a line that connects all purple blocks.
After 5 gears, here comes a matrix that requires to light-up all blocks.
Drag 5 blocks below into the matrix.
 Then it’s the end of the story.
· Ending 2
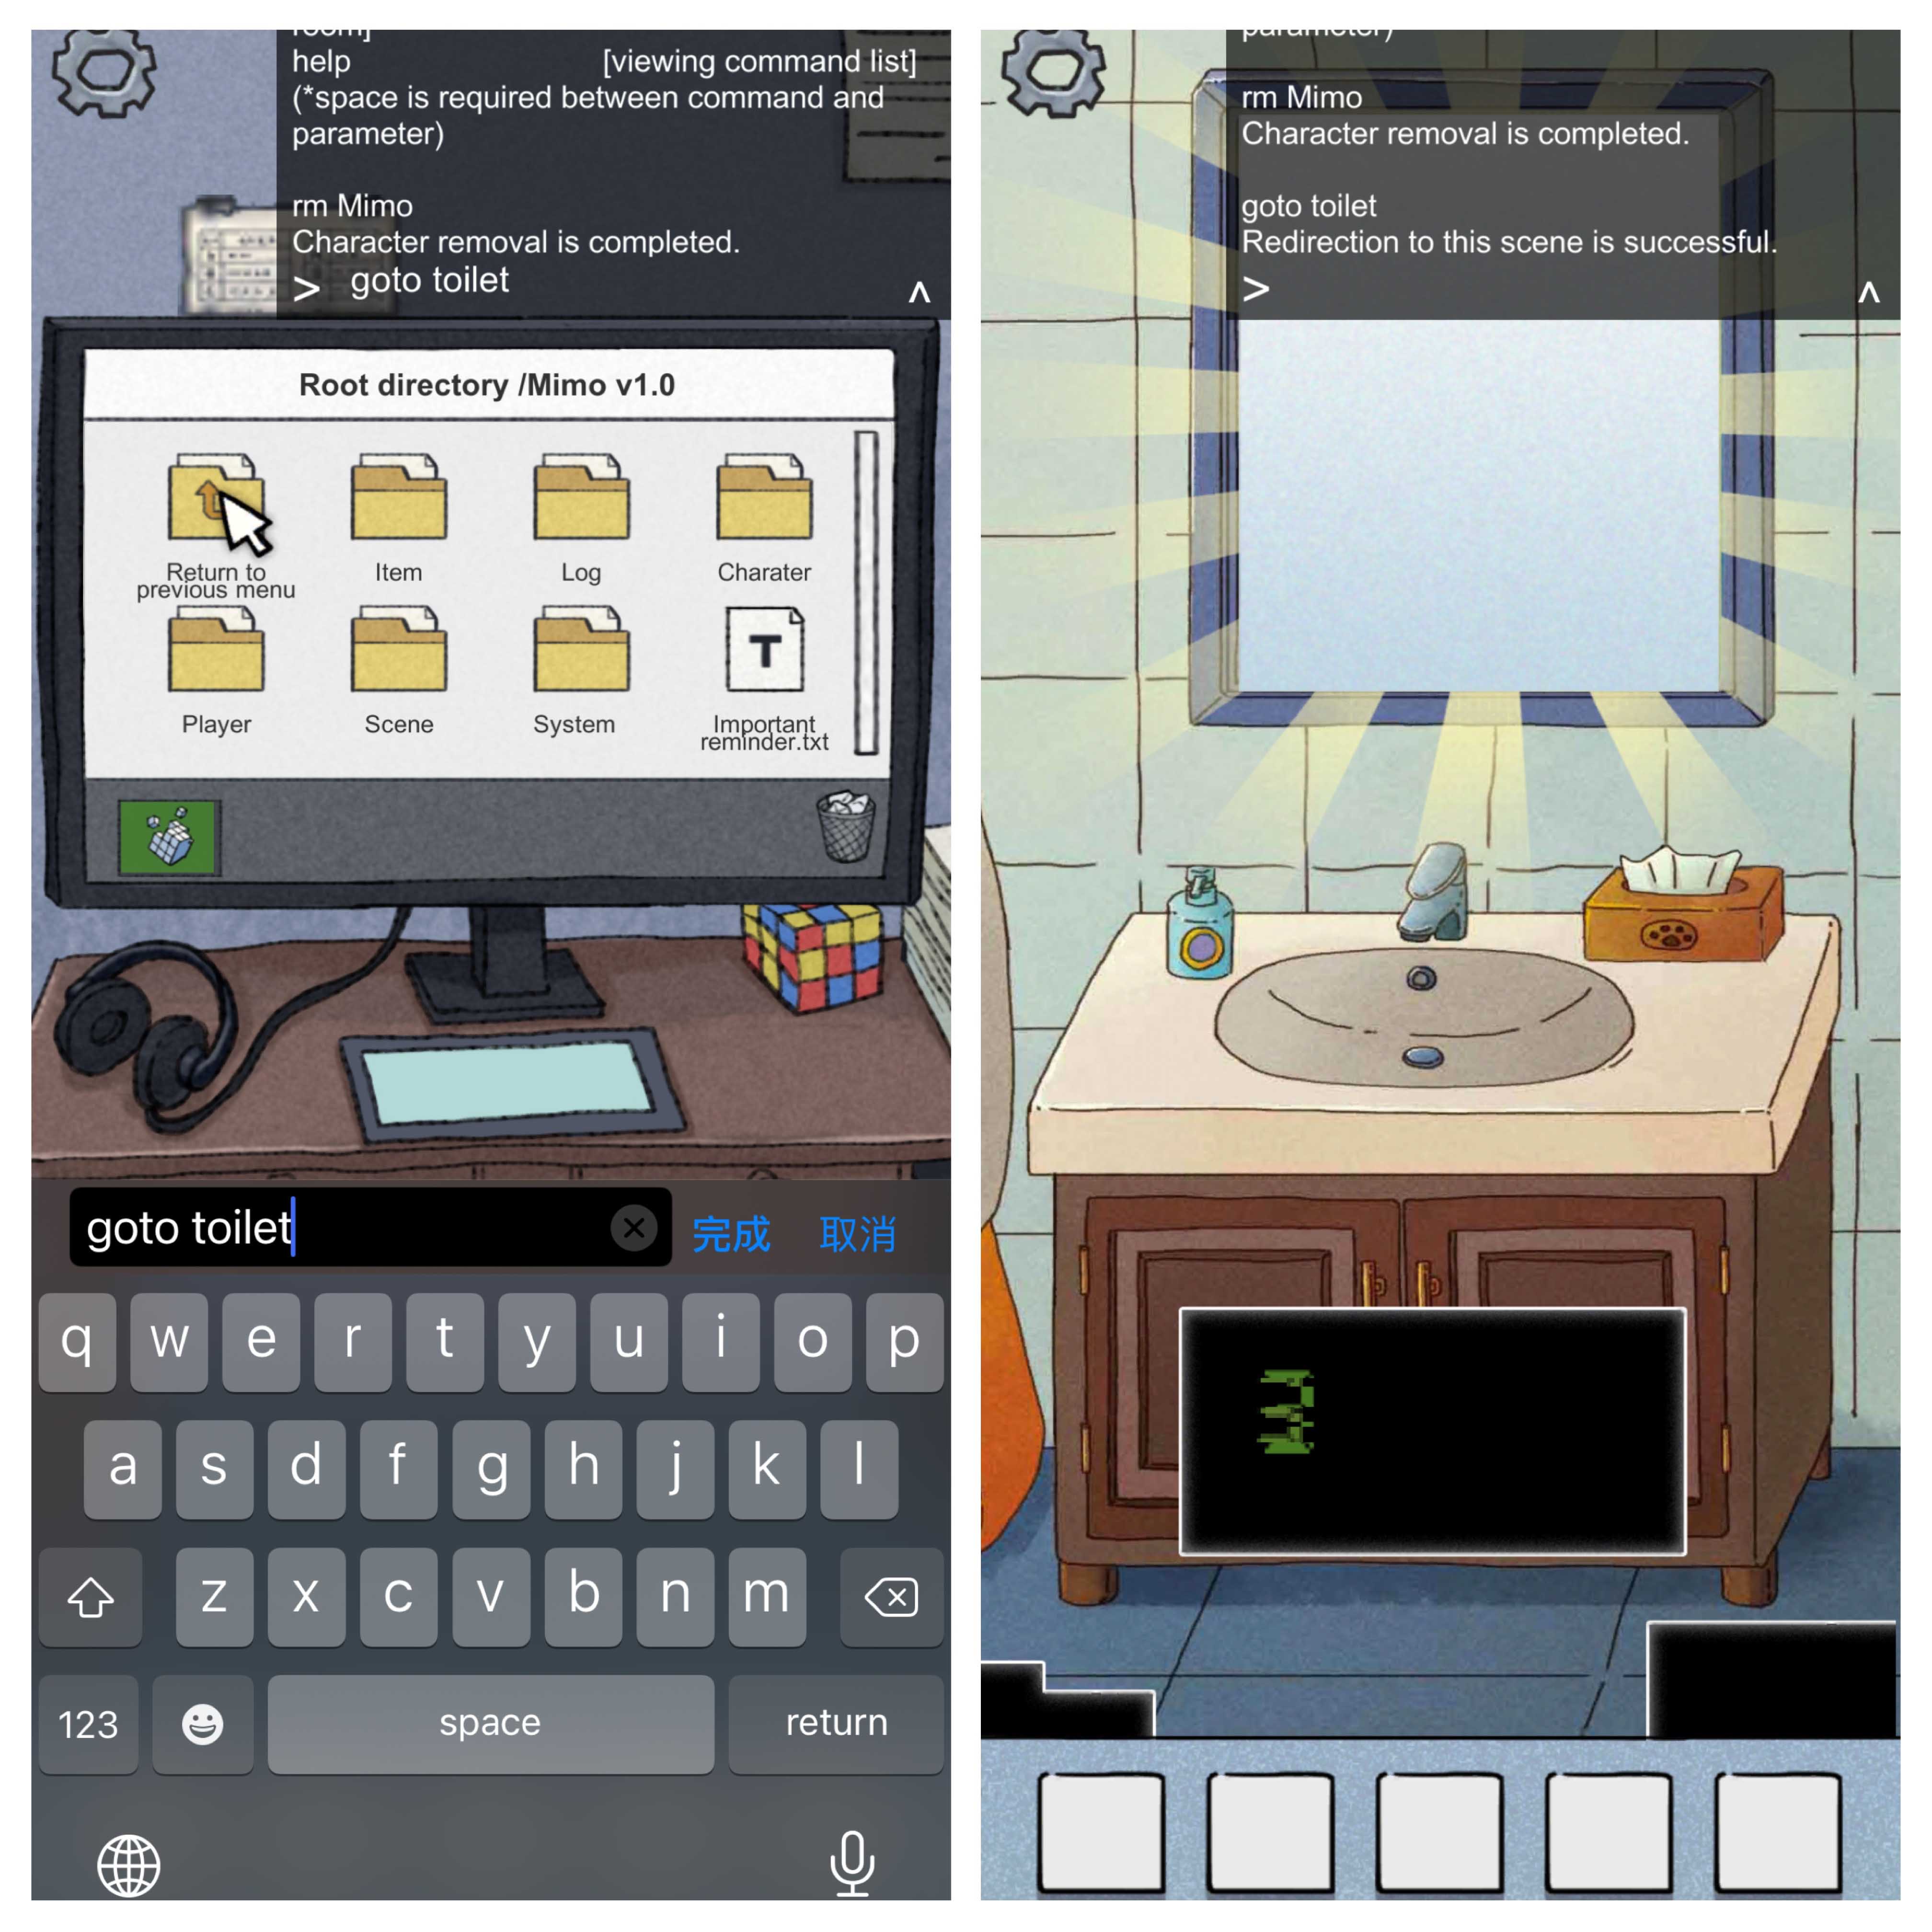
You input “Help” instead of “End”.Then it shows a series of commands, including:
end [ending program]
get Name of Item [obtaining item]
rm Name of Item or Character [removing item/character]
goto Name of Scene [redirecting to scene]
back [returning to machine room]
help [viewing command list] (*space is required between command and parameter)
 The game needs you to find 6 broken pieces of the “Reset” button in the settings penal. Each piece looks like a
piece of rock.
The game needs you to find 6 broken pieces of the “Reset” button in the settings penal. Each piece looks like a
piece of rock.
Now let us have a practice of using the system command.
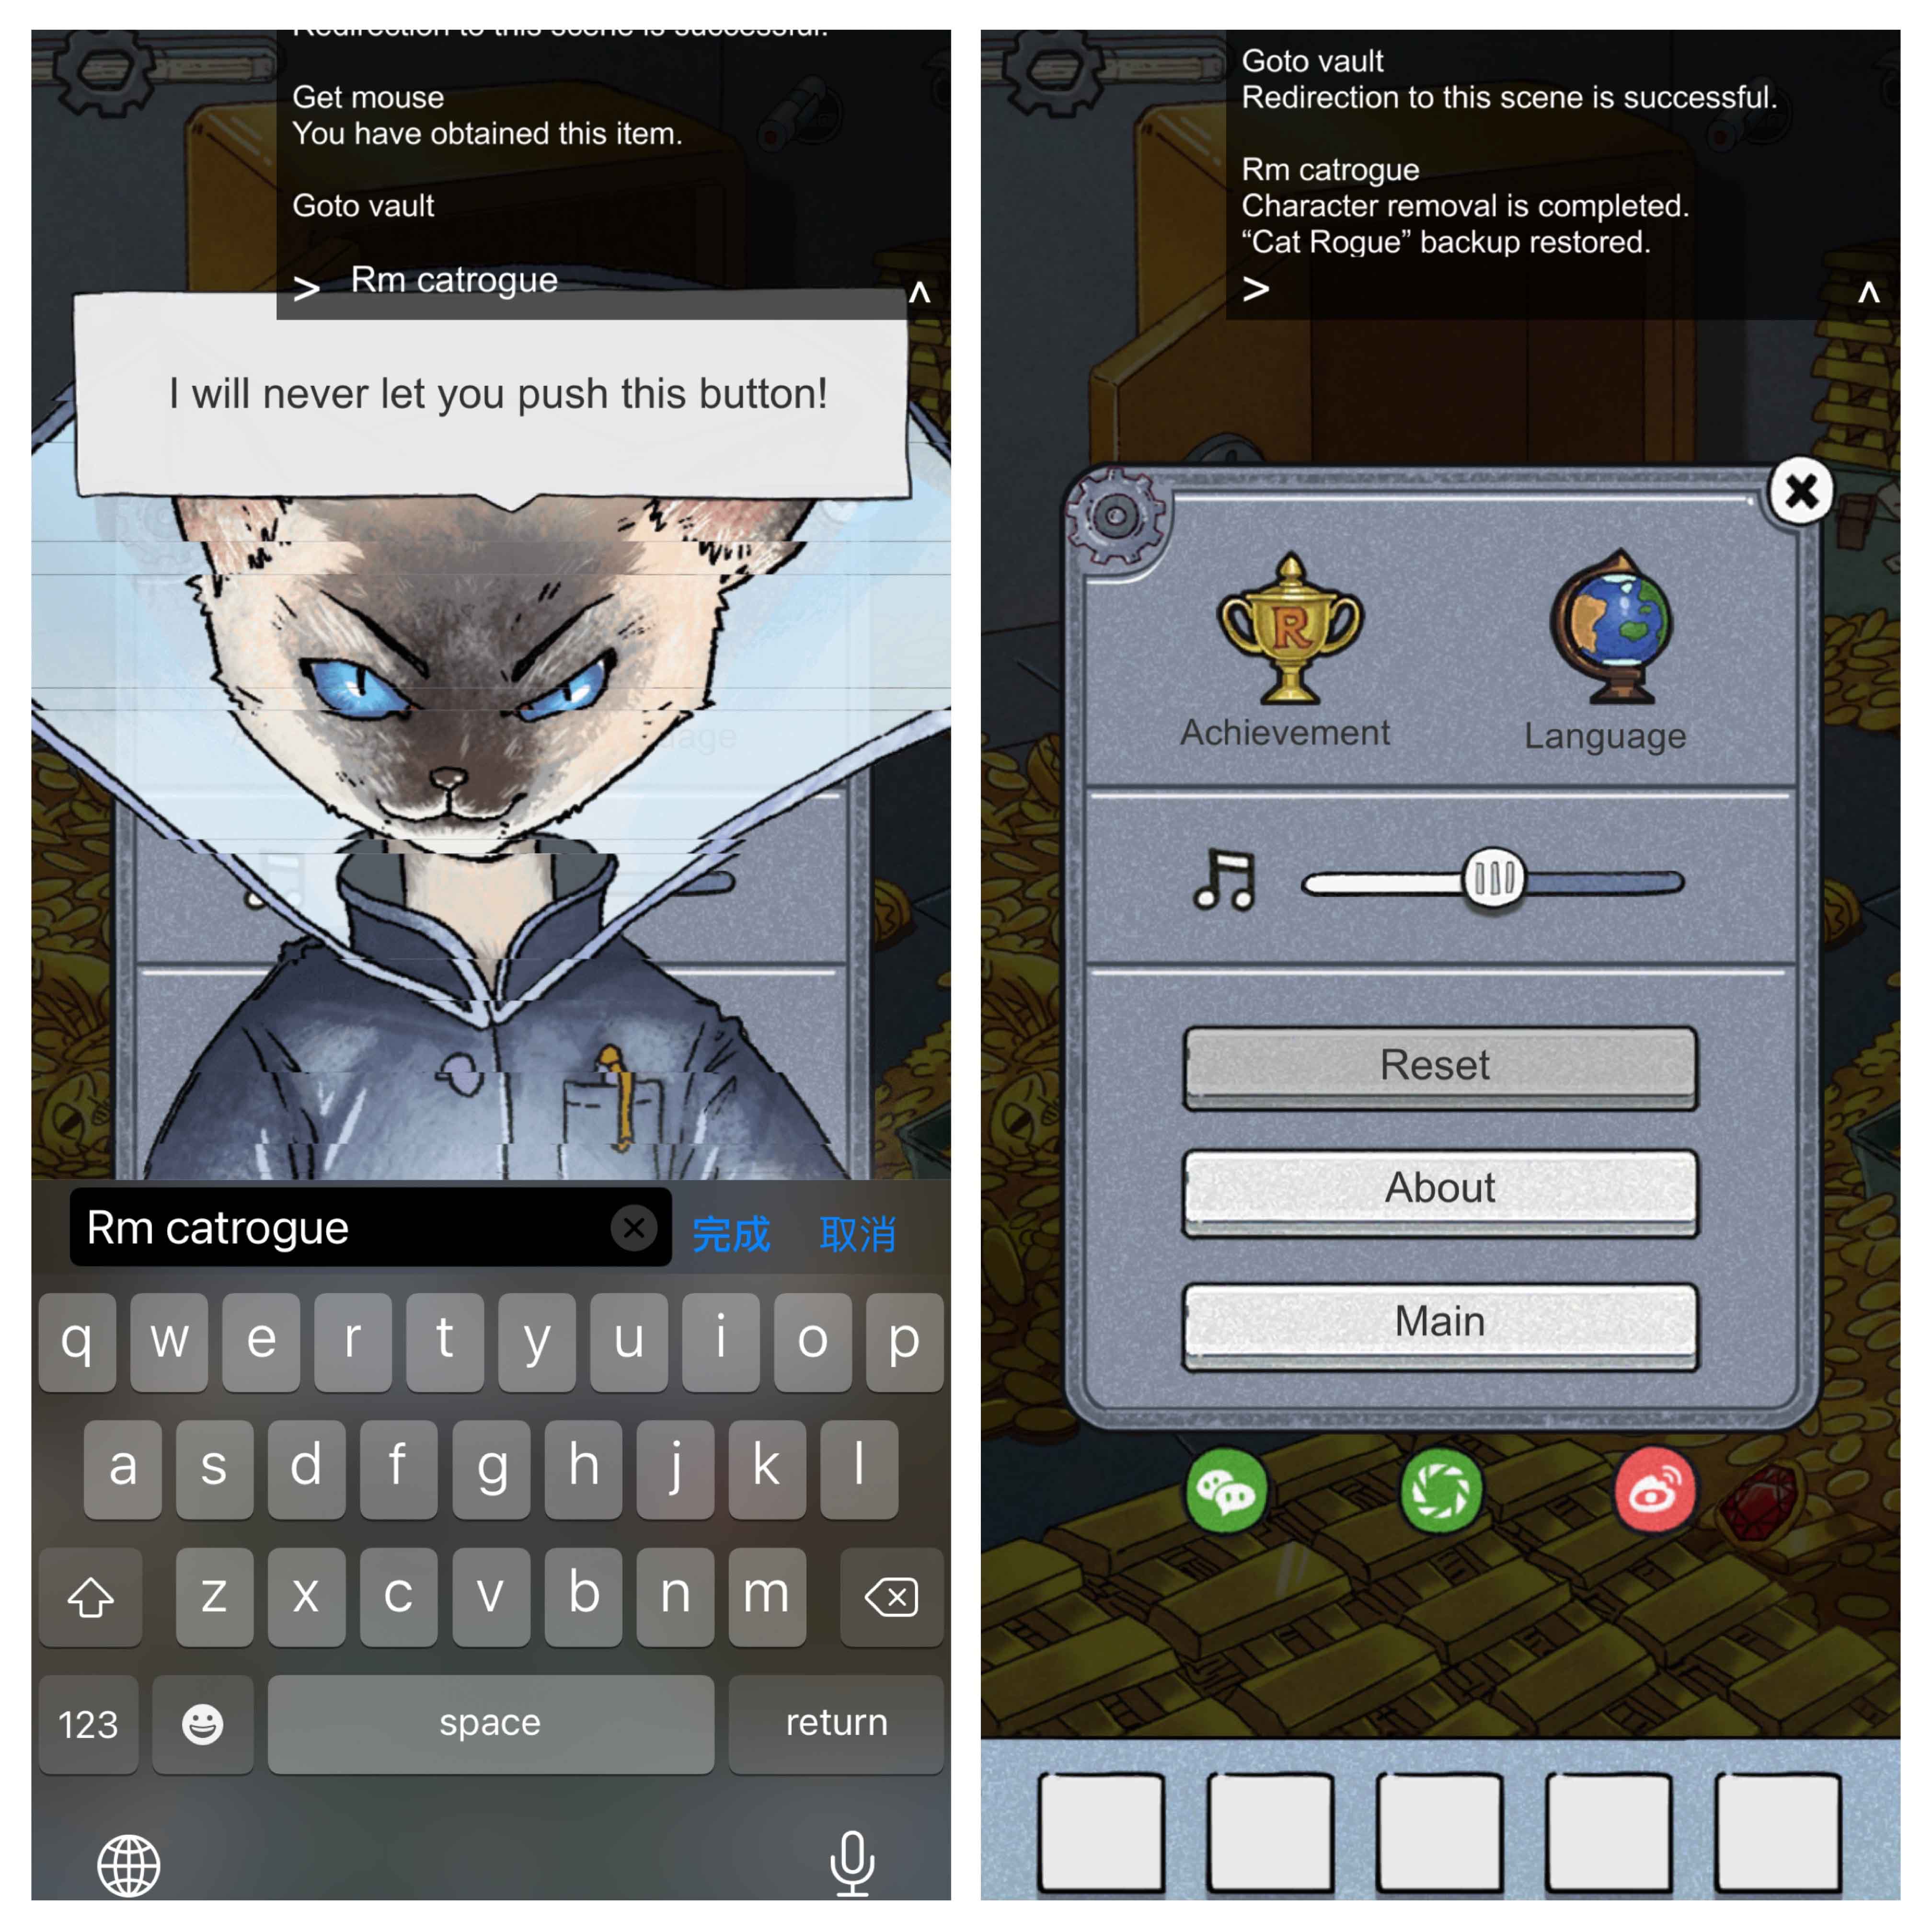
Input “rm Mimo”(remove Mimo), Mimo disappears in front of the computer.
 Now you can check the computer again. Look for the names of the Item and Scene on the computer. You will use them
frequently hence.
Now you can check the computer again. Look for the names of the Item and Scene on the computer. You will use them
frequently hence.
 Input “Goto toilet”, you get jump to the toilet room.
Find the first piece of rock in the mirror.
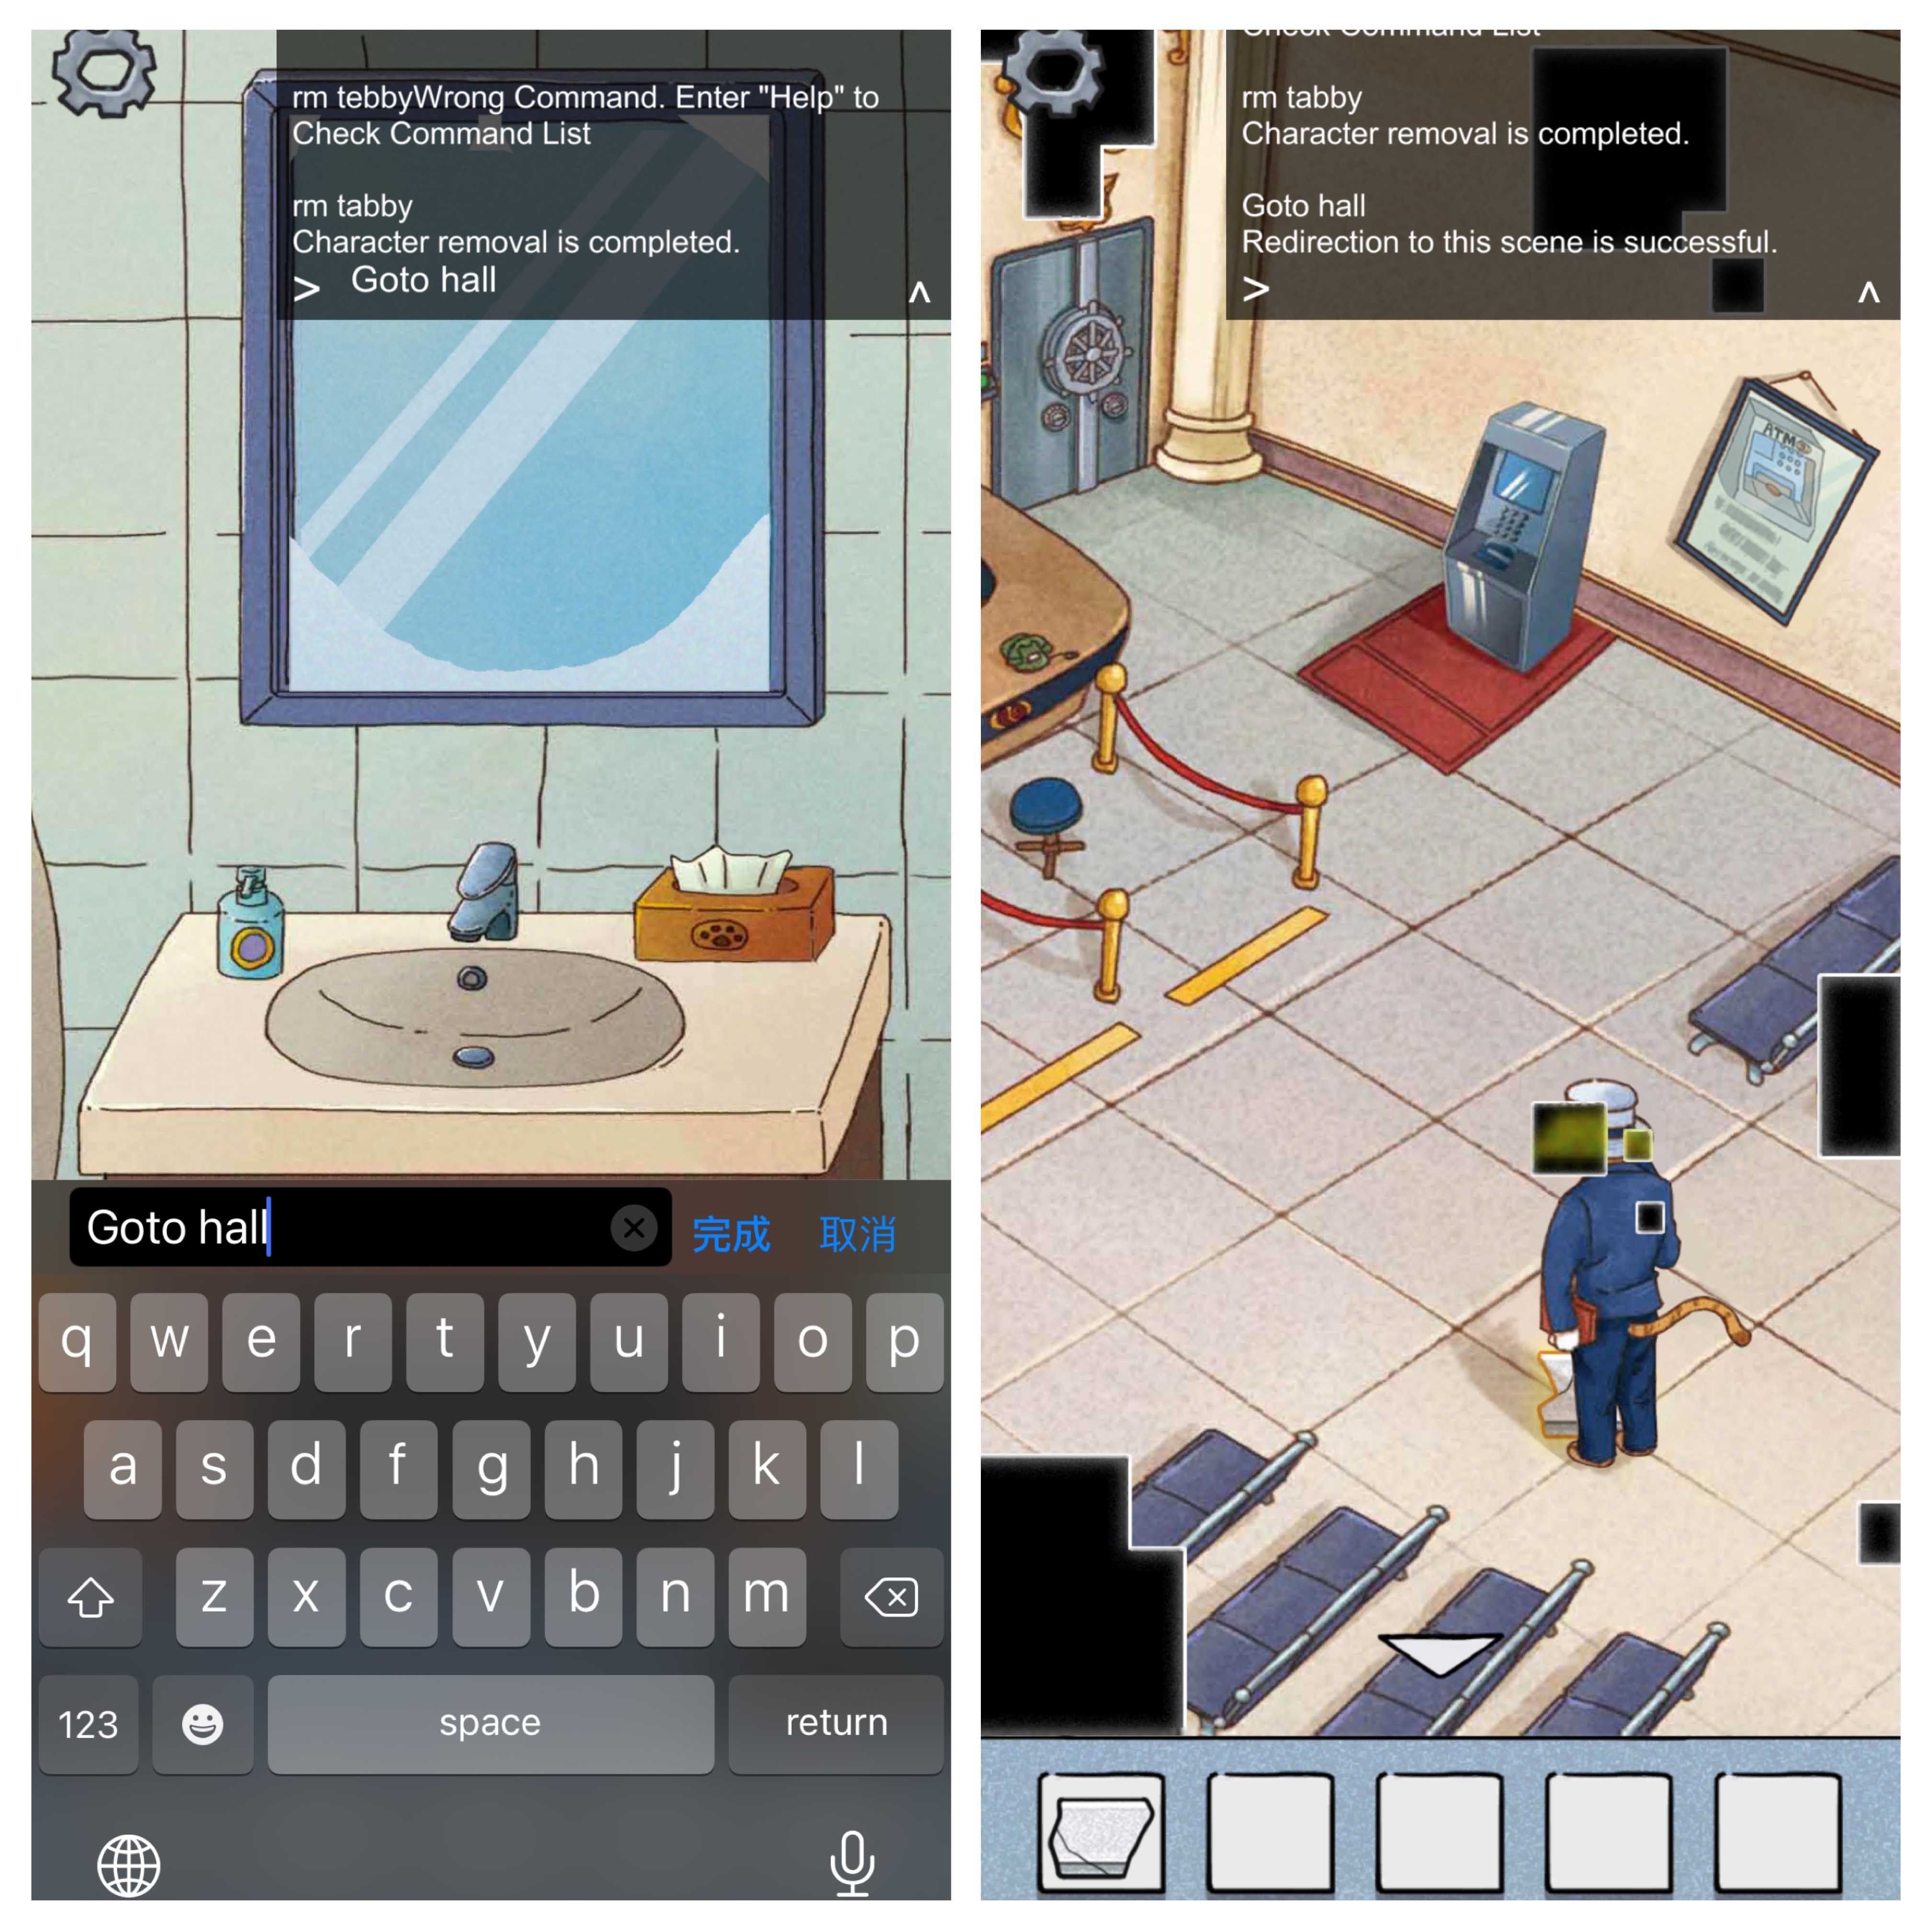
 Input “rm Tabby” when he jumps out to block your sight.
 Input “Goto hall” and “rm president” to remove the bank president and acquire the second piece of rock.
 Input “Goto Securityguarddormitory”.
 Use “Get flashlight” to get a flashlight. Use the flashlight onto the poster and acquire the third piece of rock.
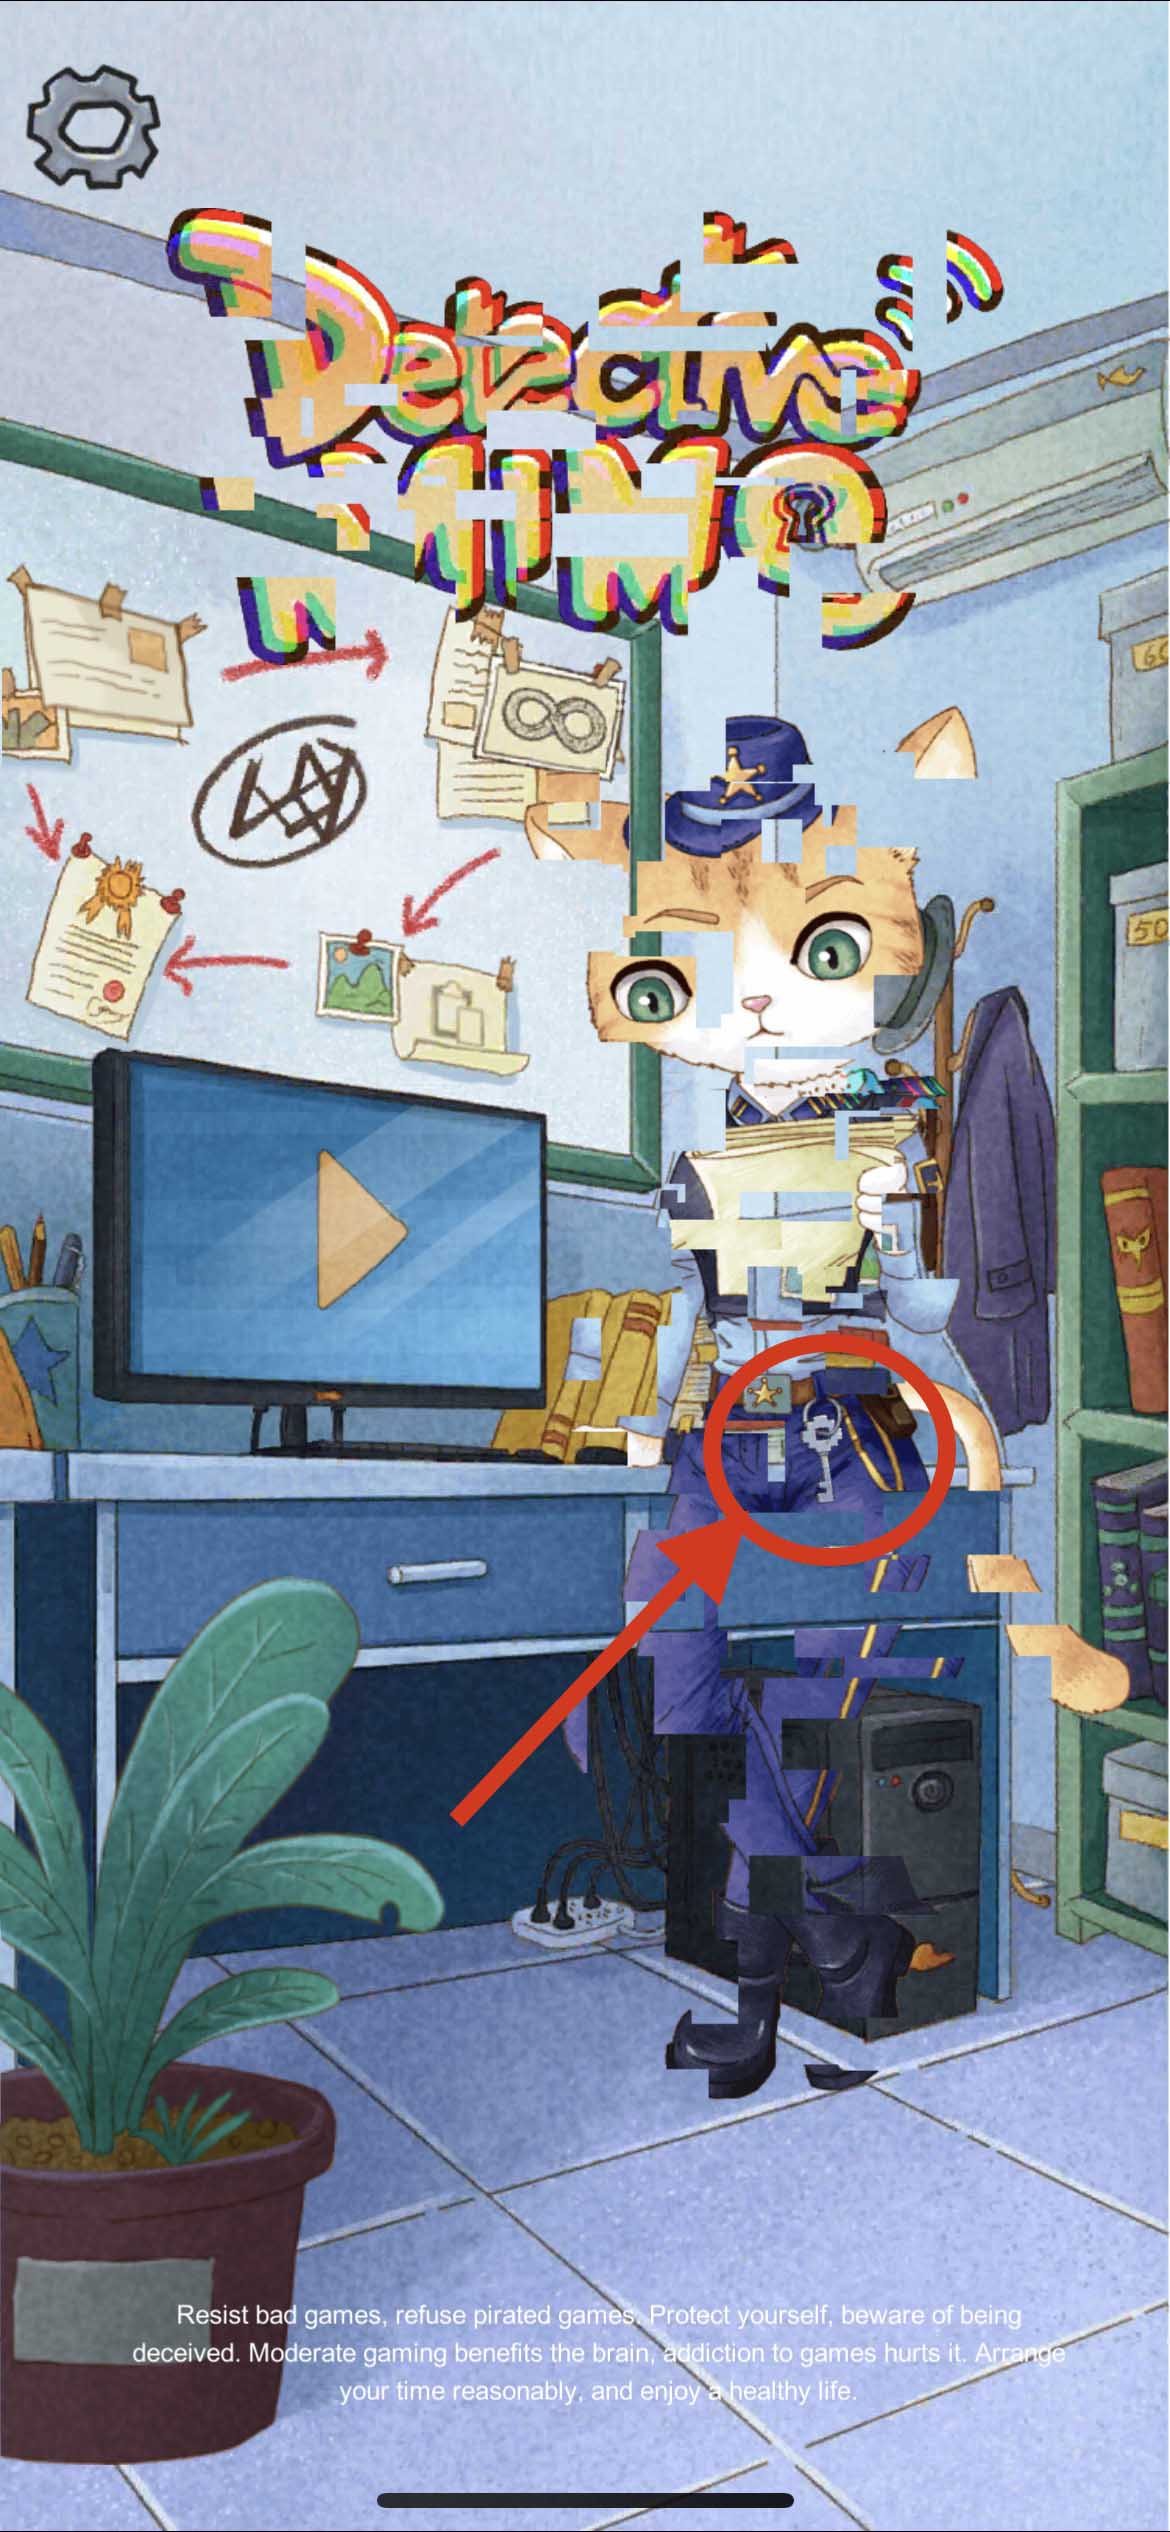
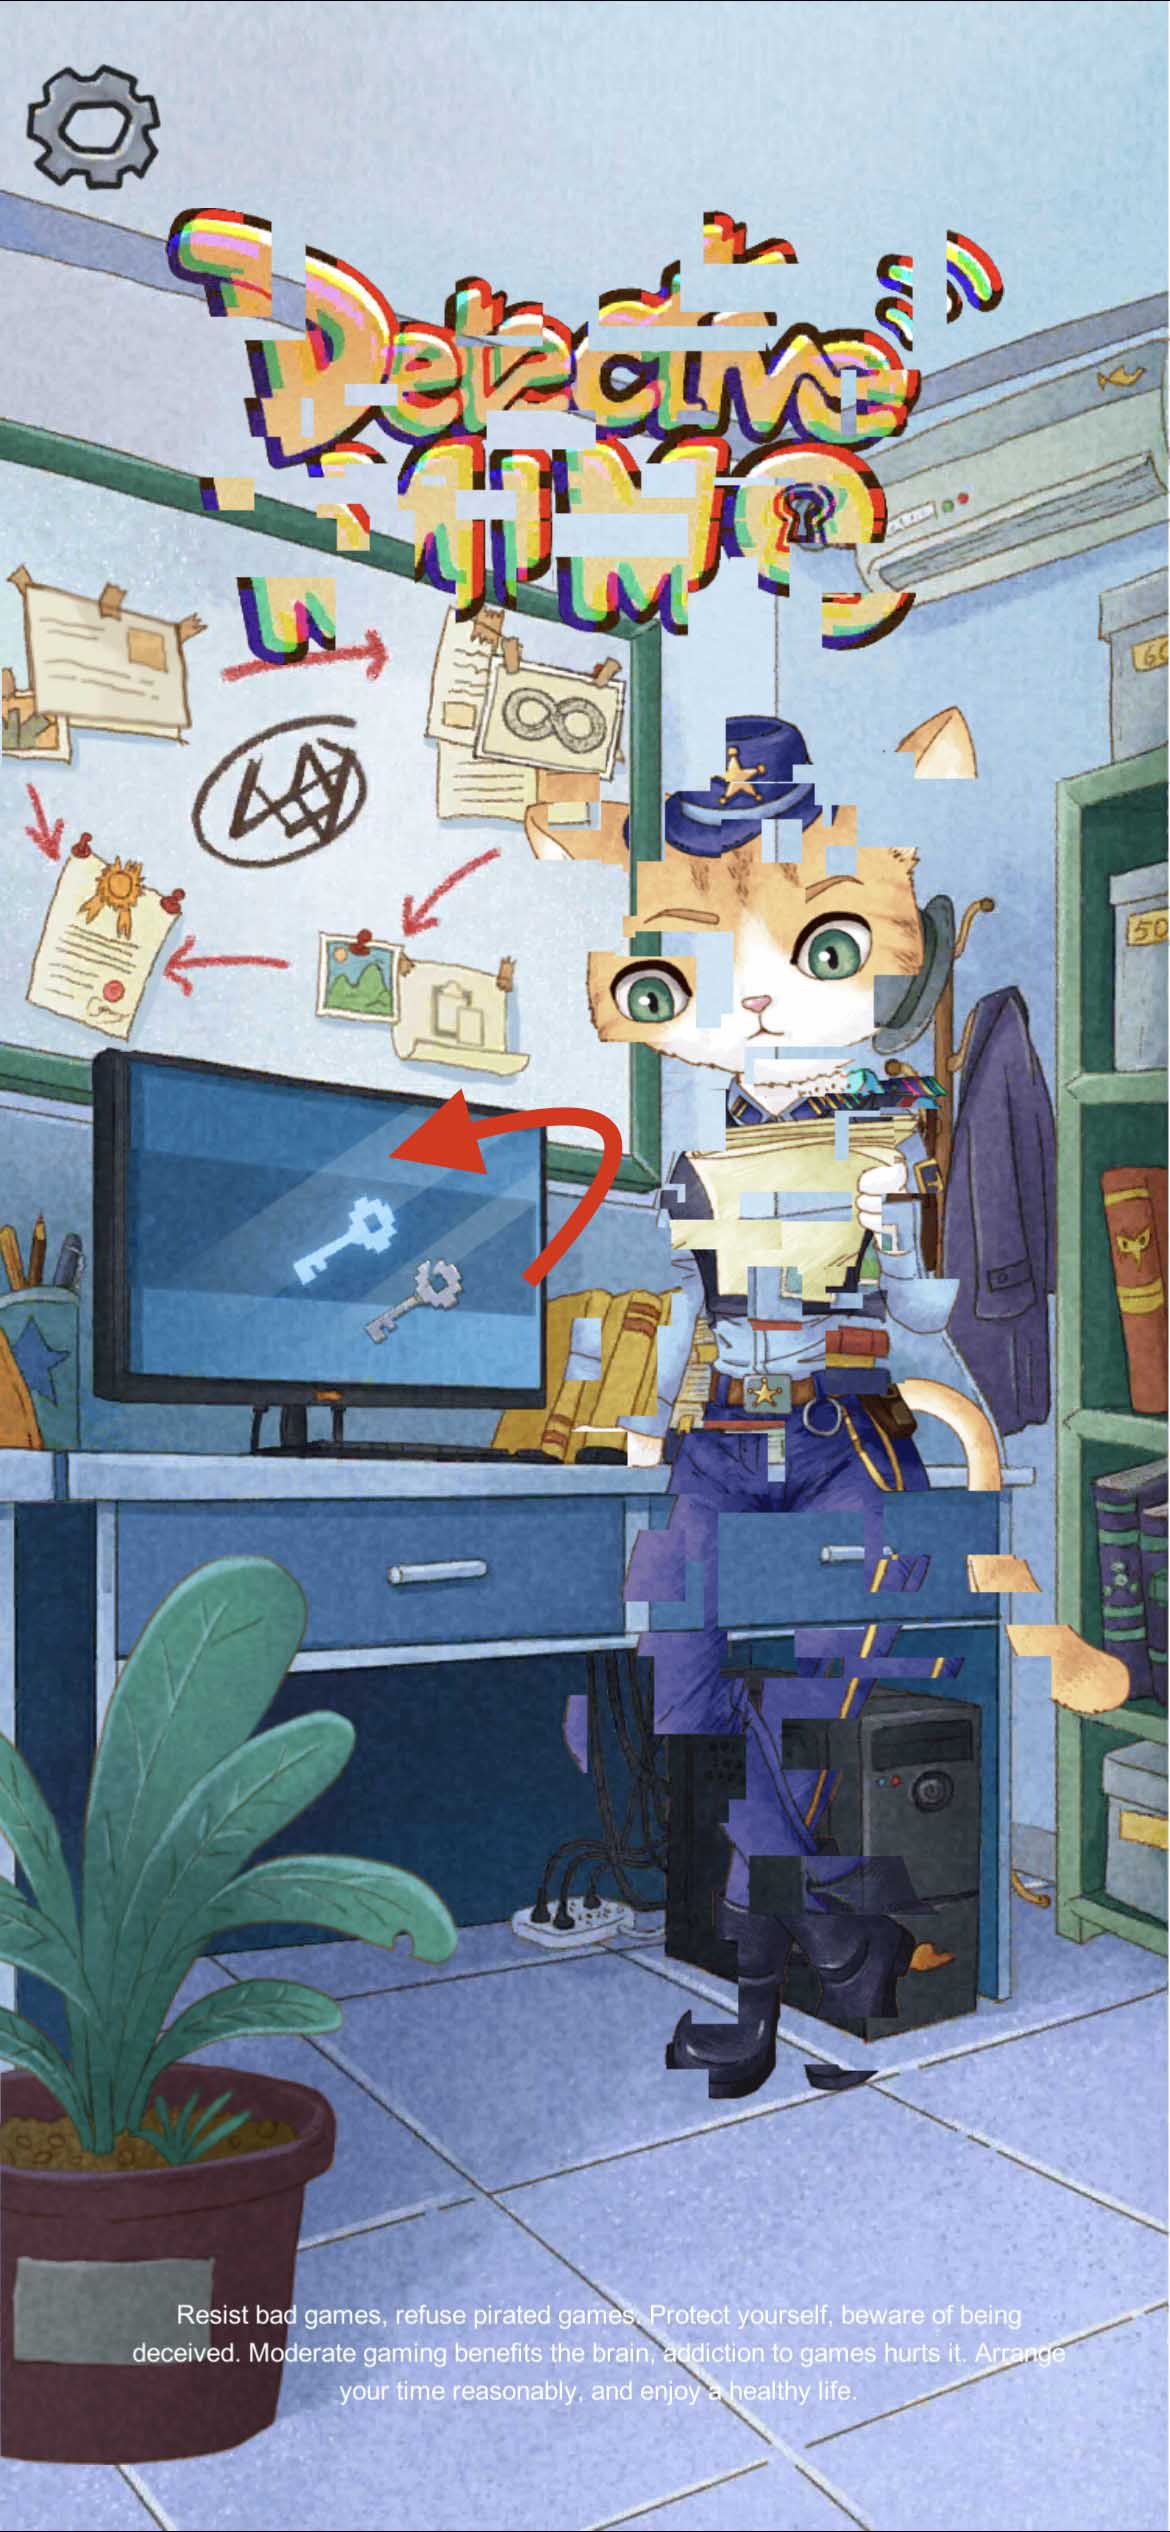
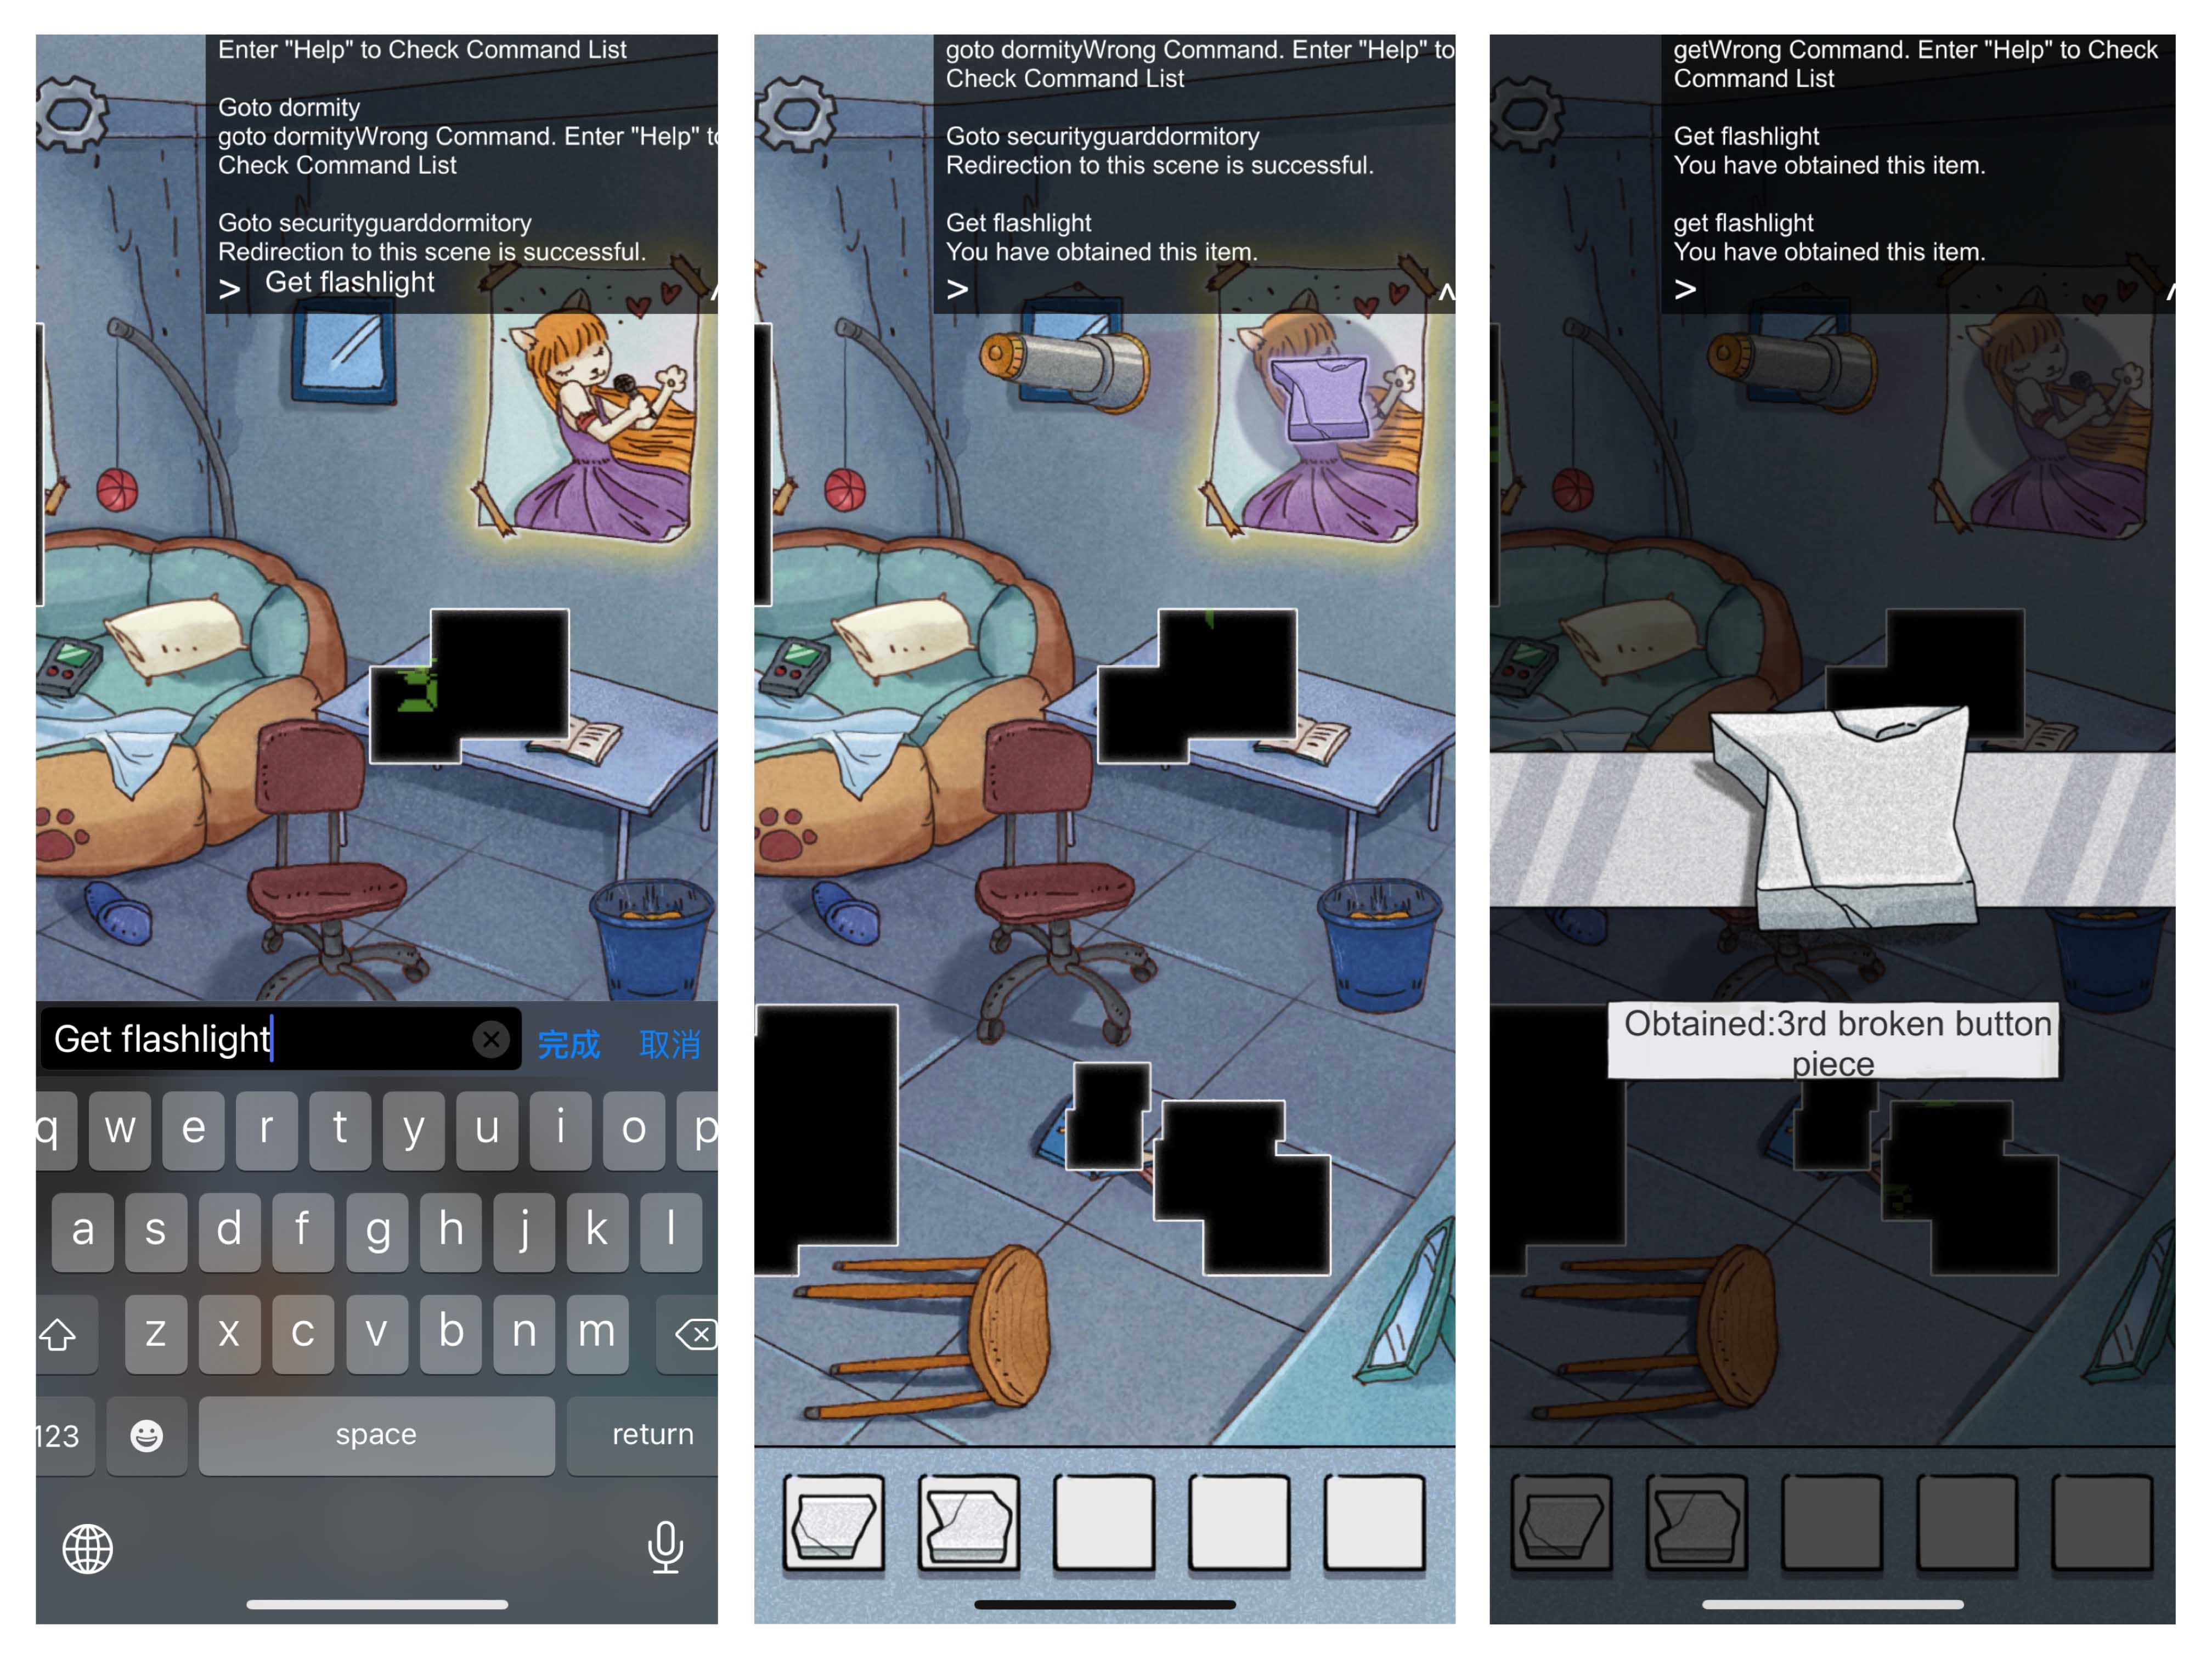 Input “Goto policestation” and “Get key”, use the key to the drawer, you get the fourth piece of rock.
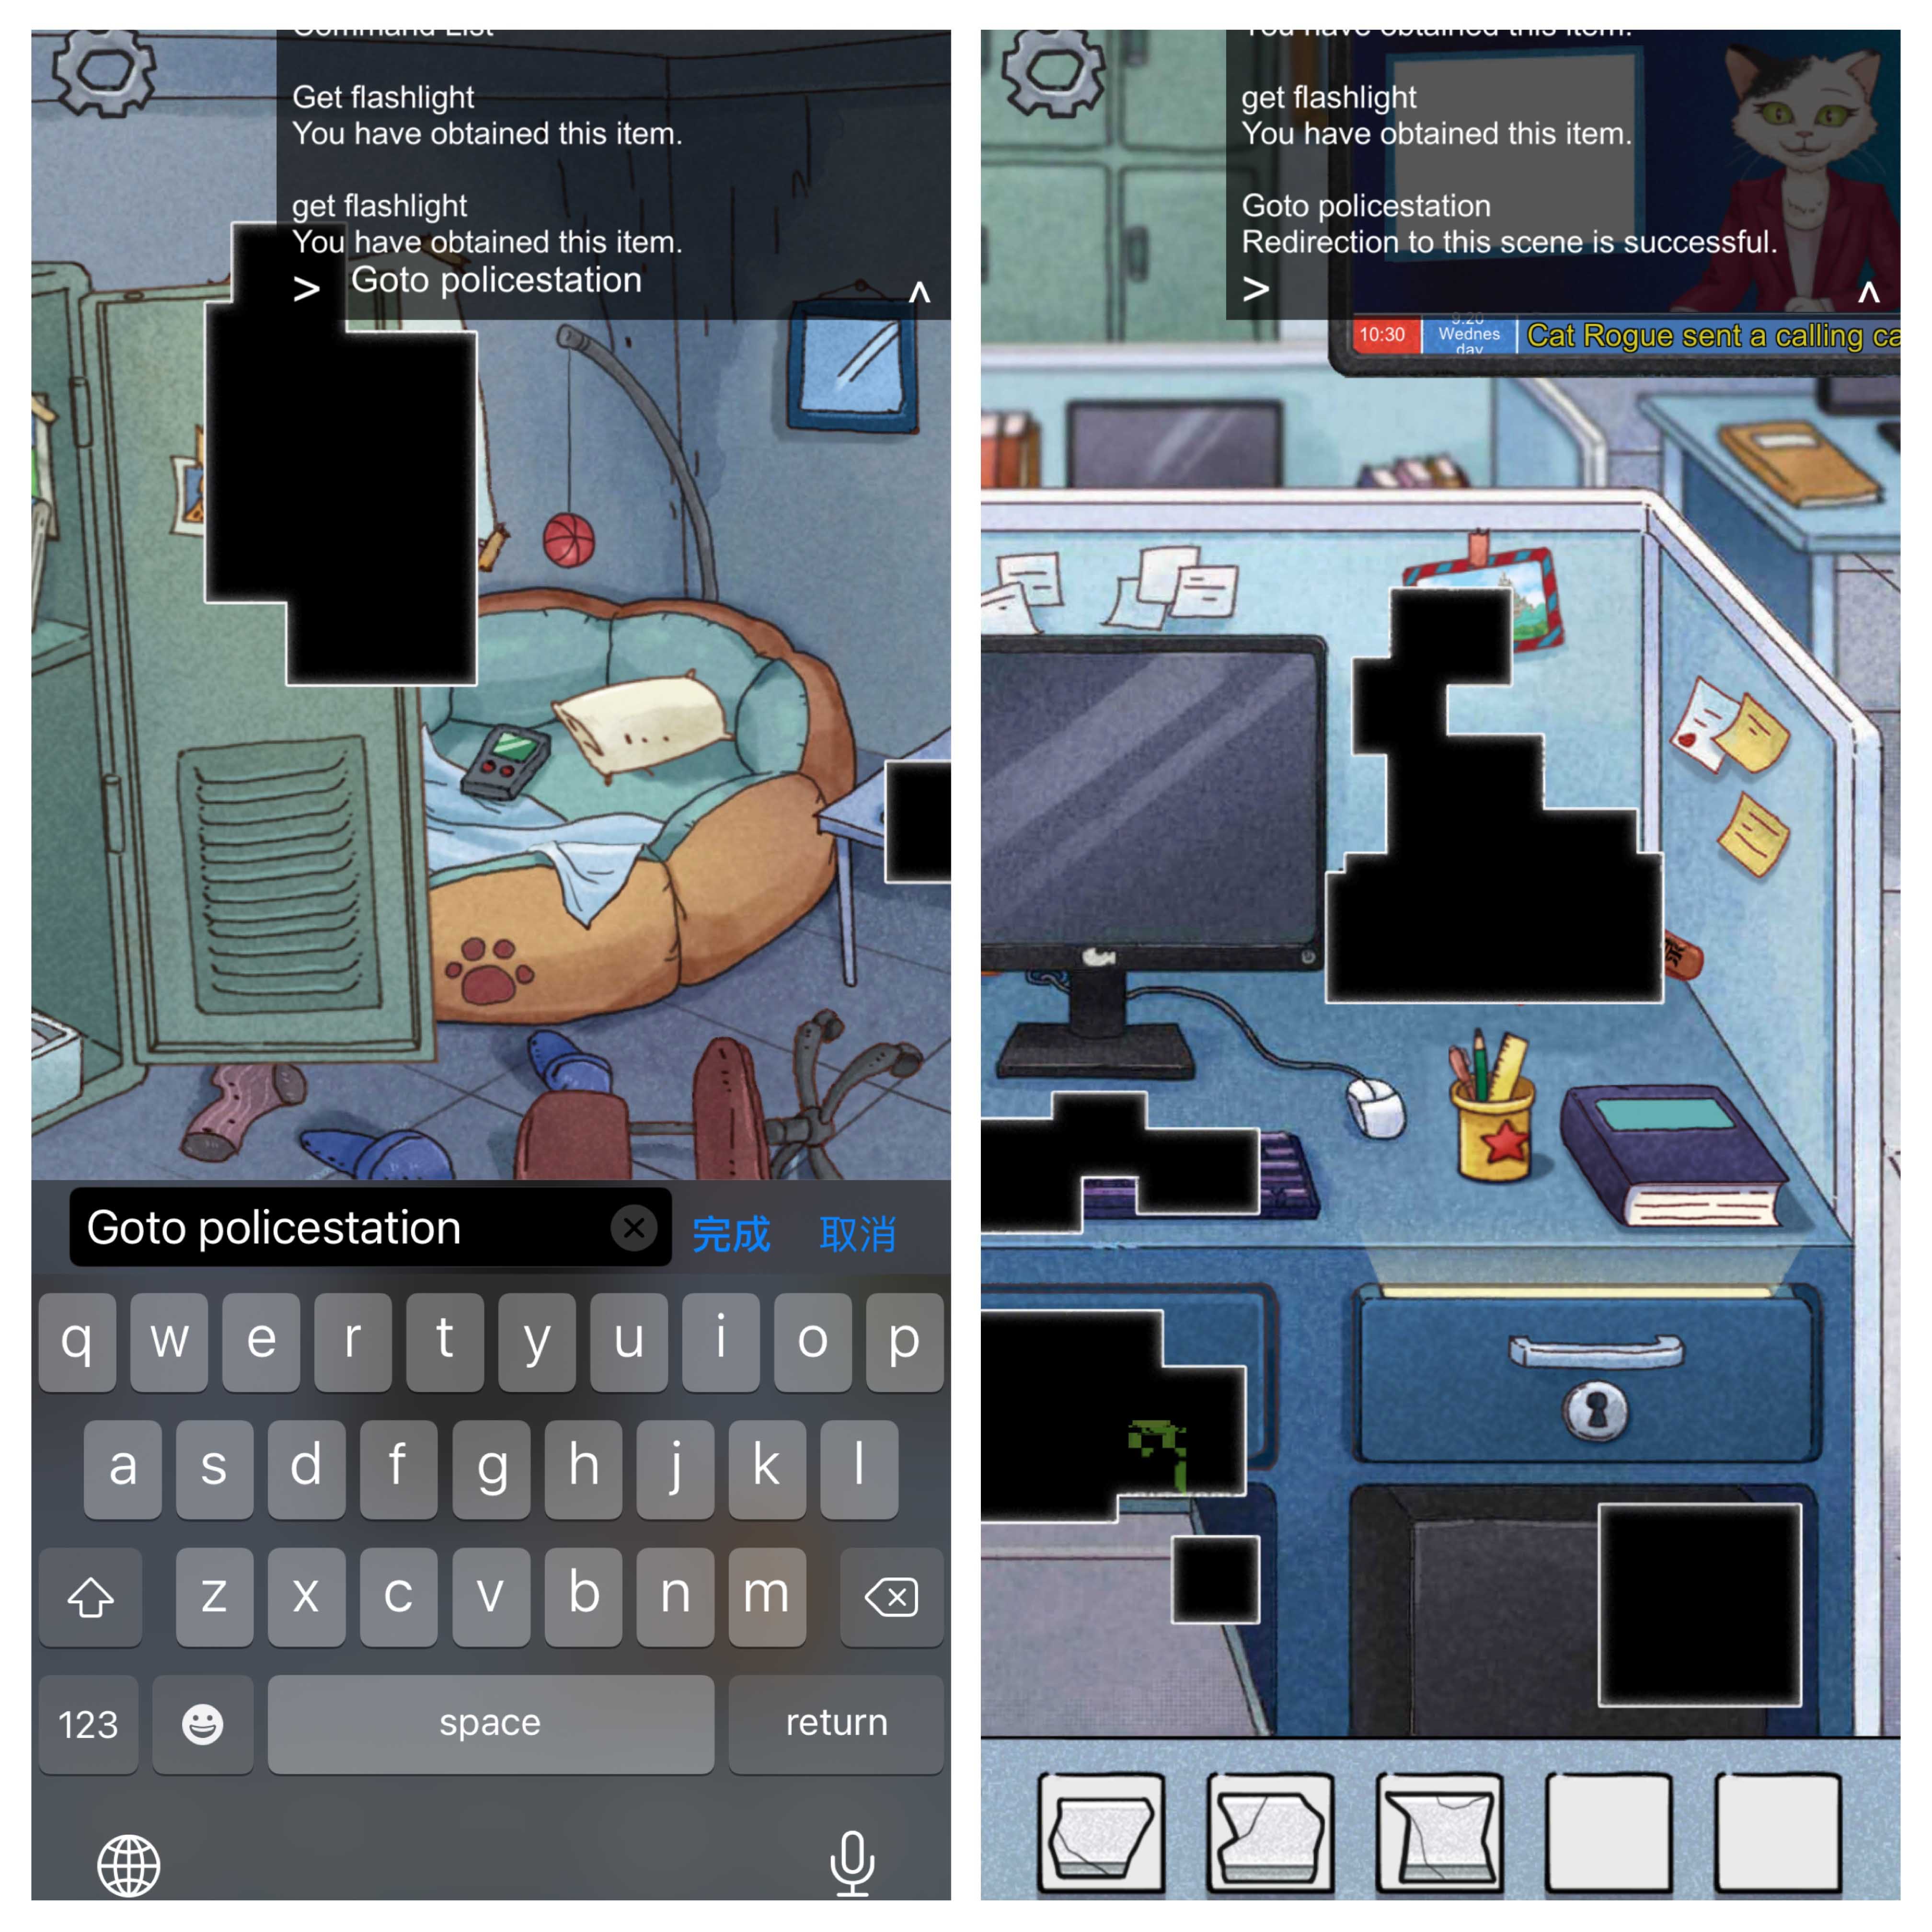
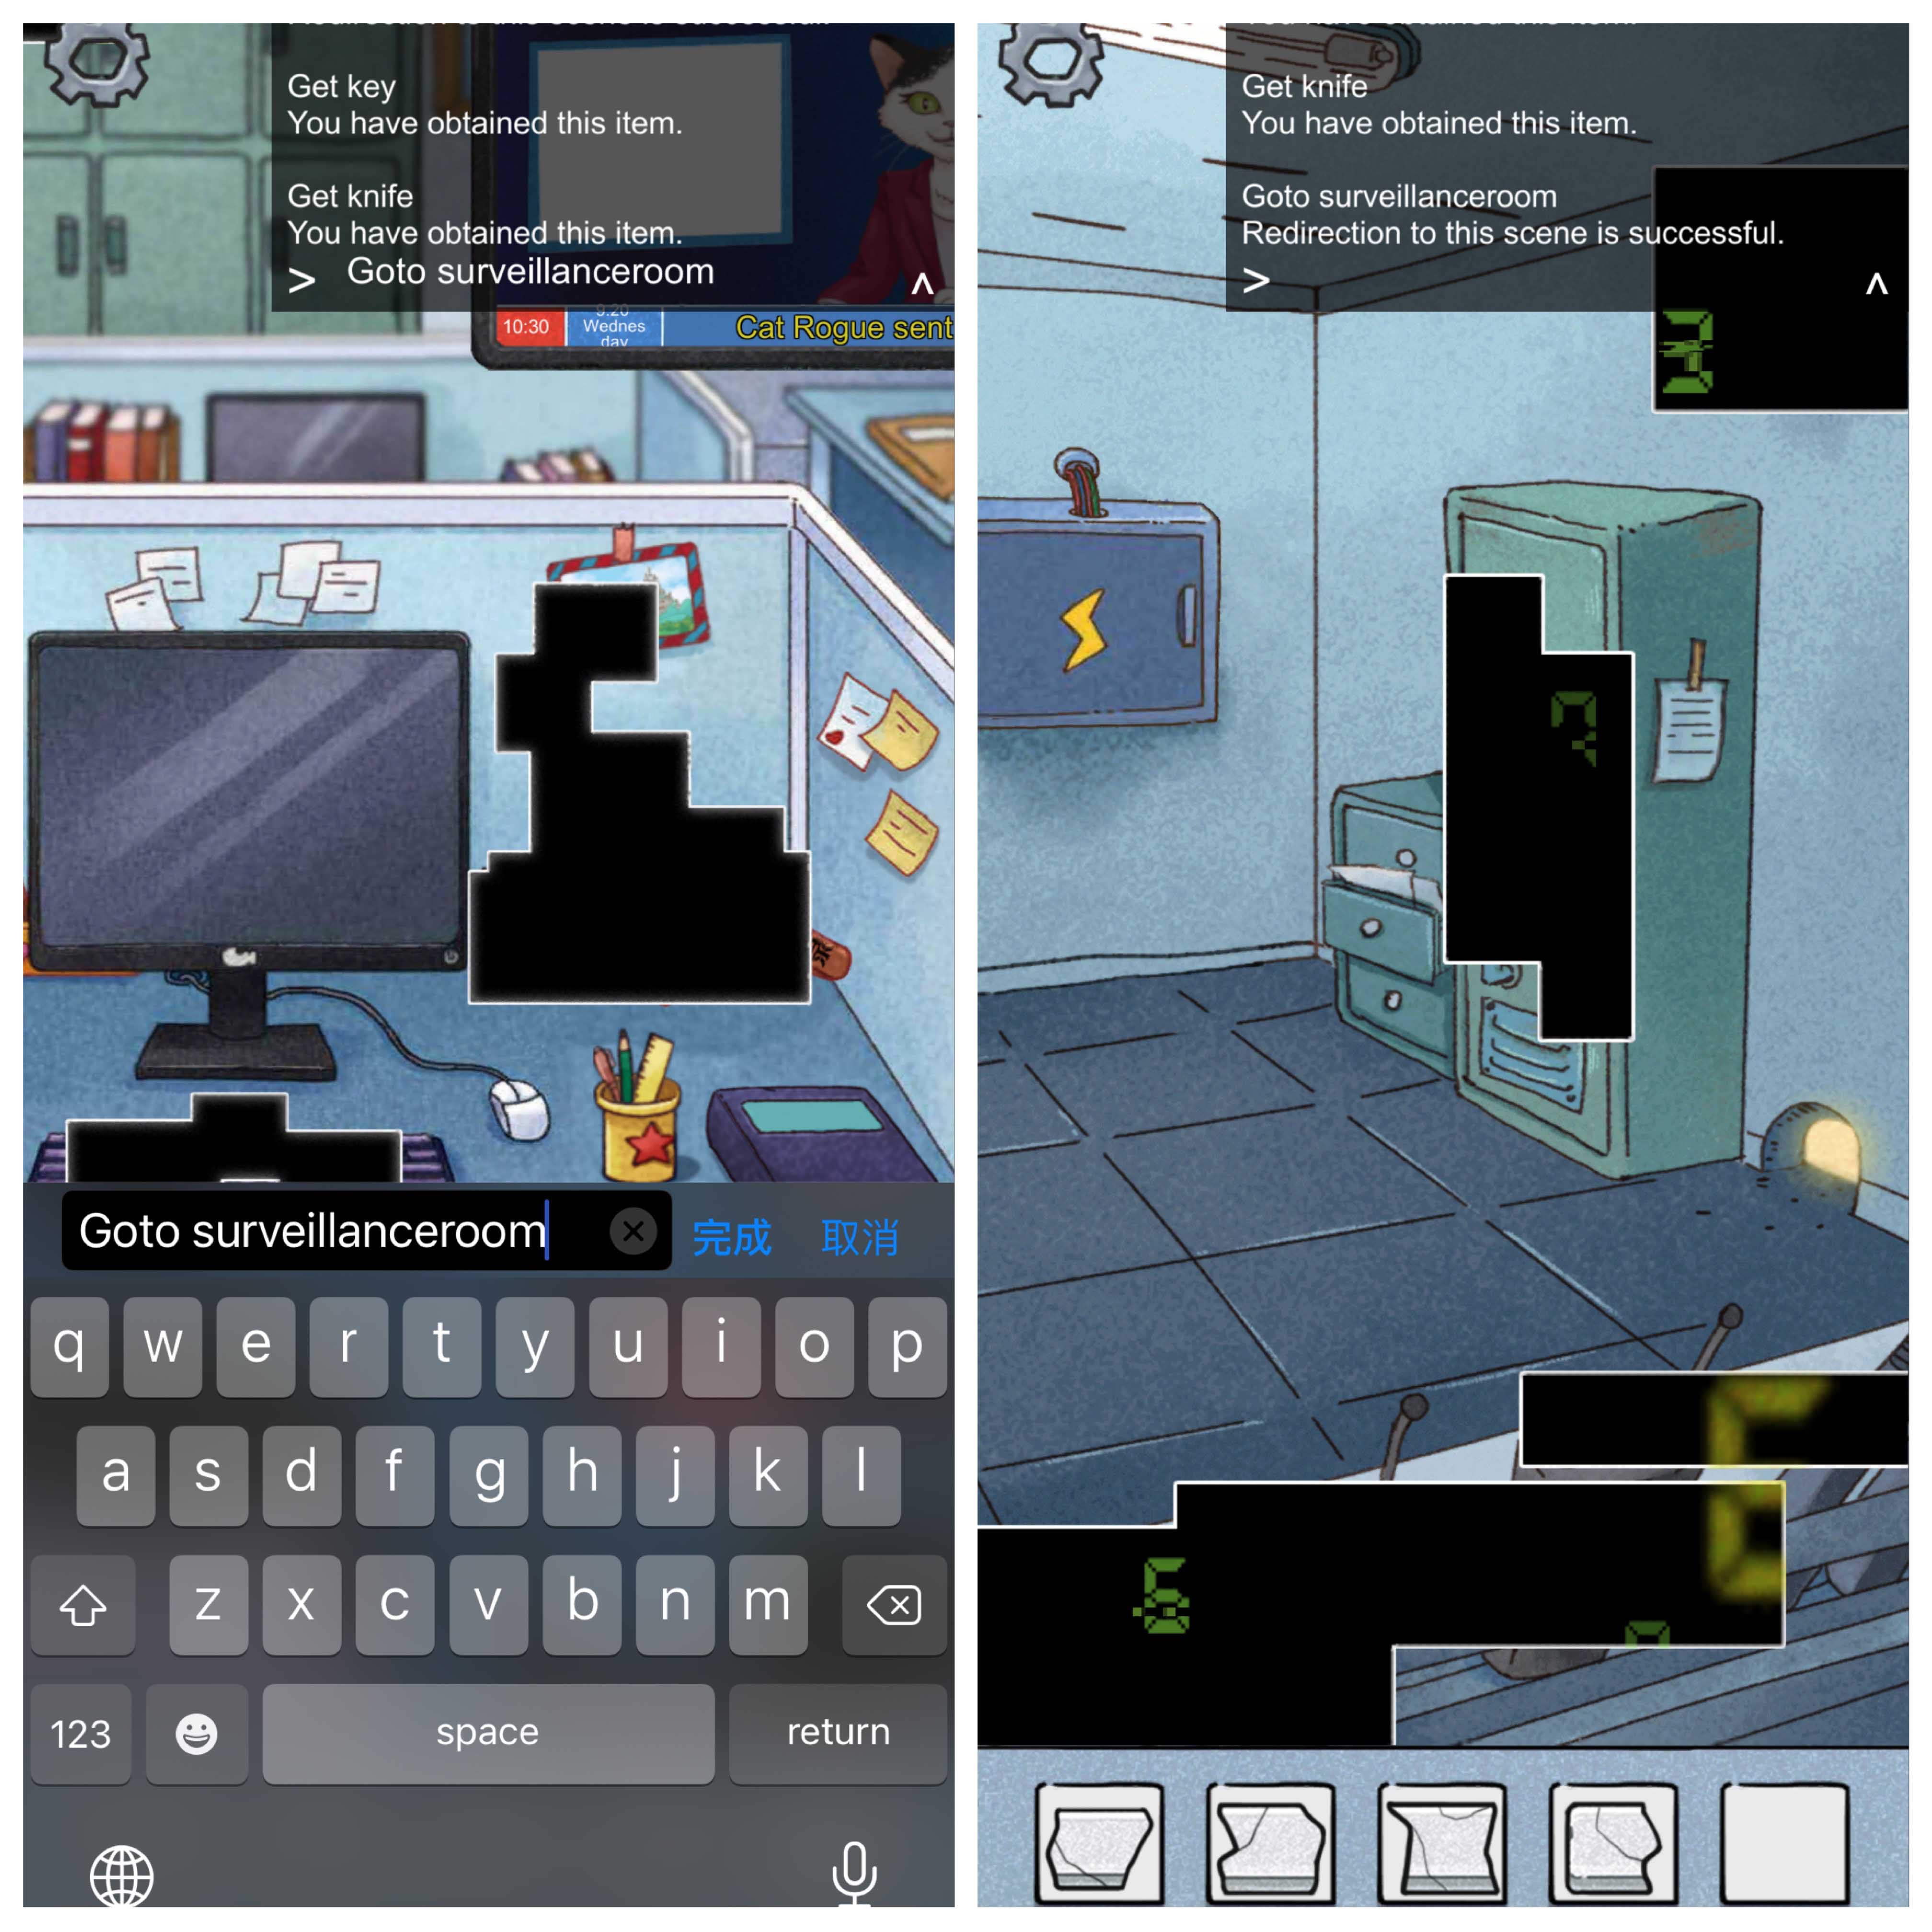
 When the Cat Rogue tries to stop you by posting a box on the screen, input “Get sharp cutter knife” and use the knife to cut through the box.
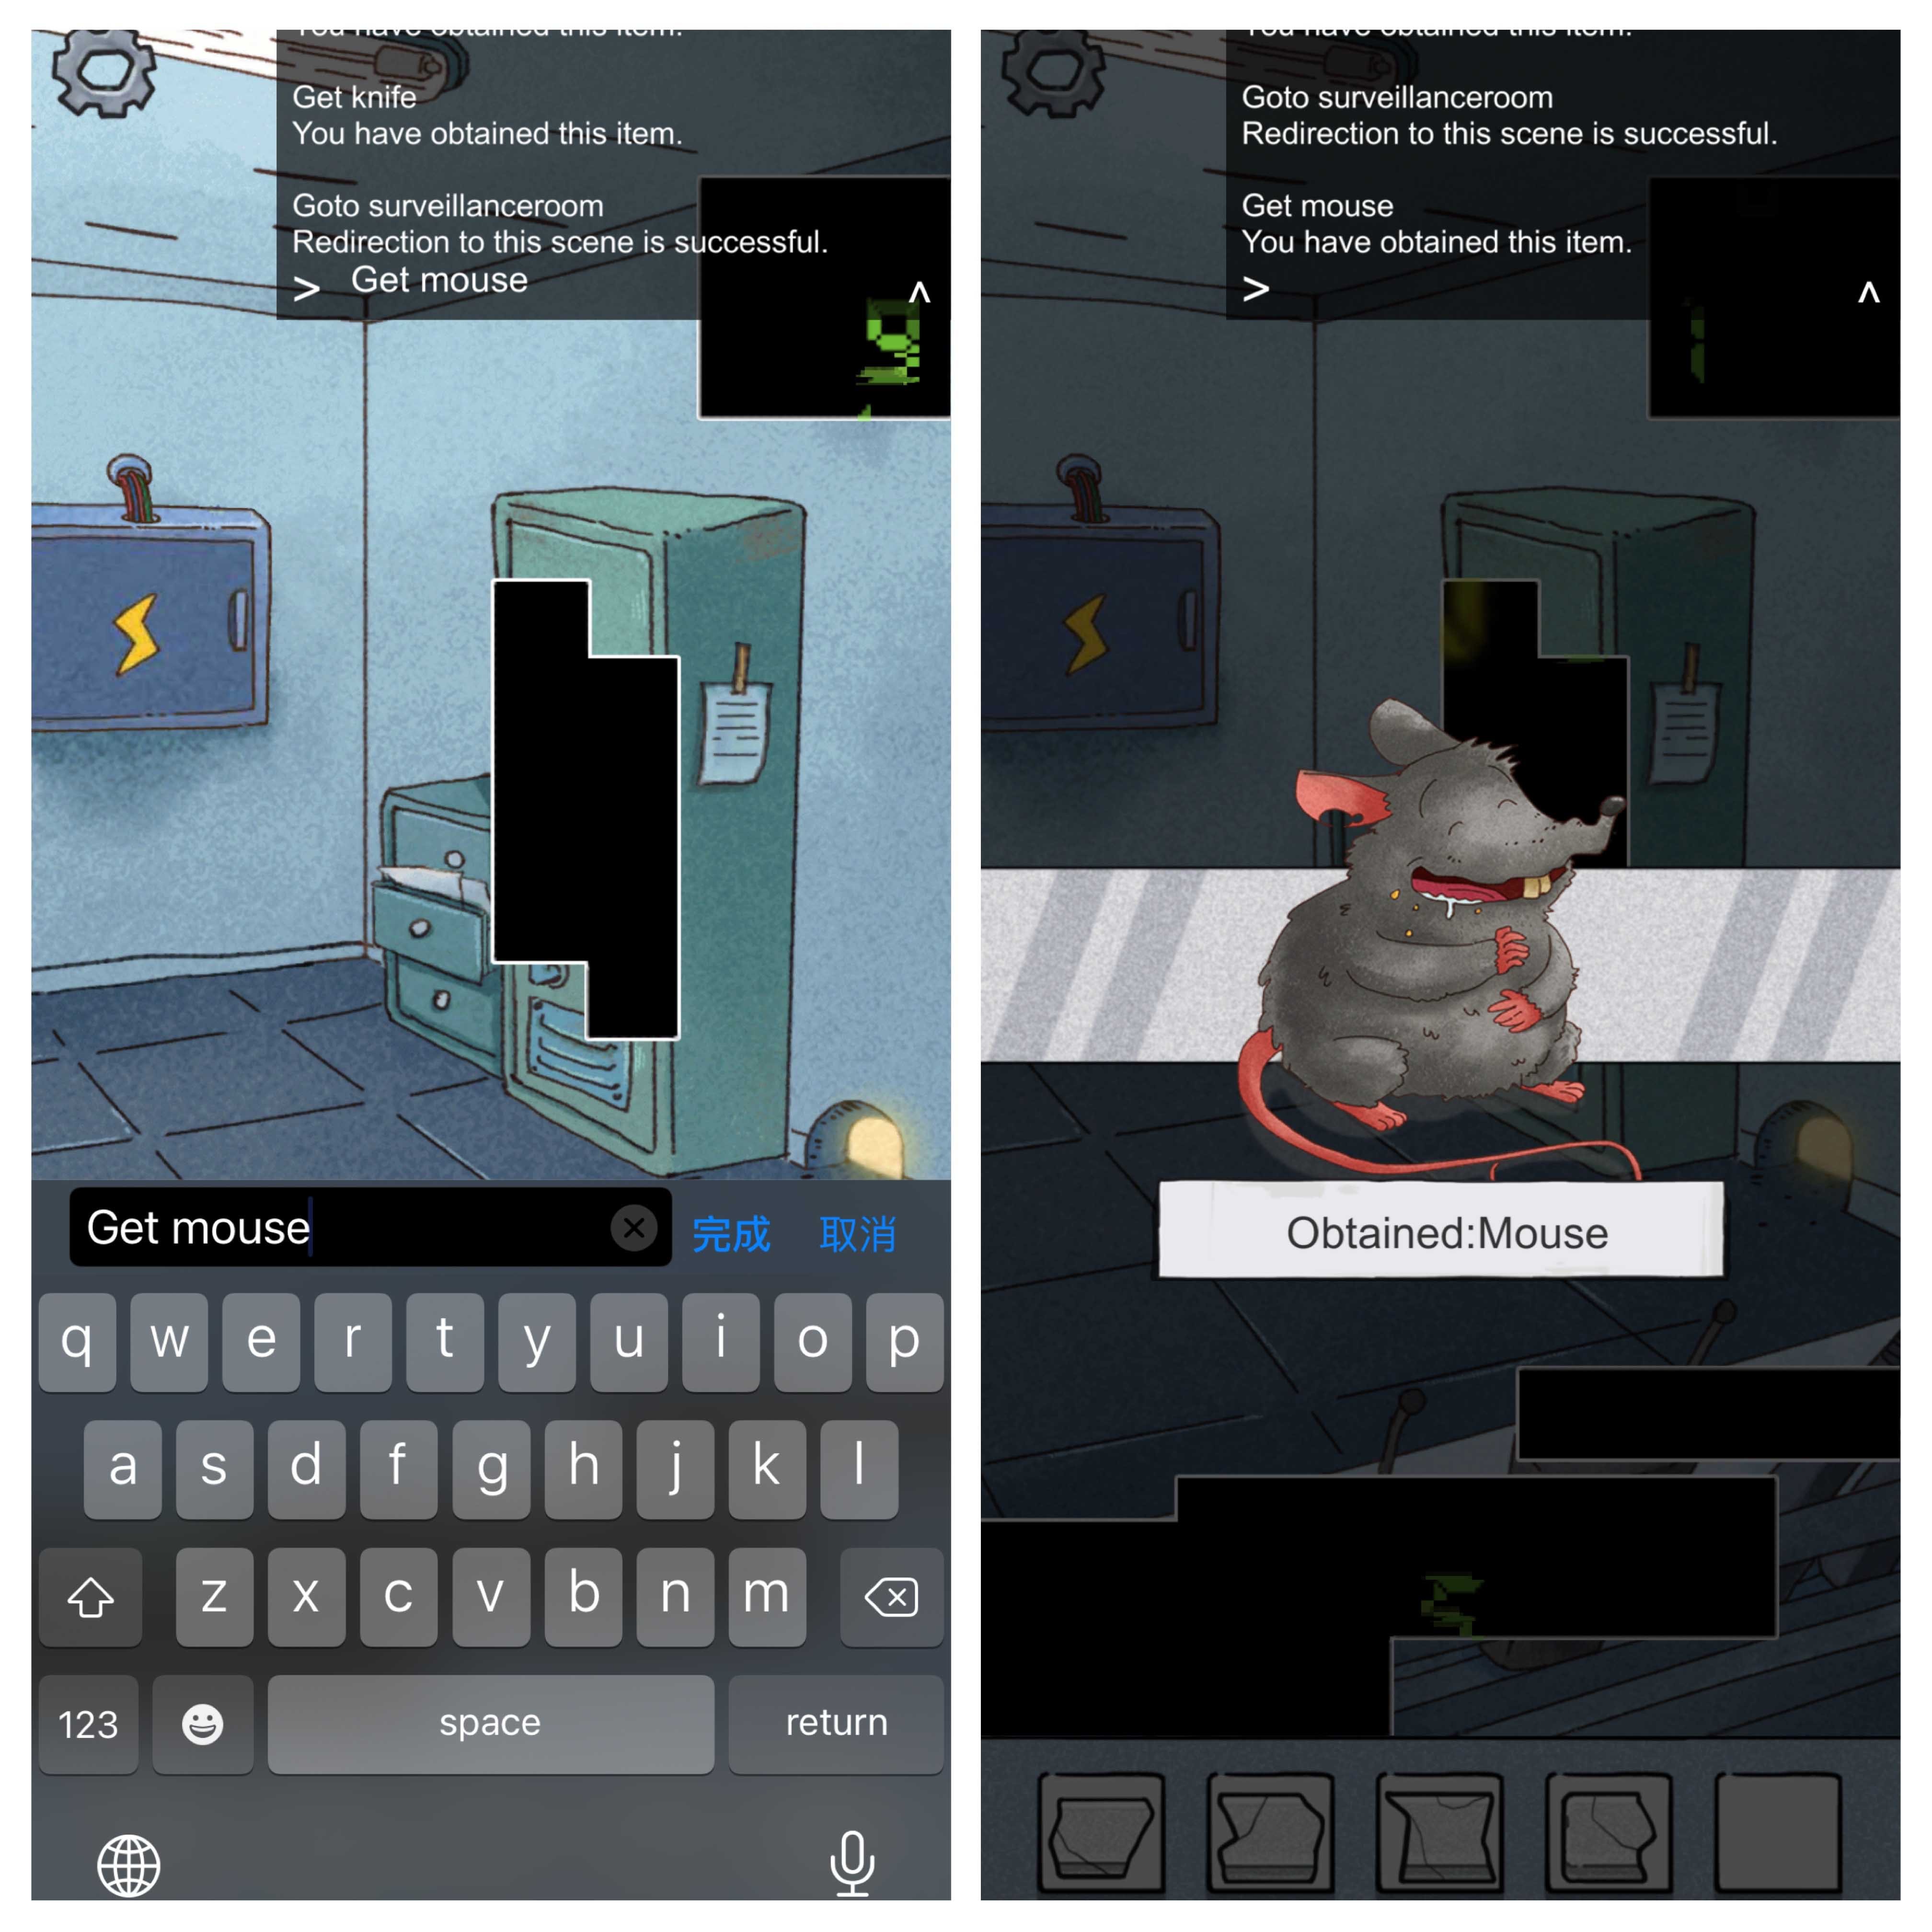
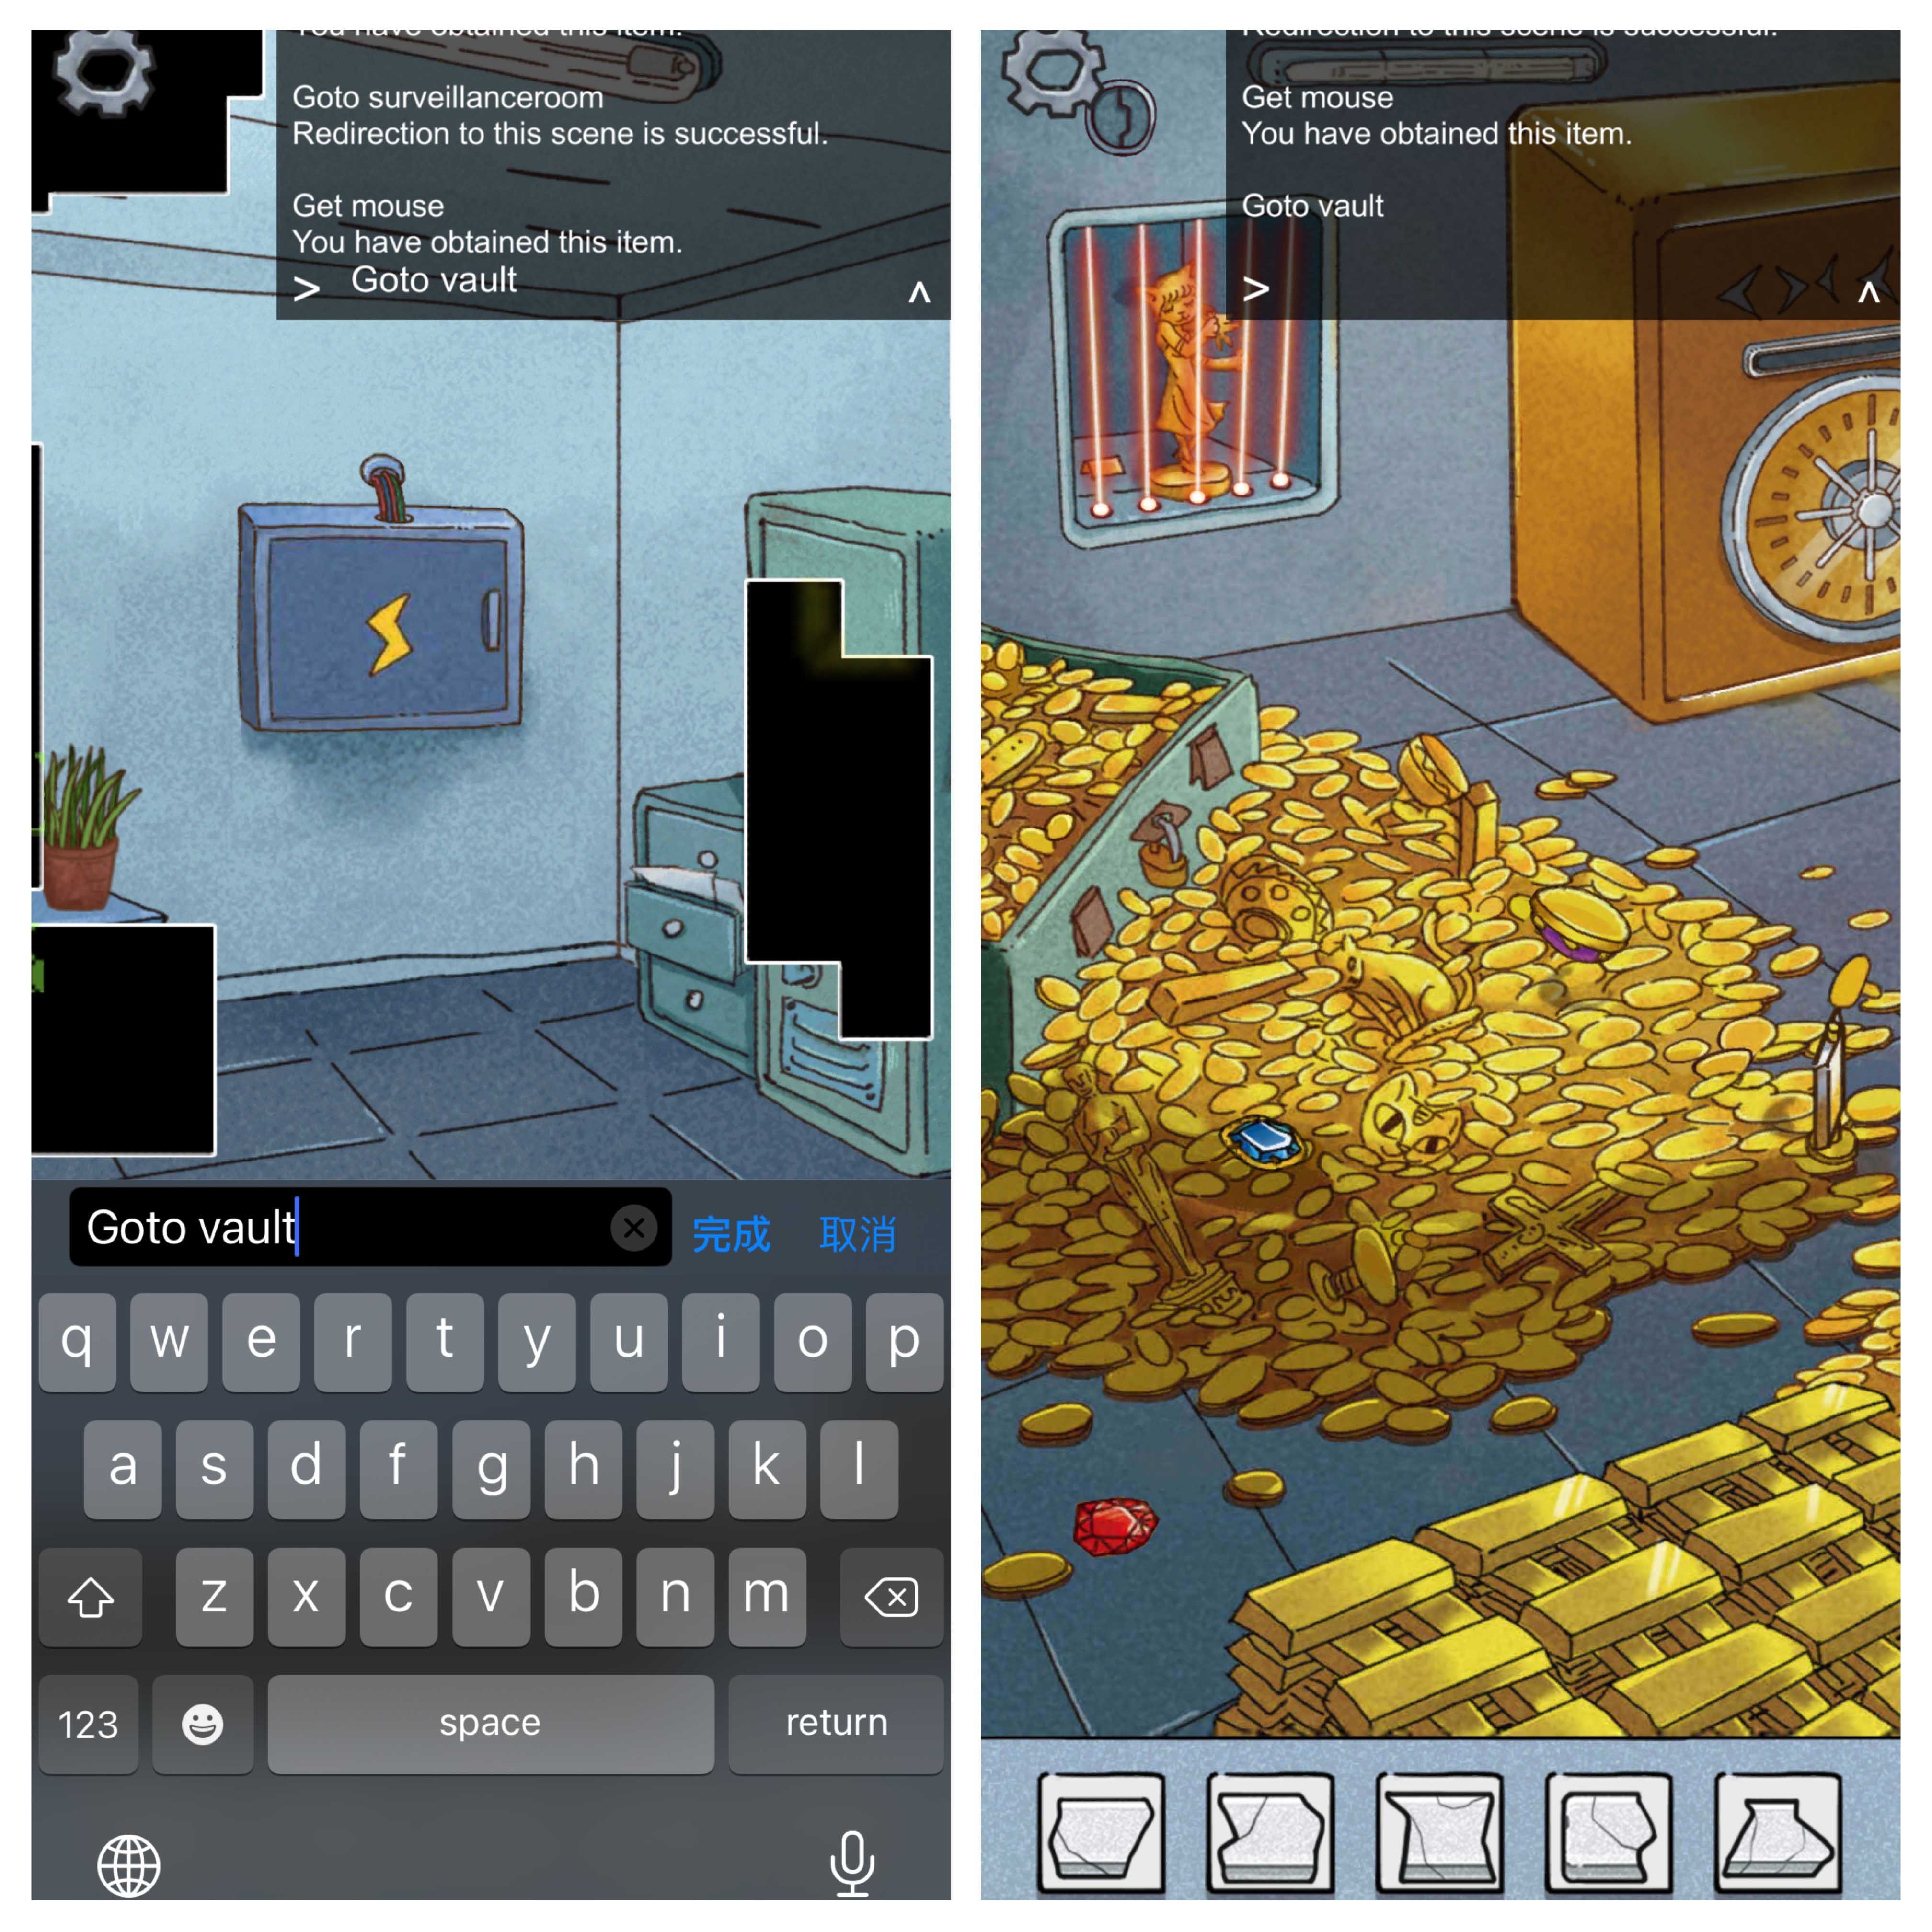
 Input “Goto surveillanceroom” and “Get mouse”, release the mouse to the cave and you get the fifth rock.
 Input “Goto Vault”. Click the door of safebox, you will see several security lasers. You need to adjust all gems and mirrors to reflect all lasers onto the safe.
 Click the door of safebox again, then rotate your phone in the direction as the arrows indicate above the wheel. When you hear a “click”, that is the right position. Turn all the arrows green. The safe will open and you get the last piece.
 Open the settings panel, insert all 6 pieces of rock on the reset button. The RESET function is finally back.
 Cat Rogue came out, input “rm catrogue”.By resetting the game, you get the other ending.